Nginx community edition
Prerequisites
This guide assumes that you have the following conditions:
- Running Casdoor service. If you haven't installed Casdoor service yet, see Server installation or Try with Docker.
- Nginx open-source edition with
ngx_http_auth_request_modulemodule enabled at compile time. See the Nginx auth_request module to enable it. - The website on which you want to enable authentication is successfully deployed on Nginx, with a configured domain name (instead of using an IP address), and can be accessed normally.
- OAuth2-Proxy (choose one of the two popular options on GitHub):
- oauth2-proxy/oauth2-proxy (used in this article) GitHub OR Official-Website
- vouch/vouch-proxy GitHub
I. Configure CasDoor
Note: The Casdoor GUI may differ by version; use this article as a reference and adapt to your build.
Note: The keys, passwords, usernames, and other confidential information mentioned in this article are all examples. For security reasons, you must replace them with your own relevant content when deploying.
-
Log in to your Casdoor admin account.
-
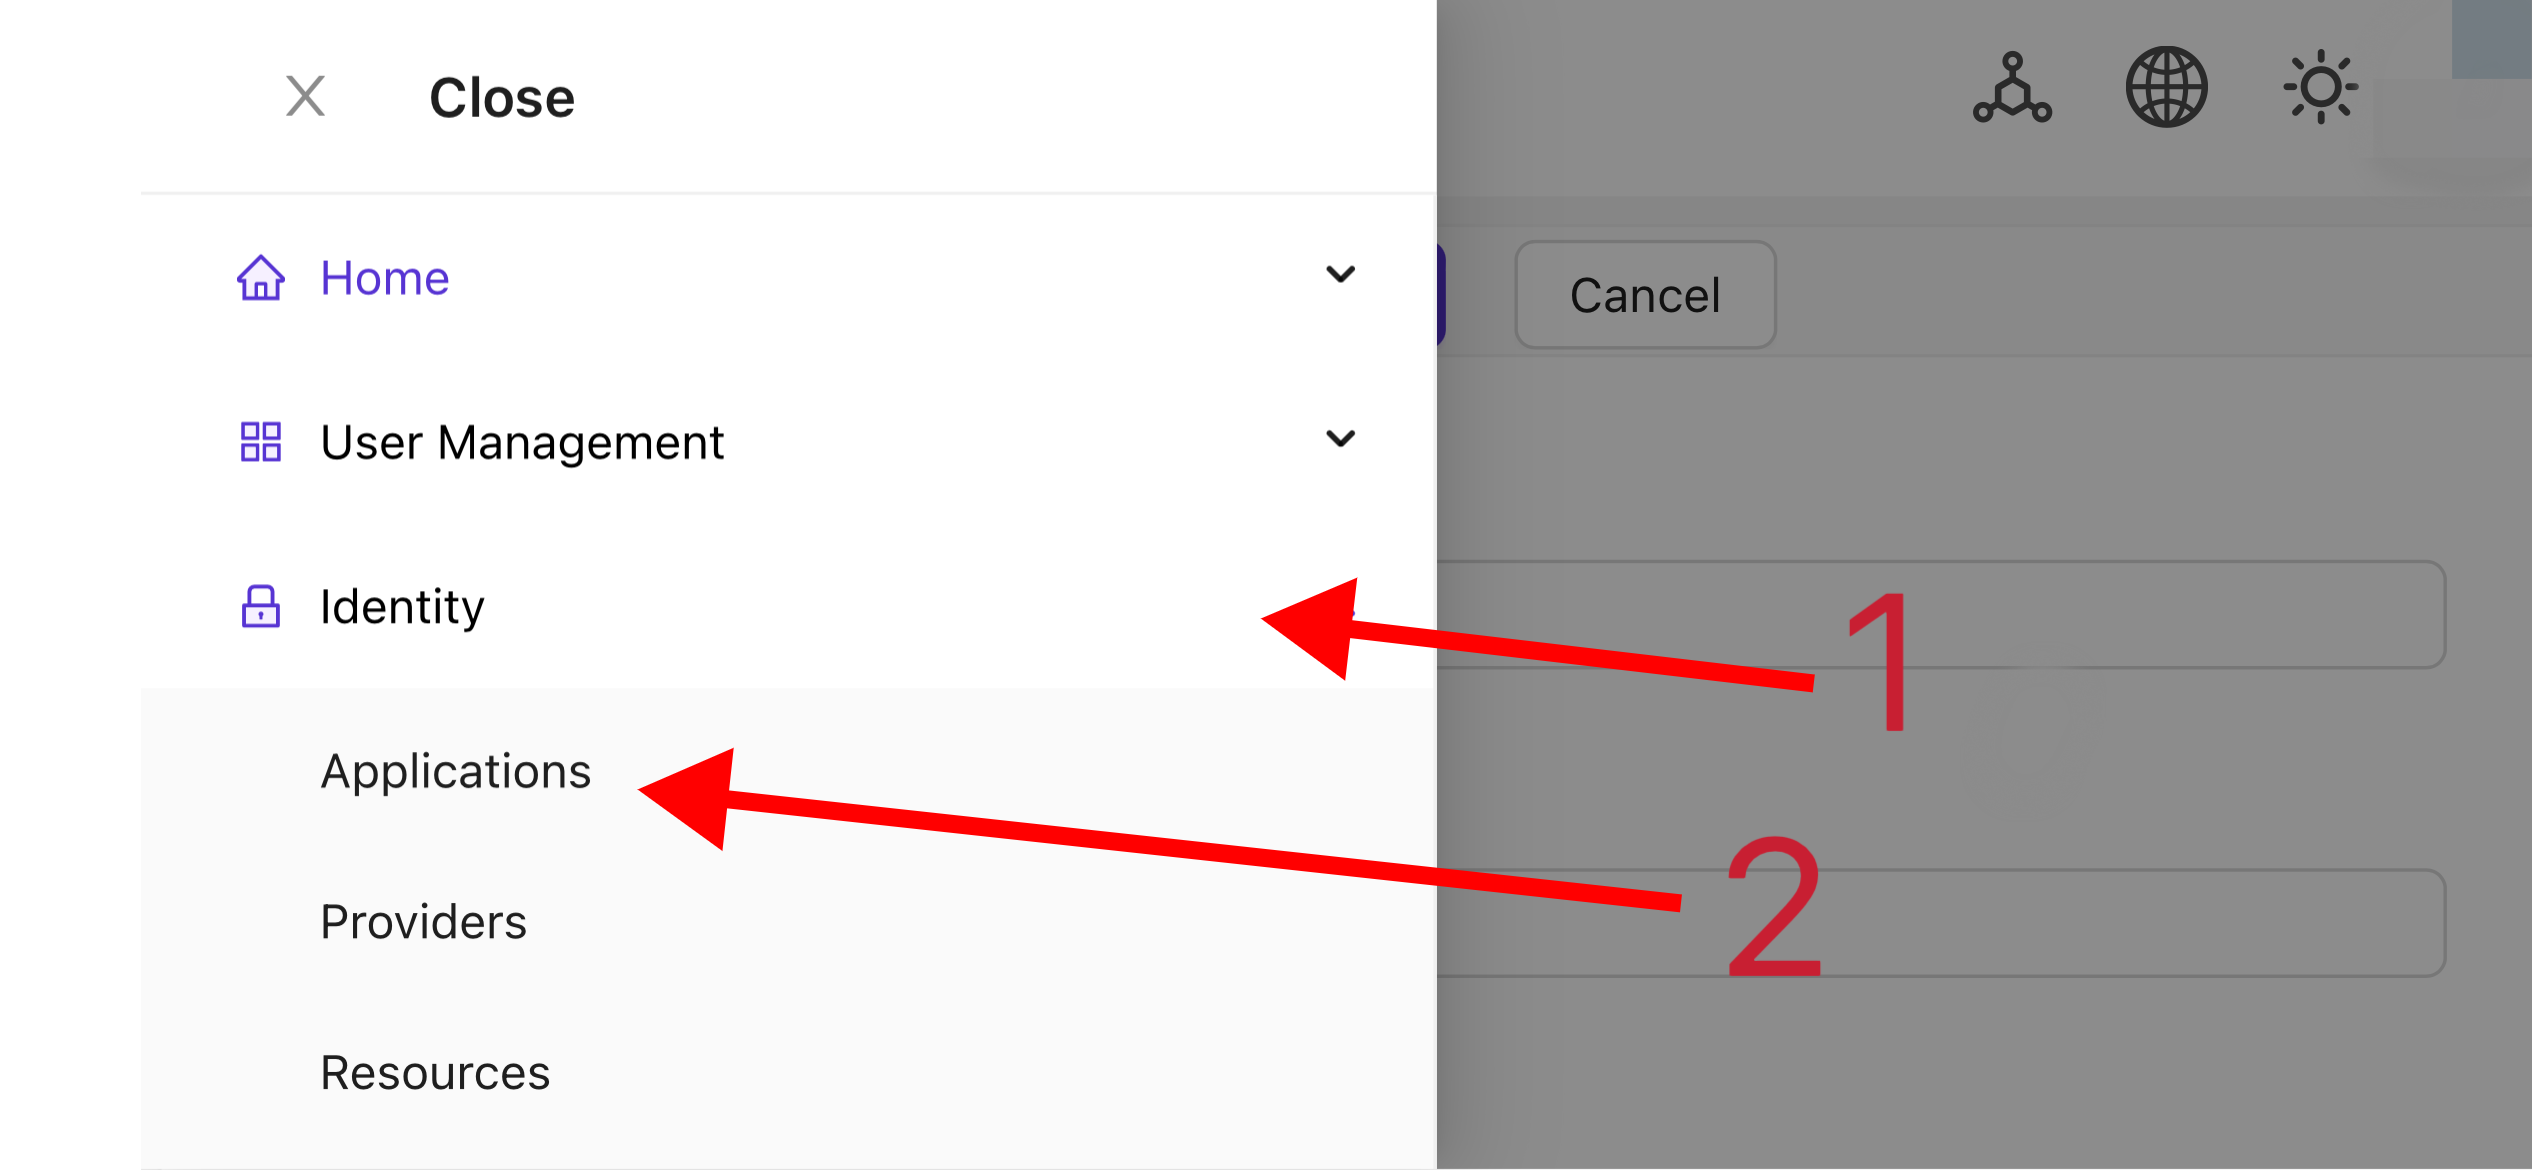
In the top bar, select "Identity Authentication" > "Applications", and then click "Add" on the "Applications" page.
-
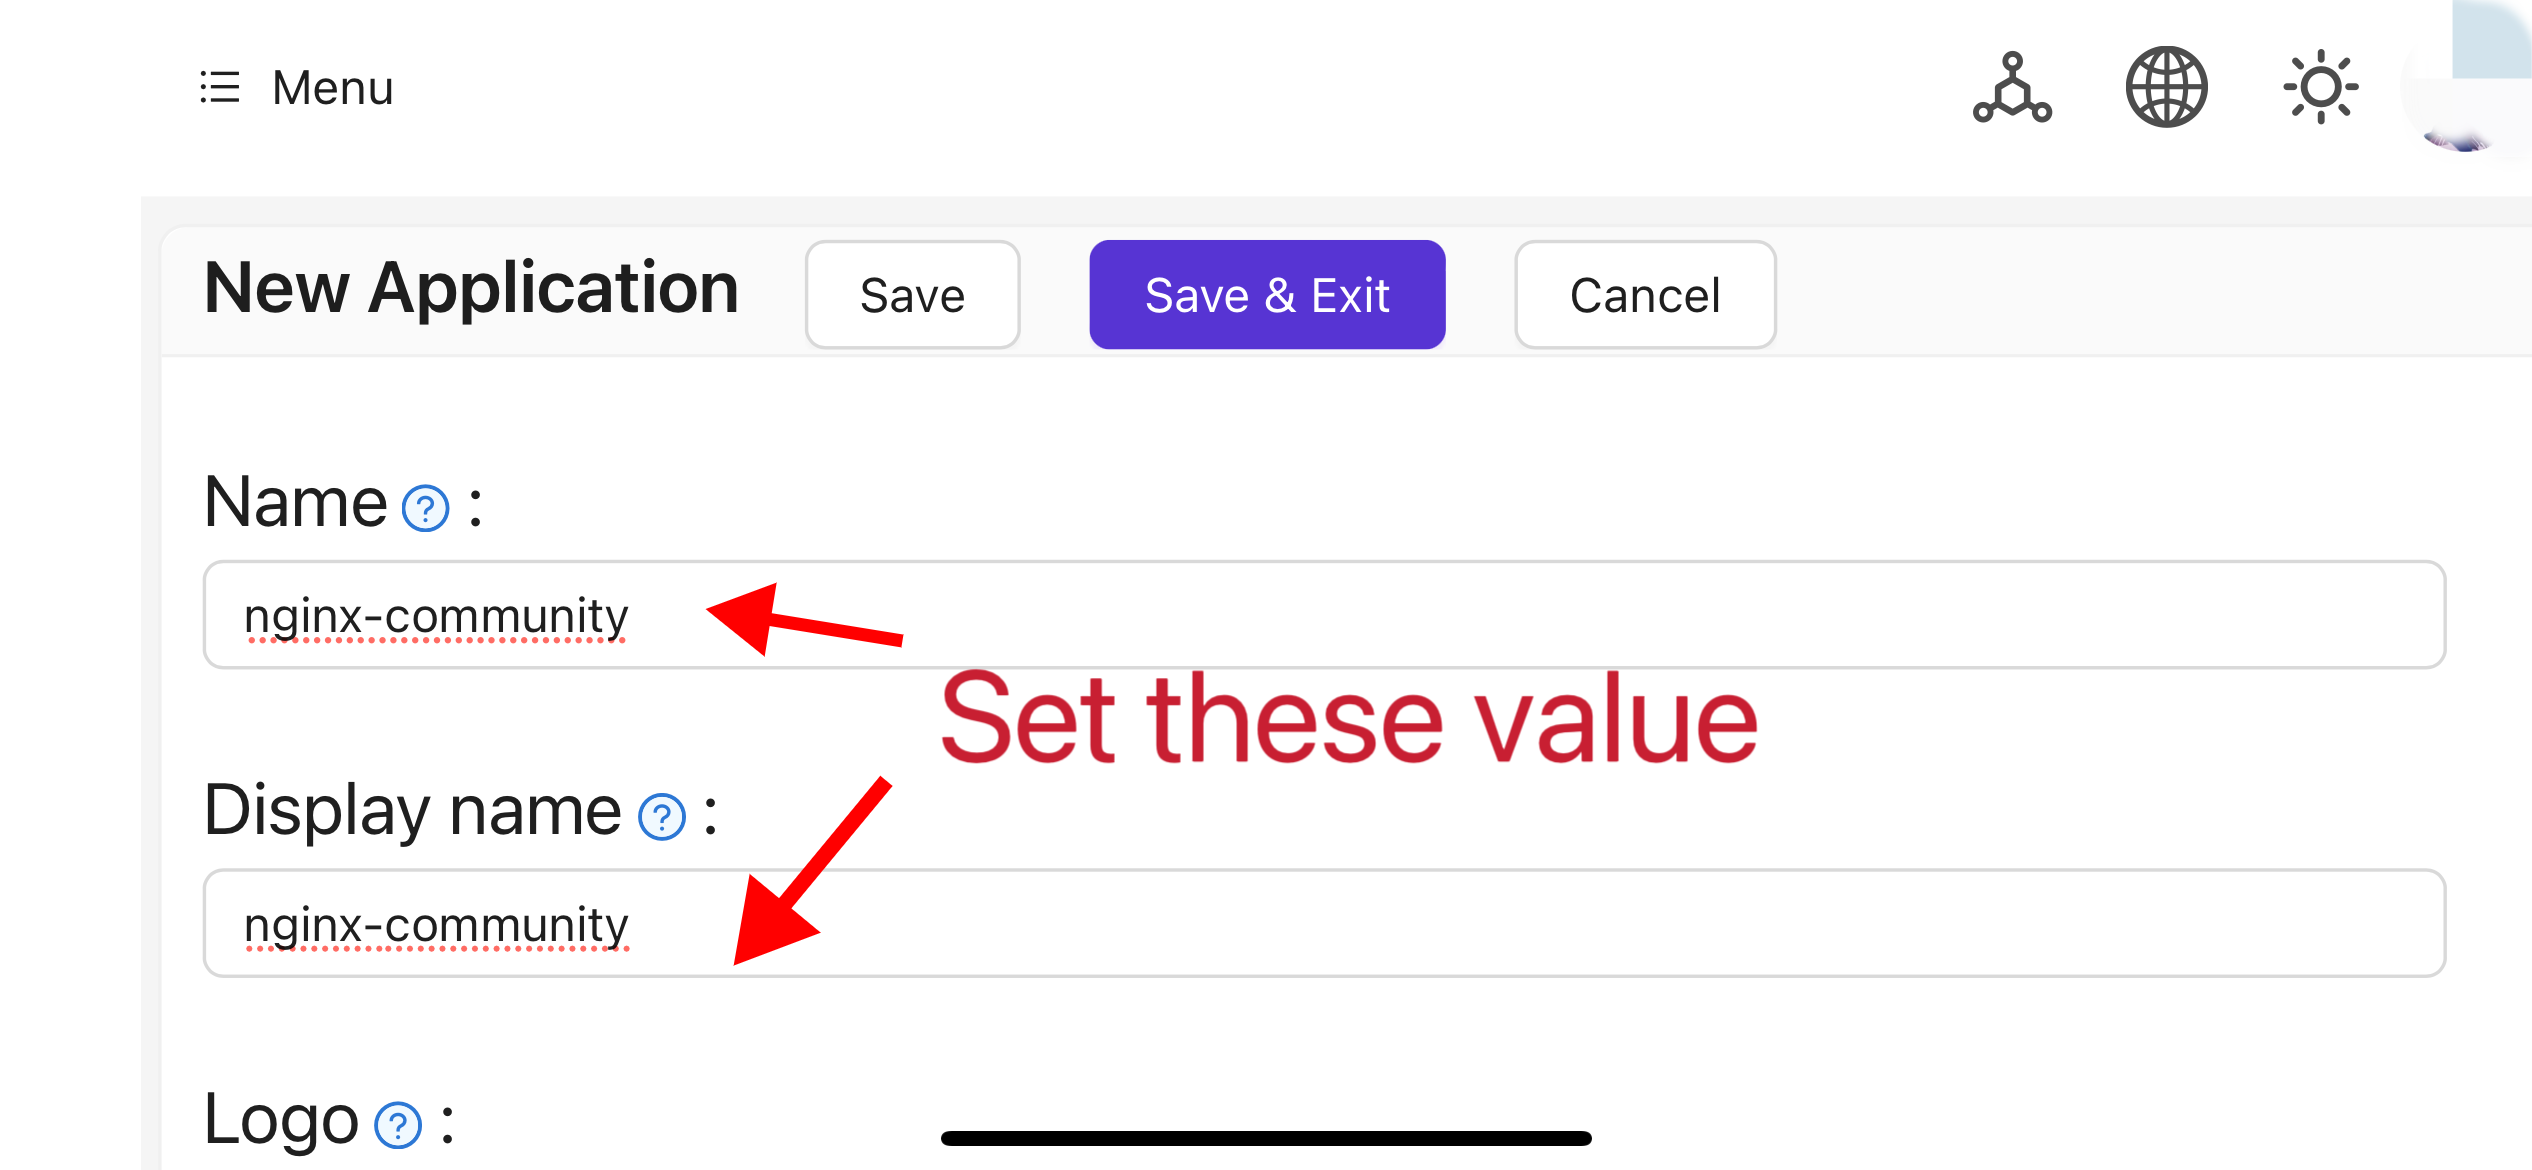
Complete the application configuration based on your project information. In this article, we use "Nginx-Community" as the example application name.
-
Take note of the values of the "Client ID" and "Client Secret" fields. They will be used when configuring OAuth2-Proxy later. Then configure the "Redirect URL" as
https://project.yourdomain.com/oauth2/callback/.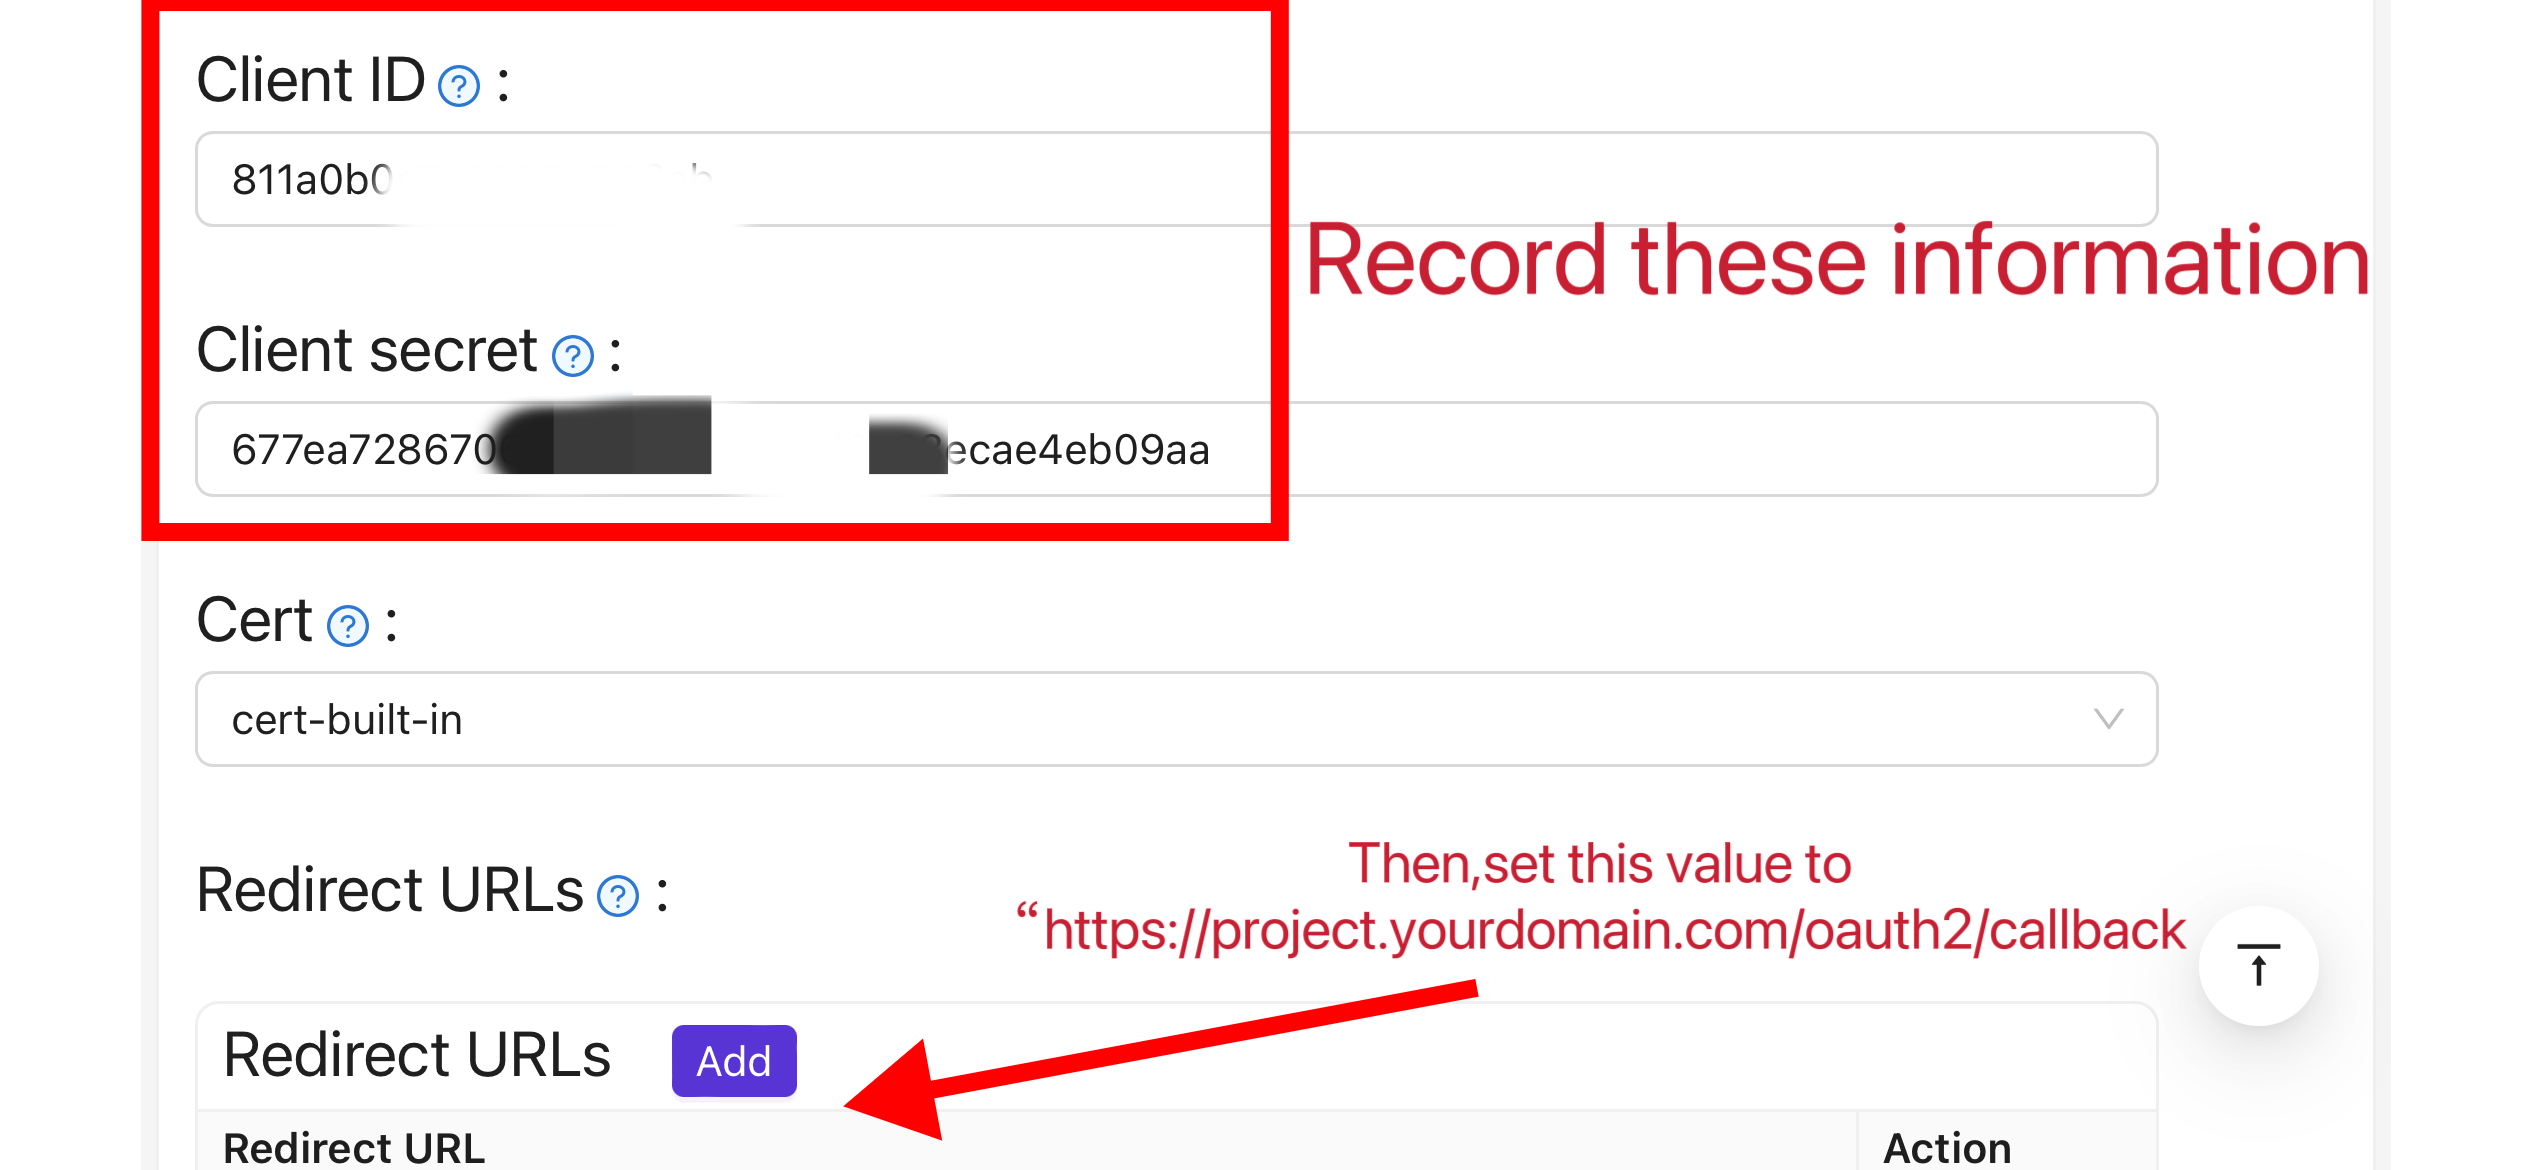
-
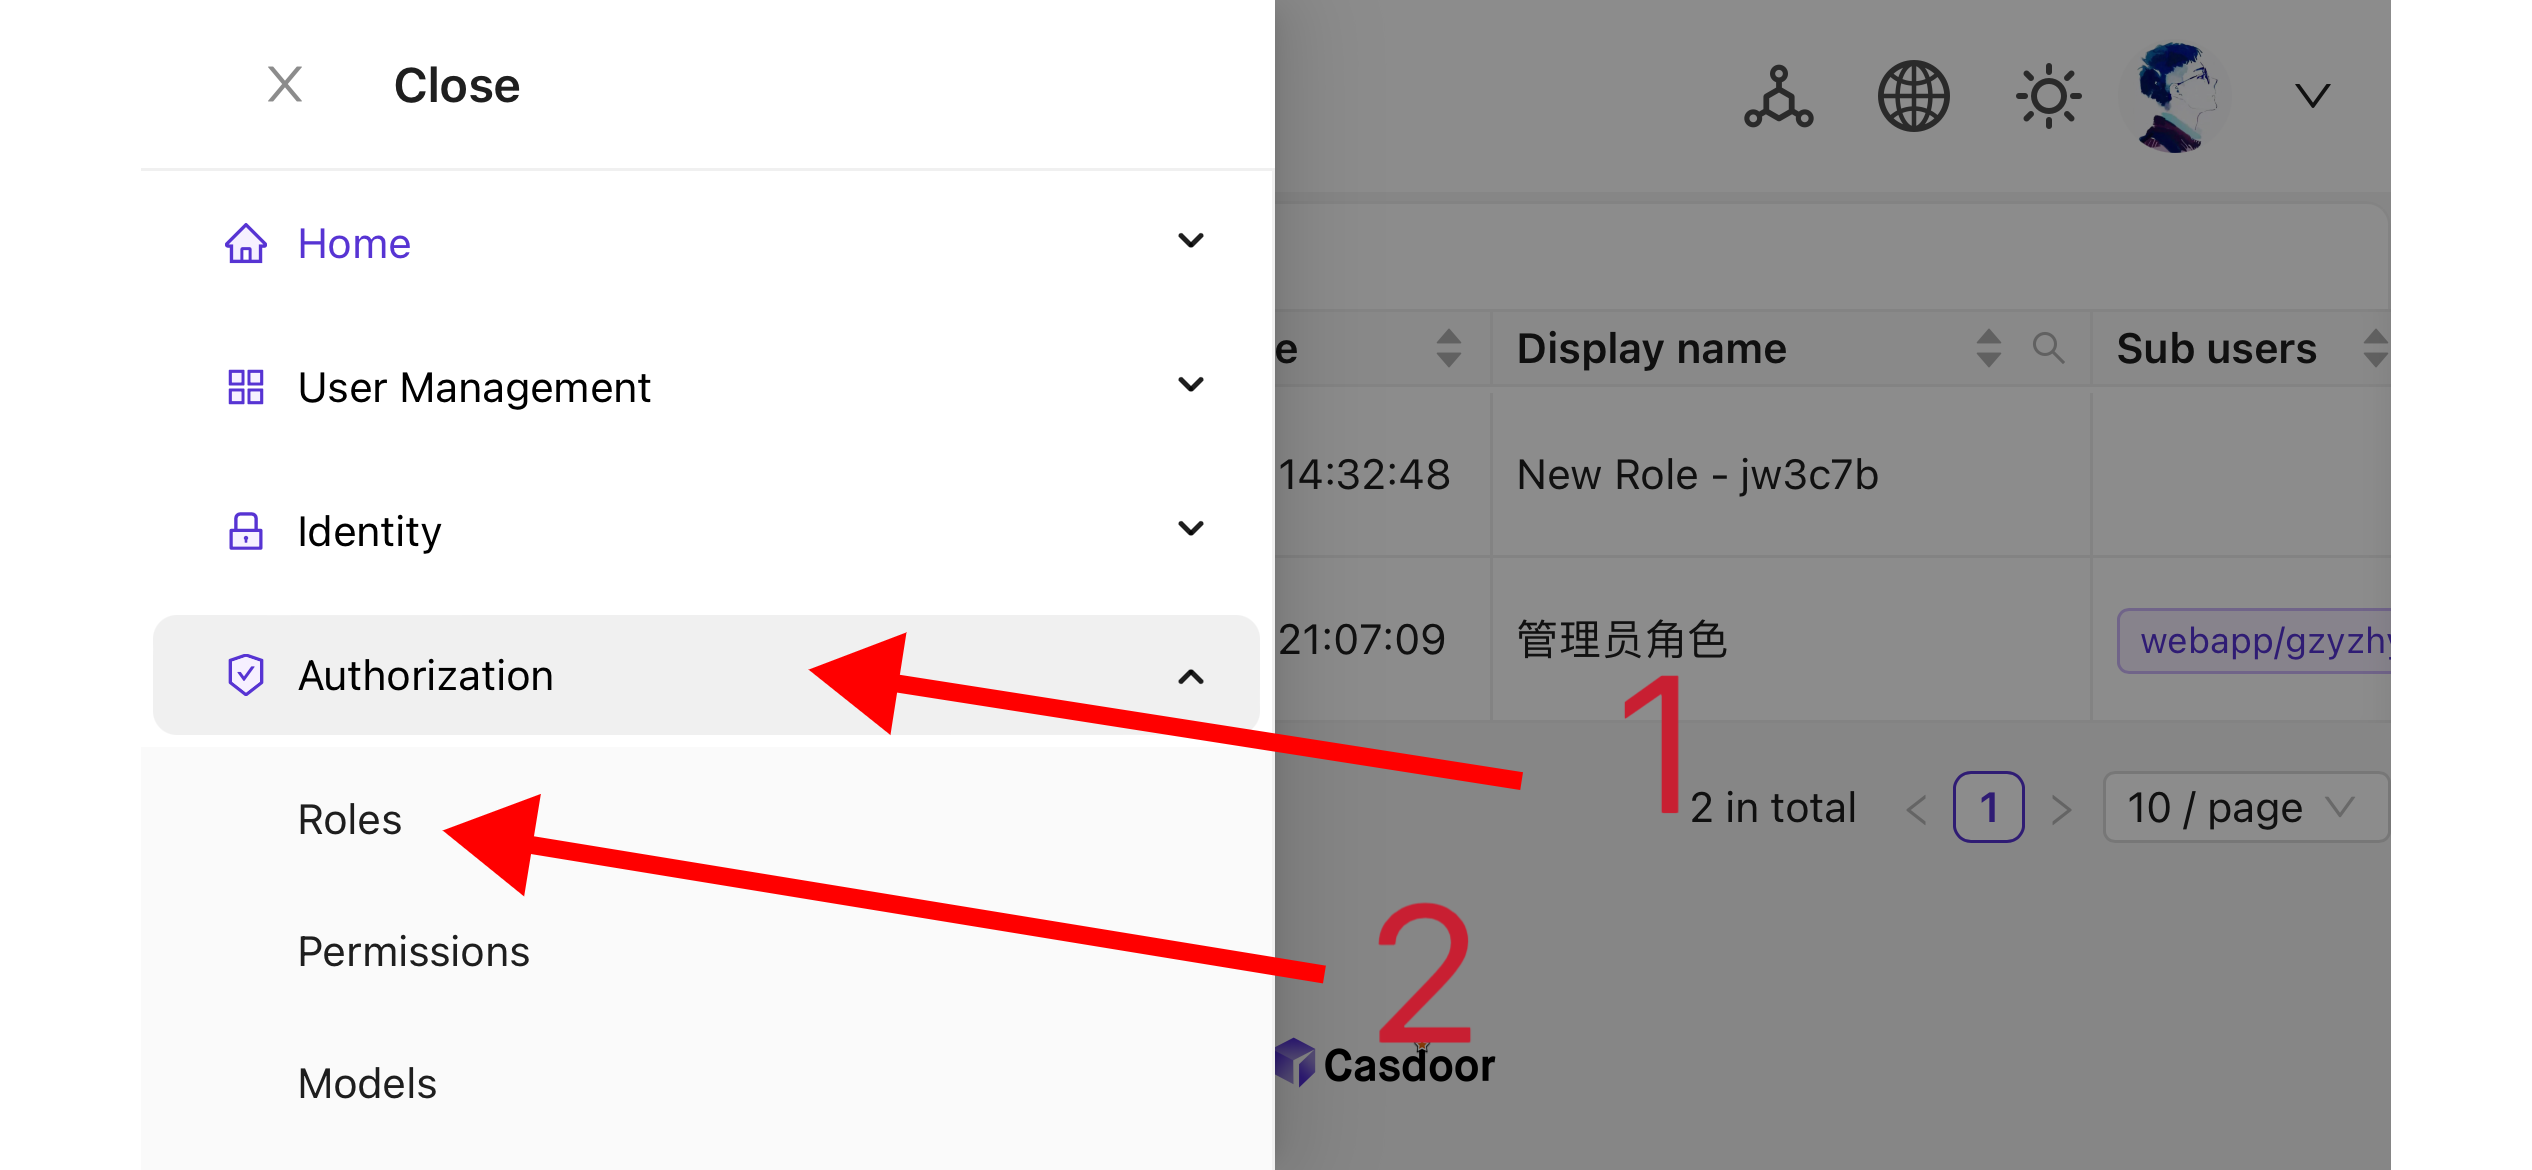
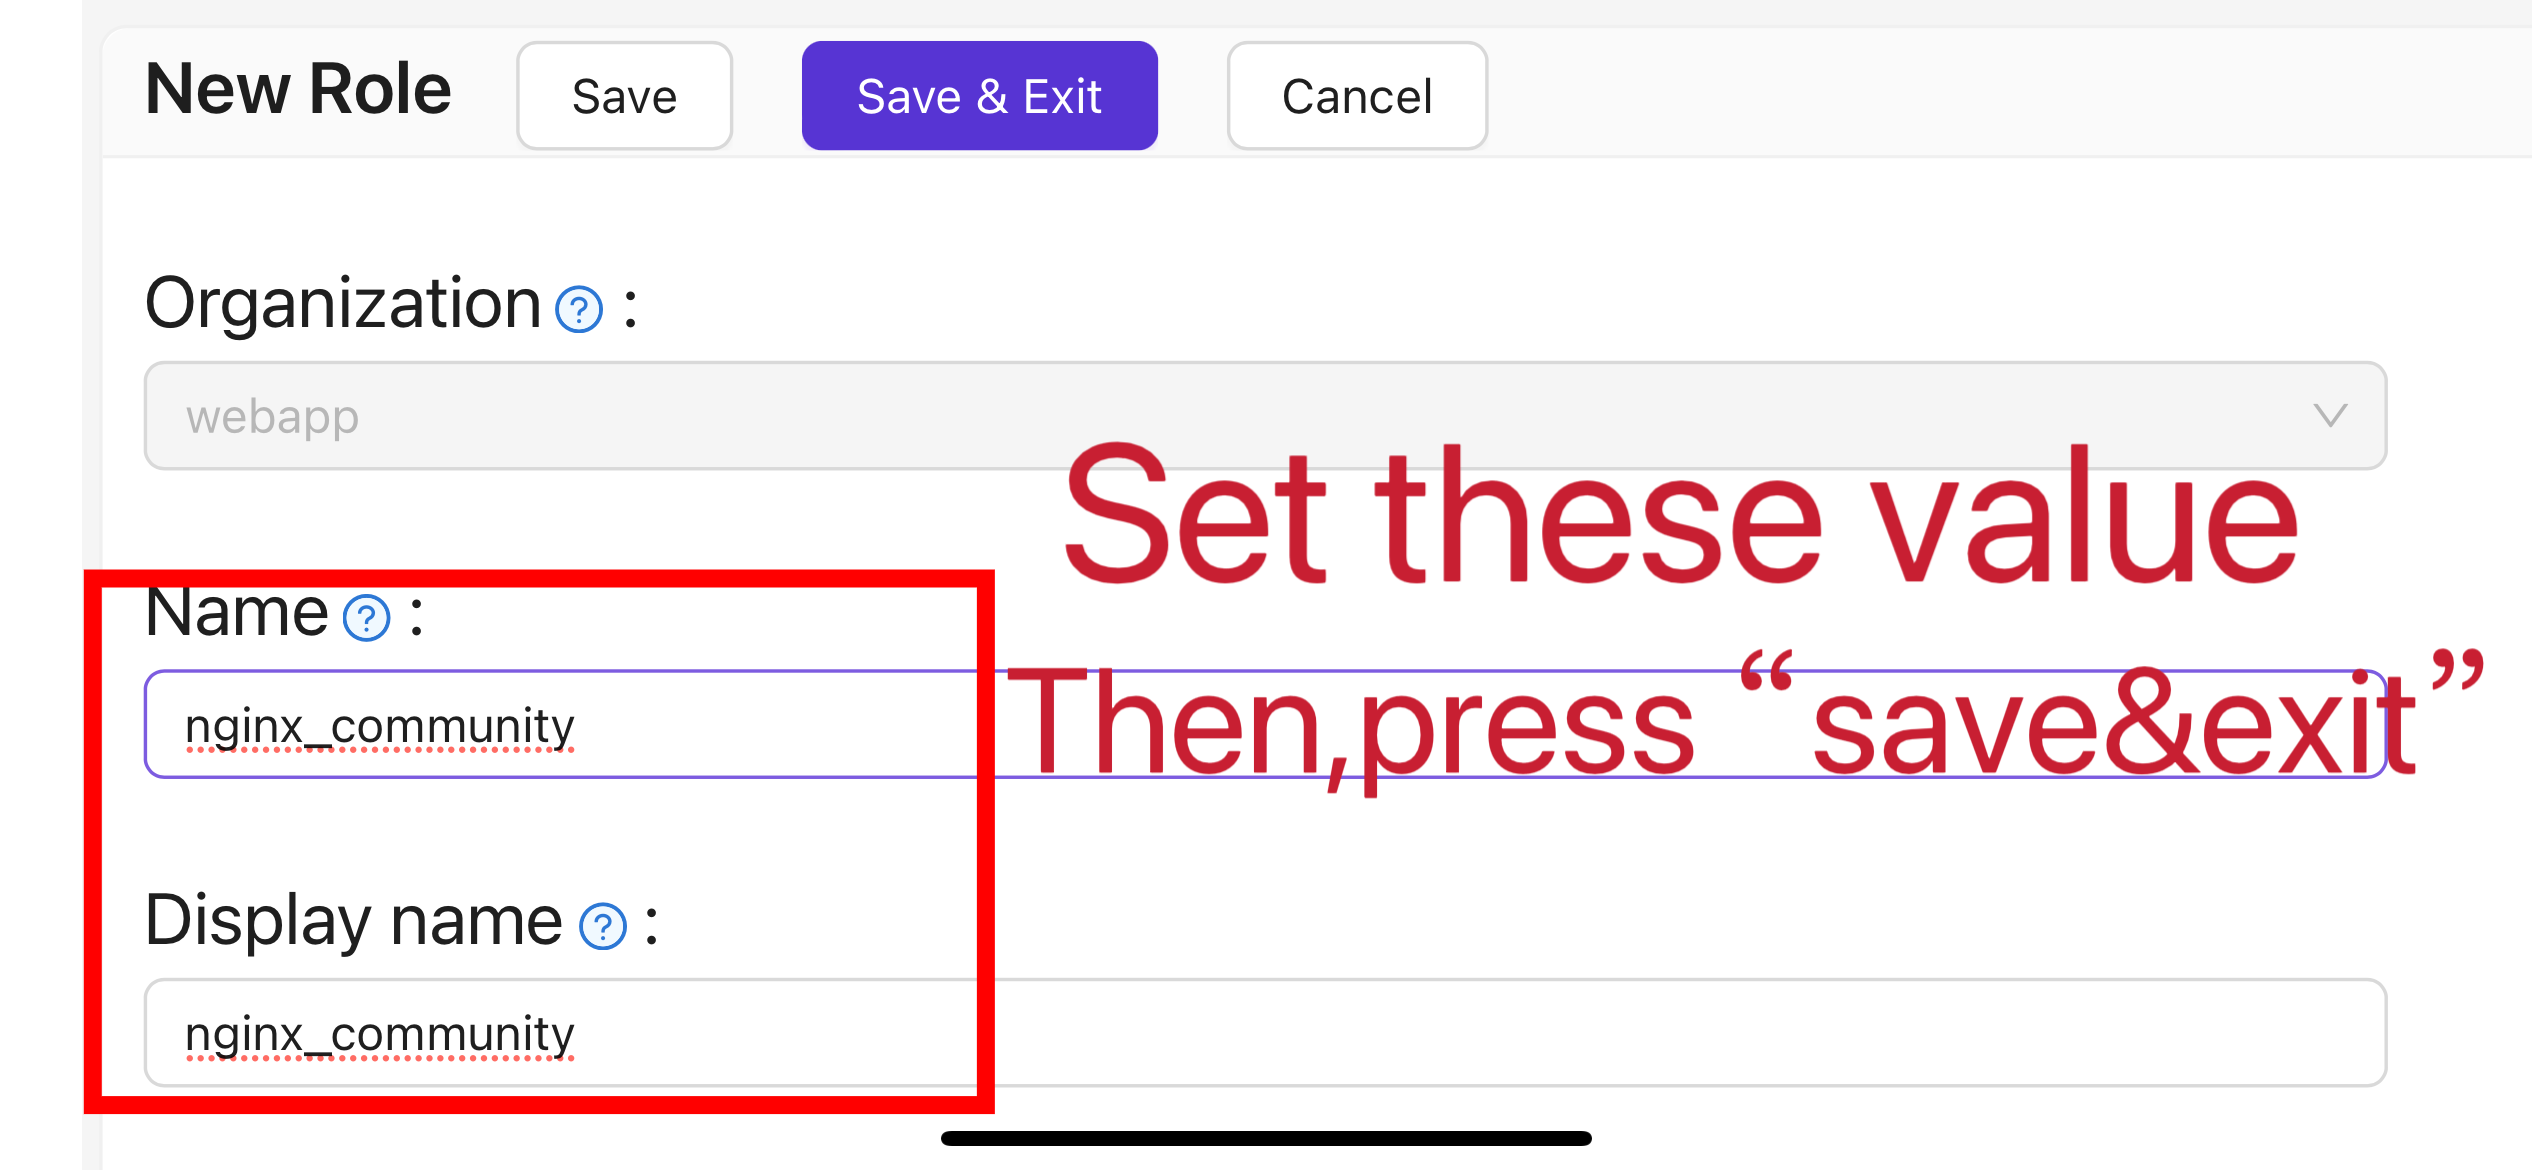
In the top bar, select "Casbin Permission Management" > "Roles", and then click "Add" on the "Roles" page.
-
Complete the role configuration based on your project information. In this article, we use "nginx_role" as the example role name.
-
(Optional) In the top bar, select "User Management" > "Users", and then add new users based on your needs. If the users already exist, skip this step. In this article, we create an example user named "user".
-
Go back to the "Roles" page mentioned in step 5, edit the
nginx_rolerole, and add the required users to Included Users (e.g. the previously createdbuiltin/user).
II. Configure Oauth2-Proxy
Note: For Vouch instead of OAuth2-Proxy, see vouch-proxy on GitHub.
Note: This guide assumes HTTPS (or HTTP→HTTPS redirect). For HTTP-only deployment, adjust the commands and see OAuth2-Proxy docs.
Tips: OAuth2-Proxy provides various deployment methods (such as source code compilation, Docker installation, etc.). For ease of explanation, this article uses the "pre-built binary" for deployment.
-
Go to the GitHub Releases page and download the binary package corresponding to your operating system and CPU architecture. As of January 1, 2024, the latest release version of OAuth-Proxy is
V7.5.1. To download the binary for this version on Linux AMD64, run:wget -O oauth2-proxy-linux.tar.gz https://github.com/oauth2-proxy/oauth2-proxy/releases/download/v7.5.1/oauth2-proxy-v7.5.1.linux-amd64.tar.gzIt is strongly recommended that you check the
SHA256SUMvalue provided by the official website on the GitHub Releases page after downloading the compressed package and compare it with theSHA256SUMvalue of the package you downloaded, character by character. -
Extract the downloaded package:
tar -zxvf oauth2-proxy-*.tar.gz -
Enter the extracted directory:
cd oauth2-proxy-v7.5.1.linux-amd64 -
Move the obtained binary file to
/usr/local/binand configure it with executable permissions. You may need to elevate permissions usingsudodepending on your situation.cp ./oauth2-proxy /usr/local/bin
cd /usr/local/bin
chmod +x ./oauth2-proxy -
Test the binary installation. If the installation is successful, after executing the following command, you should see output similar to
oauth2-proxy v7.5.1 (built with go1.21.1).cd ~
oauth2-proxy --version -
Run oauth2-proxy with command-line parameters. Parameters marked with [required] must be configured according to your specific situation, while parameters marked with [optional] can optimize performance but can also be omitted. To run oauth2-proxy in the background, use a process manager such as
Screen,Supervisor, or a terminal multiplexer.oauth2-proxy \
--provider=oidc \ #[required] Do not change
--client-id=abc123456def \ #[required] "Client ID" obtained in step I.4 above
--client-secret=abc123456def \ #[required] "Client Secret" obtained in step I.4 above
--oidc-issuer-url=https://auth.yourdomain.com \ #[required] Your Casdoor URL (domain name or public IP)
--redirect-url=https://project.yourdomain.com/oauth2/callback \ #[required] https://domain-of-the-project-to-protect/oauth2/callback
--scope=email+profile+groups+openid \ #[required] Obtained from Casdoor: user email, user profile, groups, and login authentication
--cookie-domain=project.yourdomain.com \ #[required] Domain name of the project you want to protect
--whitelist-domain=project.yourdomain.com \ #[required] Domain name of the project you want to protect
--cookie-secret=abc123456def \ #[required] Use a random string (letters and numbers)
--email-domain=* \ #[required] List of acceptable user email domains (* means accept all domains). If the user's email suffix is not in this list, a 403 error will be returned even if the login is successful.
--insecure-oidc-allow-unverified-email=true \ #[required] Whether to accept users with unverified email addresses
--http-address=http://127.0.0.1:65534 \ #[required] Address oauth2-proxy listens on; note this for the Nginx config later.
--cookie-expire=24h0m0s \ #[optional] Cookie expiration time. After this period, users will need to log in again.
--custom-sign-in-logo=https://cdn.yourdomain.com/pic/proj.png \ #[optional] Icon displayed on the login page. It is recommended to use a rectangular image rather than a square one.
--session-store-type=redis \ #[optional] Use Redis cache. Omit if not using Redis.
--redis-connection-url=redis://127.0.0.1:6379/0 \ #[optional] Redis URL. Omit if not using Redis.
--redis-password=123456 #[optional] Redis password. Omit if not using Redis or if Redis has no password.
III. Configure Nginx
Note: If building Nginx from source, ensure ngx_http_auth_request_module is enabled (add --with_http_auth_request_module). See the Nginx auth_request module.
Tips: Nginx installed using the Baota panel tool does not enable this module by default.
-
Open the configuration file of the website you have already deployed and want to protect, and make the following modifications:
Note: Adjust the config for your setup; Nginx version and environment may require changes.
server {
    listen 443 ssl http2;

    include /path/to/ssl.conf;

    # Add the following content
    location ^~ /oauth2/ {
        proxy_pass       http://127.0.0.1:65534; # Change this to the "--http-address" configured in step II.6

        proxy_set_header Host                    $host;
        proxy_set_header X-Real-IP               $remote_addr;
        proxy_set_header X-Scheme                $scheme;

        proxy_set_header X-Auth-Request-Redirect $request_uri;
        # or, if you are handling multiple domains:
        # proxy_set_header X-Auth-Request-Redirect $scheme://$host$request_uri;
    }
    location = /oauth2/auth {
        proxy_pass       http://127.0.0.1:65534; # Change this to the "--http-address" configured in step II.6

        proxy_set_header Host             $host;
        proxy_set_header X-Real-IP        $remote_addr;
        proxy_set_header X-Scheme         $scheme;
        proxy_set_header Content-Length   "";
        proxy_pass_request_body           off;
    }
    location ^~ / {
        auth_request /oauth2/auth;
        error_page 401 = /oauth2/sign_in;

        auth_request_set $user   $upstream_http_x_auth_request_user;
        auth_request_set $email  $upstream_http_x_auth_request_email;
        proxy_set_header X-User  $user; # Pass the username of the user logged in to your backend service
        proxy_set_header X-Email $email; # Pass the email of the user logged in to your backend service

        auth_request_set $token  $upstream_http_x_auth_request_access_token;
        proxy_set_header X-Access-Token $token; # Pass the user's login token to your backend service

        # The following configurations are related to cookie validation for user login
        auth_request_set $auth_cookie $upstream_http_set_cookie;
        add_header Set-Cookie $auth_cookie;

        auth_request_set $auth_cookie_name_upstream_1 $upstream_cookie_auth_cookie_name_1;

        if ($auth_cookie ~* "(; .*)") {
            set $auth_cookie_name_0 $auth_cookie;
            set $auth_cookie_name_1 "auth_cookie_name_1=$auth_cookie_name_upstream_1$1";
        }

        if ($auth_cookie_name_upstream_1) {
            add_header Set-Cookie $auth_cookie_name_0;
            add_header Set-Cookie $auth_cookie_name_1;
        }
        proxy_no_cache $cookie_session;

        # Provide the web page to the user after successful validation

        proxy_pass http://127.0.0.1:8080; # The address where your backend service runs
        # Note: This is not the Casdoor deployment address or the Oauth2-Proxy running address, but the address where your backend service that needs login protection runs.

        # Then add configurations to pass user IP, Connection request headers, etc., to your backend service, for example:
        proxy_set_header X-Forwarded-For $remote_addr;
        proxy_http_version 1.1;
        proxy_set_header Upgrade $http_upgrade;
        proxy_set_header Connection upgrade;
        proxy_set_header Accept-Encoding gzip;
    }
    access_log /path/to/access_log.log;
    error_log /path/to/error_log.log;
} -
Save the file and reload your Nginx.
Testing
- Next, test your implementation.
- In normal circumstances, your users will go through the following process when logging in to your service:
- Open the URL
project.yourdomain.comin a browser -> Only see a page requiring login, including a button named "Sign in with OpenID Connect" -> Click the button and be redirected to your Casdoor address, where they will be asked to log in -> Users enter their username and password, and Casdoor verifies their credentials -> Automatically redirect back to your URLproject.yourdomain.com-> Successfully access your service -> Users will be asked to log in again when the--cookie-expiretime you set expires.
Troubleshooting
- If it does not run as expected, check your Nginx and OAuth2-Proxy configuration.
- See OAuth2-Proxy documentation.
- To suggest fixes for this doc, open an issue or PR on GitHub.