Nginx community edition
先决条件
本指南假设您具有以下条件:
- 正在运行的Casdoor服务。 If you haven't installed Casdoor service yet, see Server installation or Try with Docker.
- 在编译时启用了
ngx_http_auth_request_module模块的Nginx开源版。 See the Nginx auth_request module to enable it. - 您希望启用身份验证的网站已成功部署在Nginx上,具有配置的域名(而不是使用IP地址),并且可以正常访问。
- OAuth2-Proxy (choose one of the two popular options on GitHub):
I. 配置CasDoor
Note: The Casdoor GUI may differ by version; use this article as a reference and adapt to your build.
注意:本文中提到的密钥、密码、用户名和其他机密信息都是示例。 出于安全原因,您在部署时必须用您自己的相关内容替换它们。
-
登录到您的Casdoor管理员账户。
-
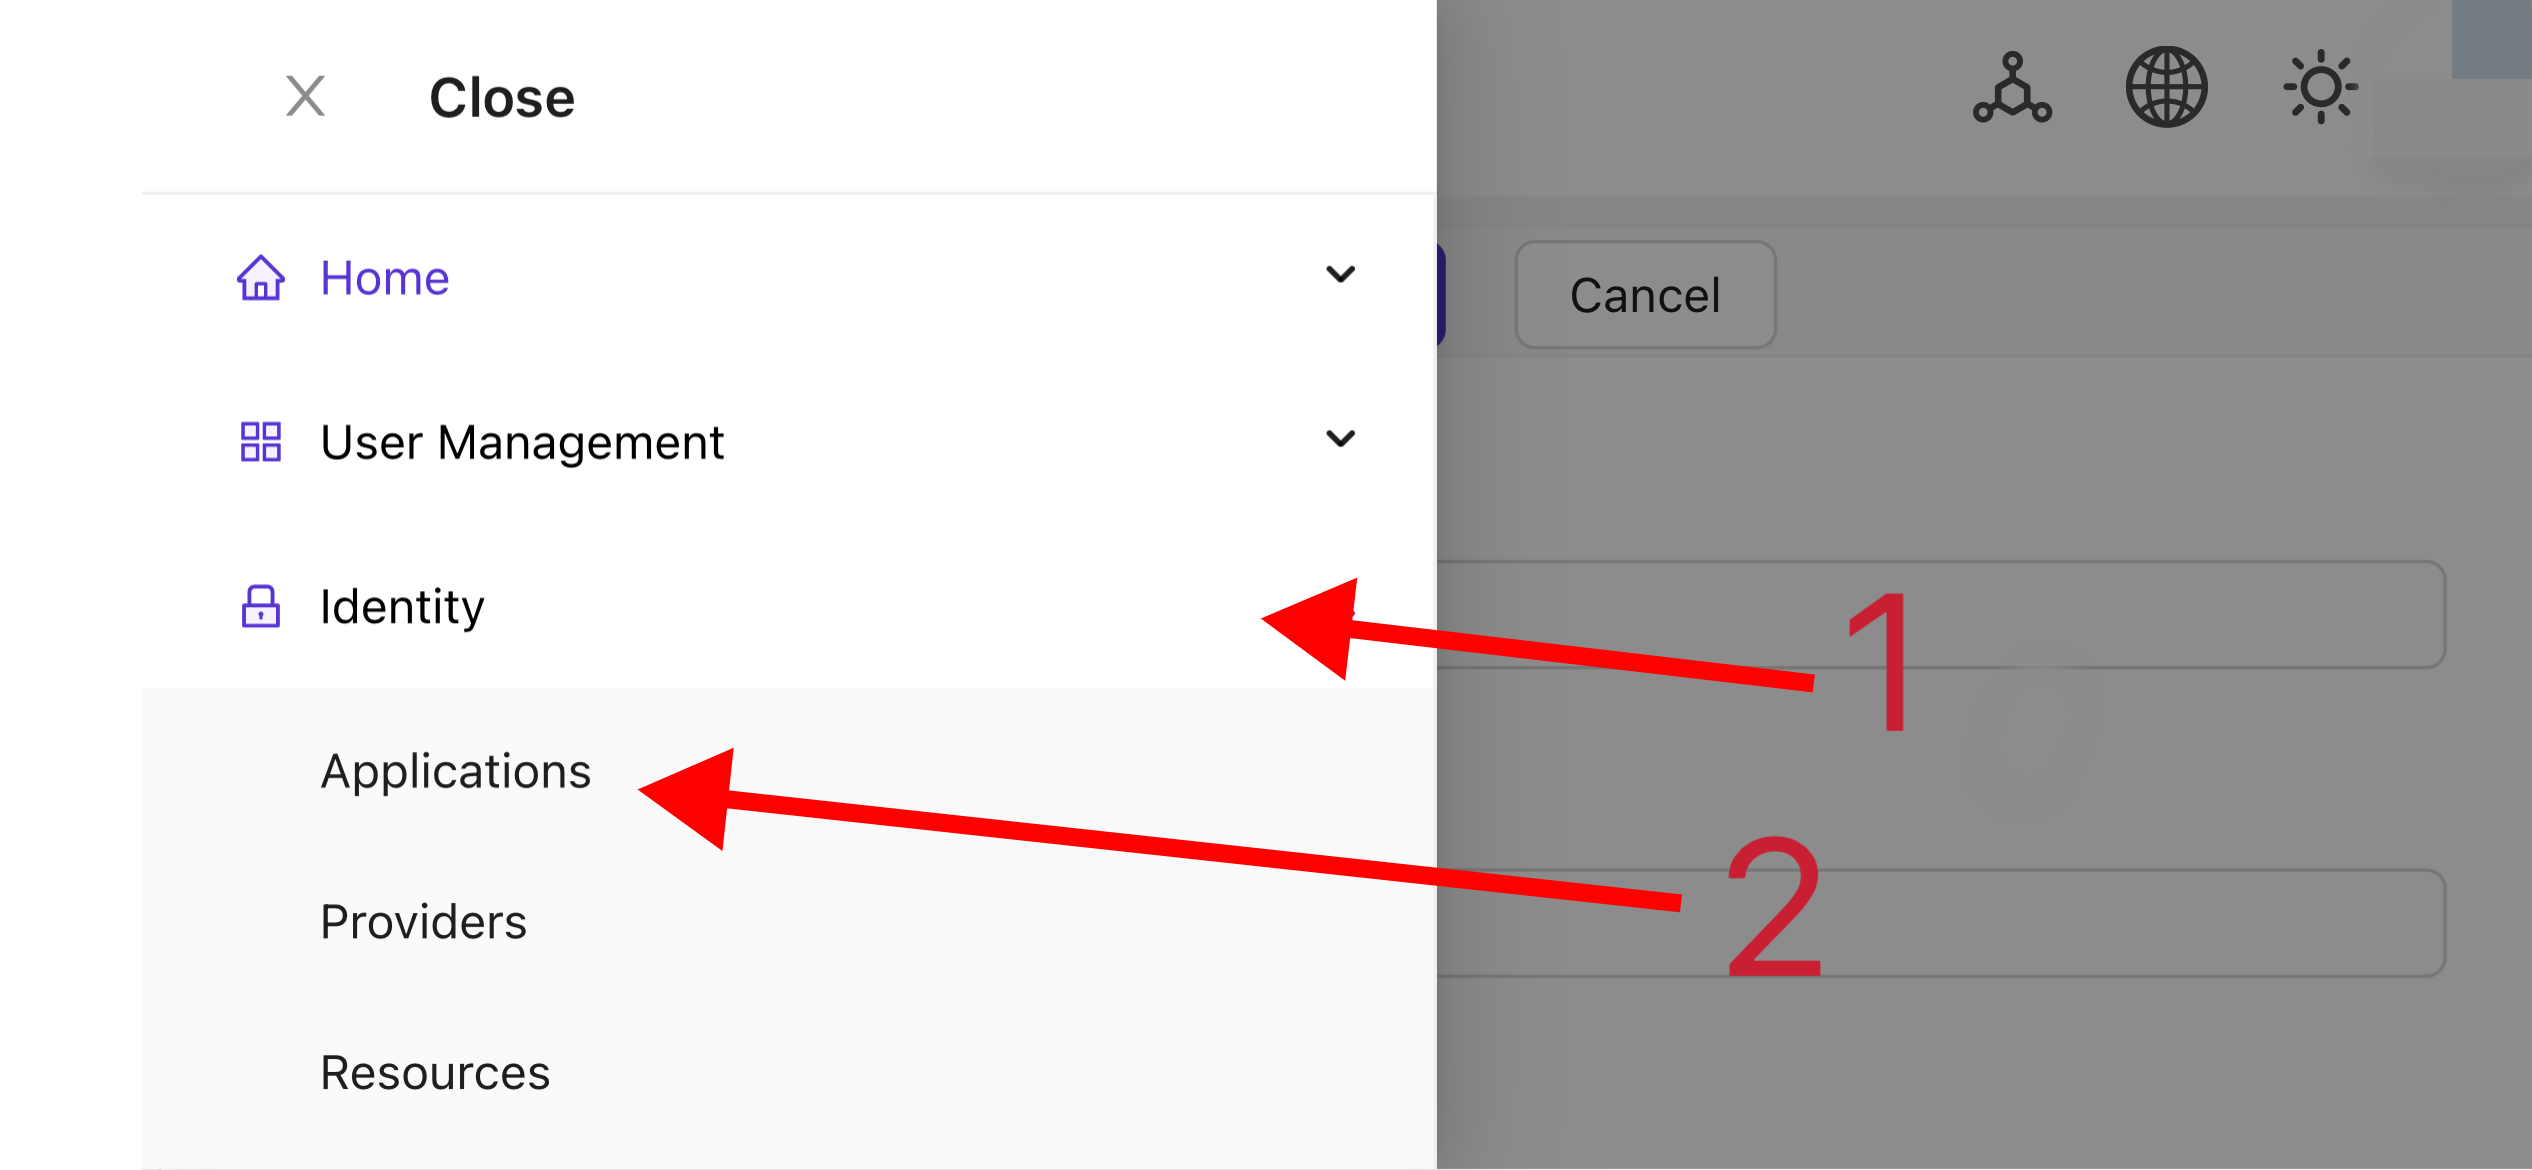
在顶部栏中,选择"身份验证" > "应用程序",然后在"应用程序"页面上点击"添加"。
-
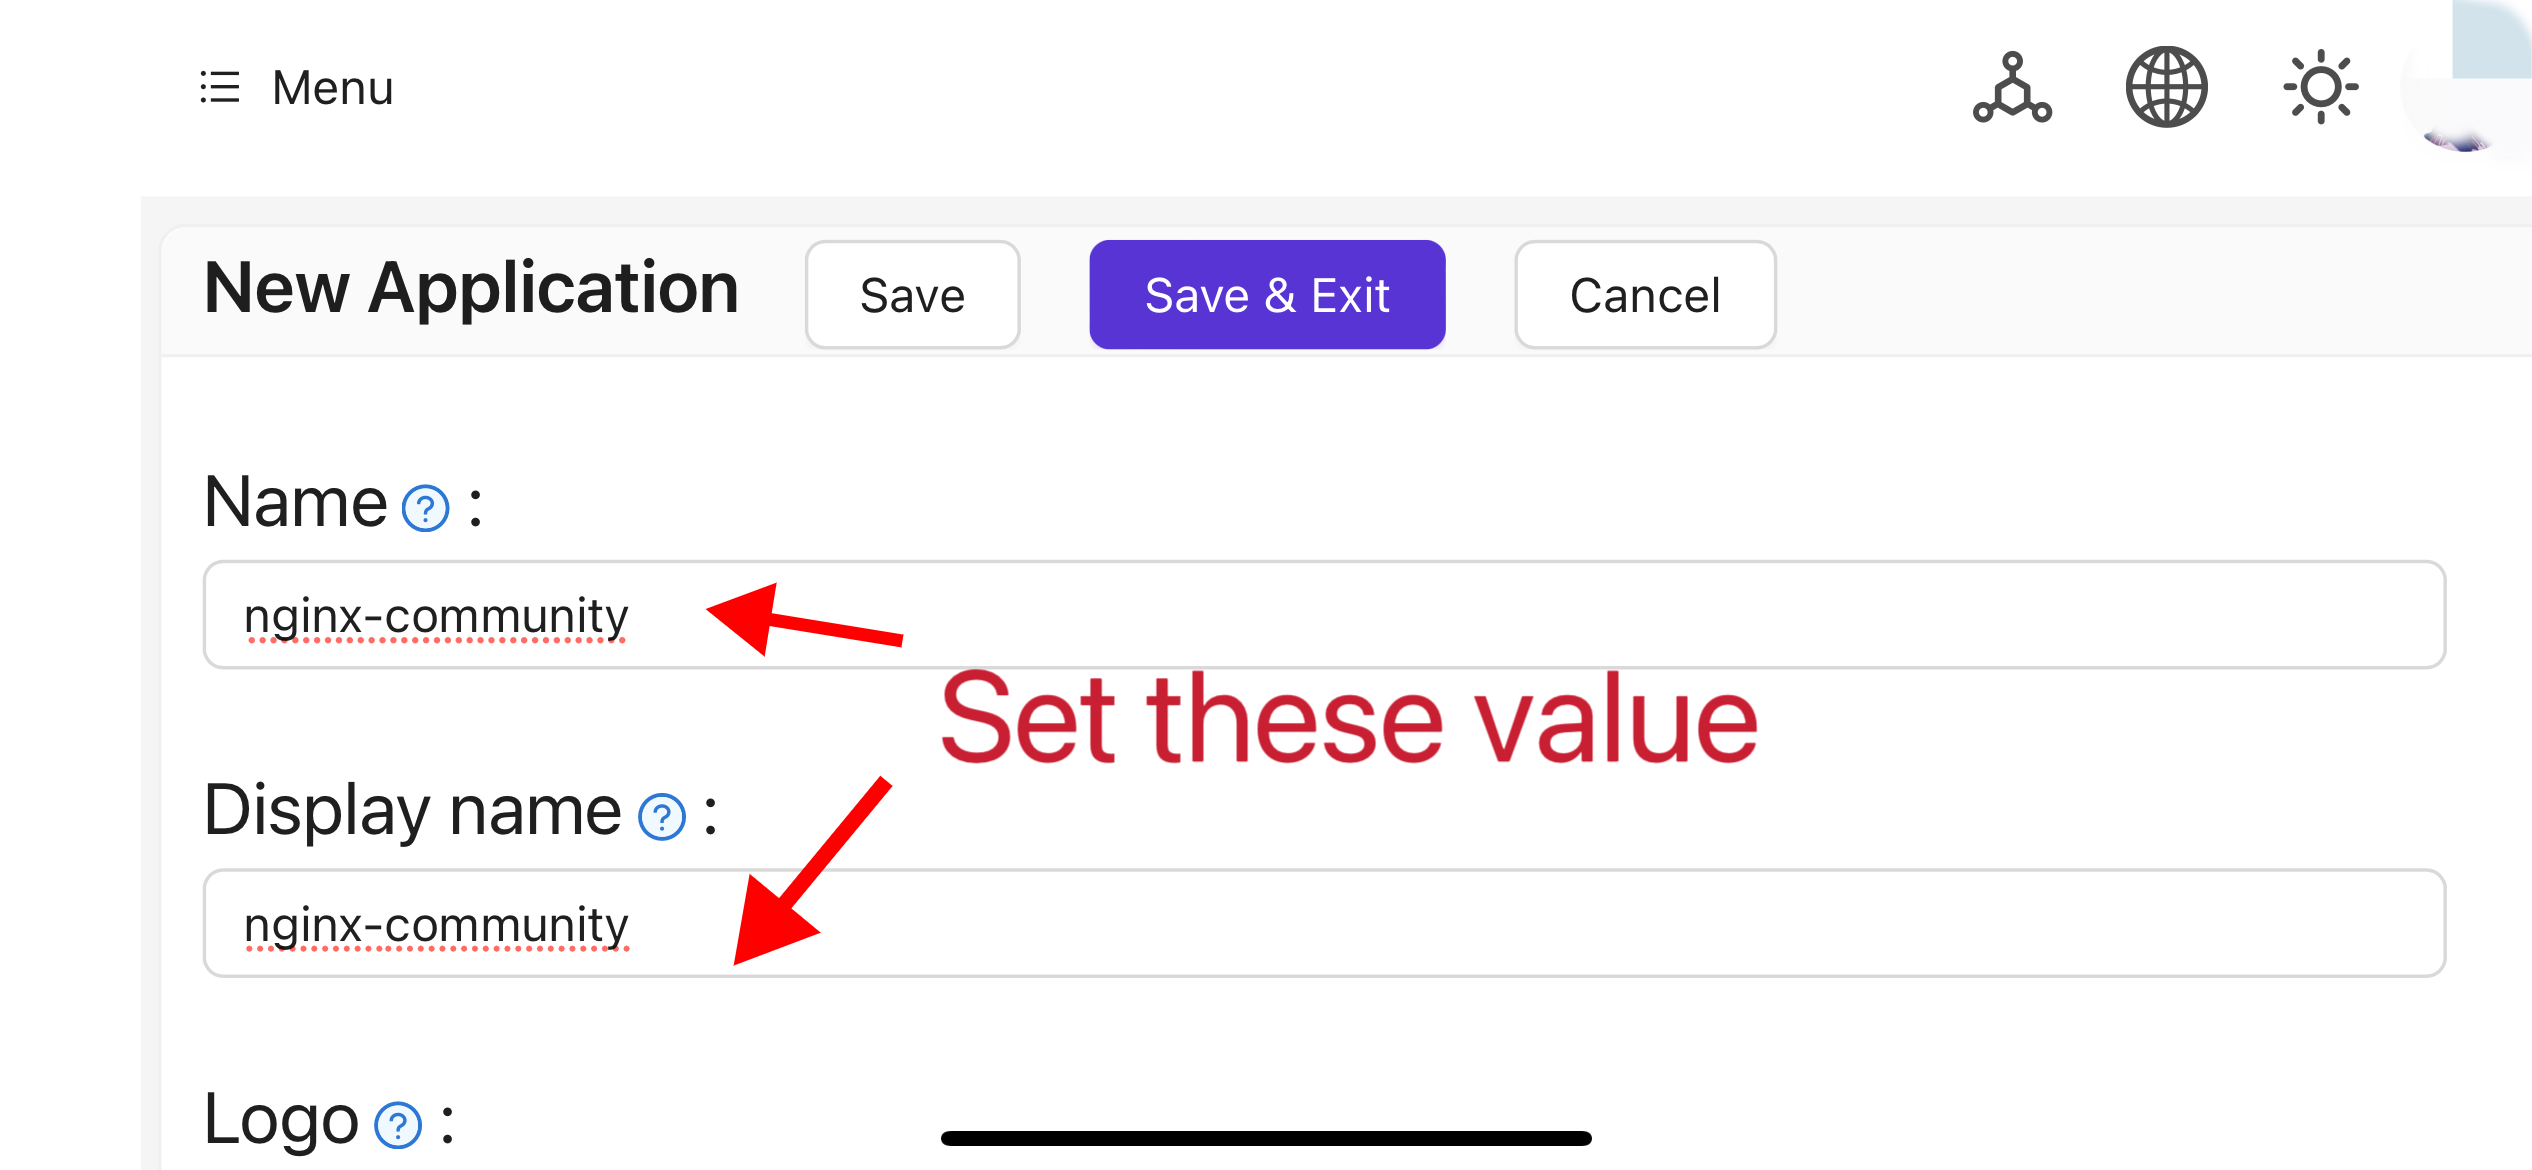
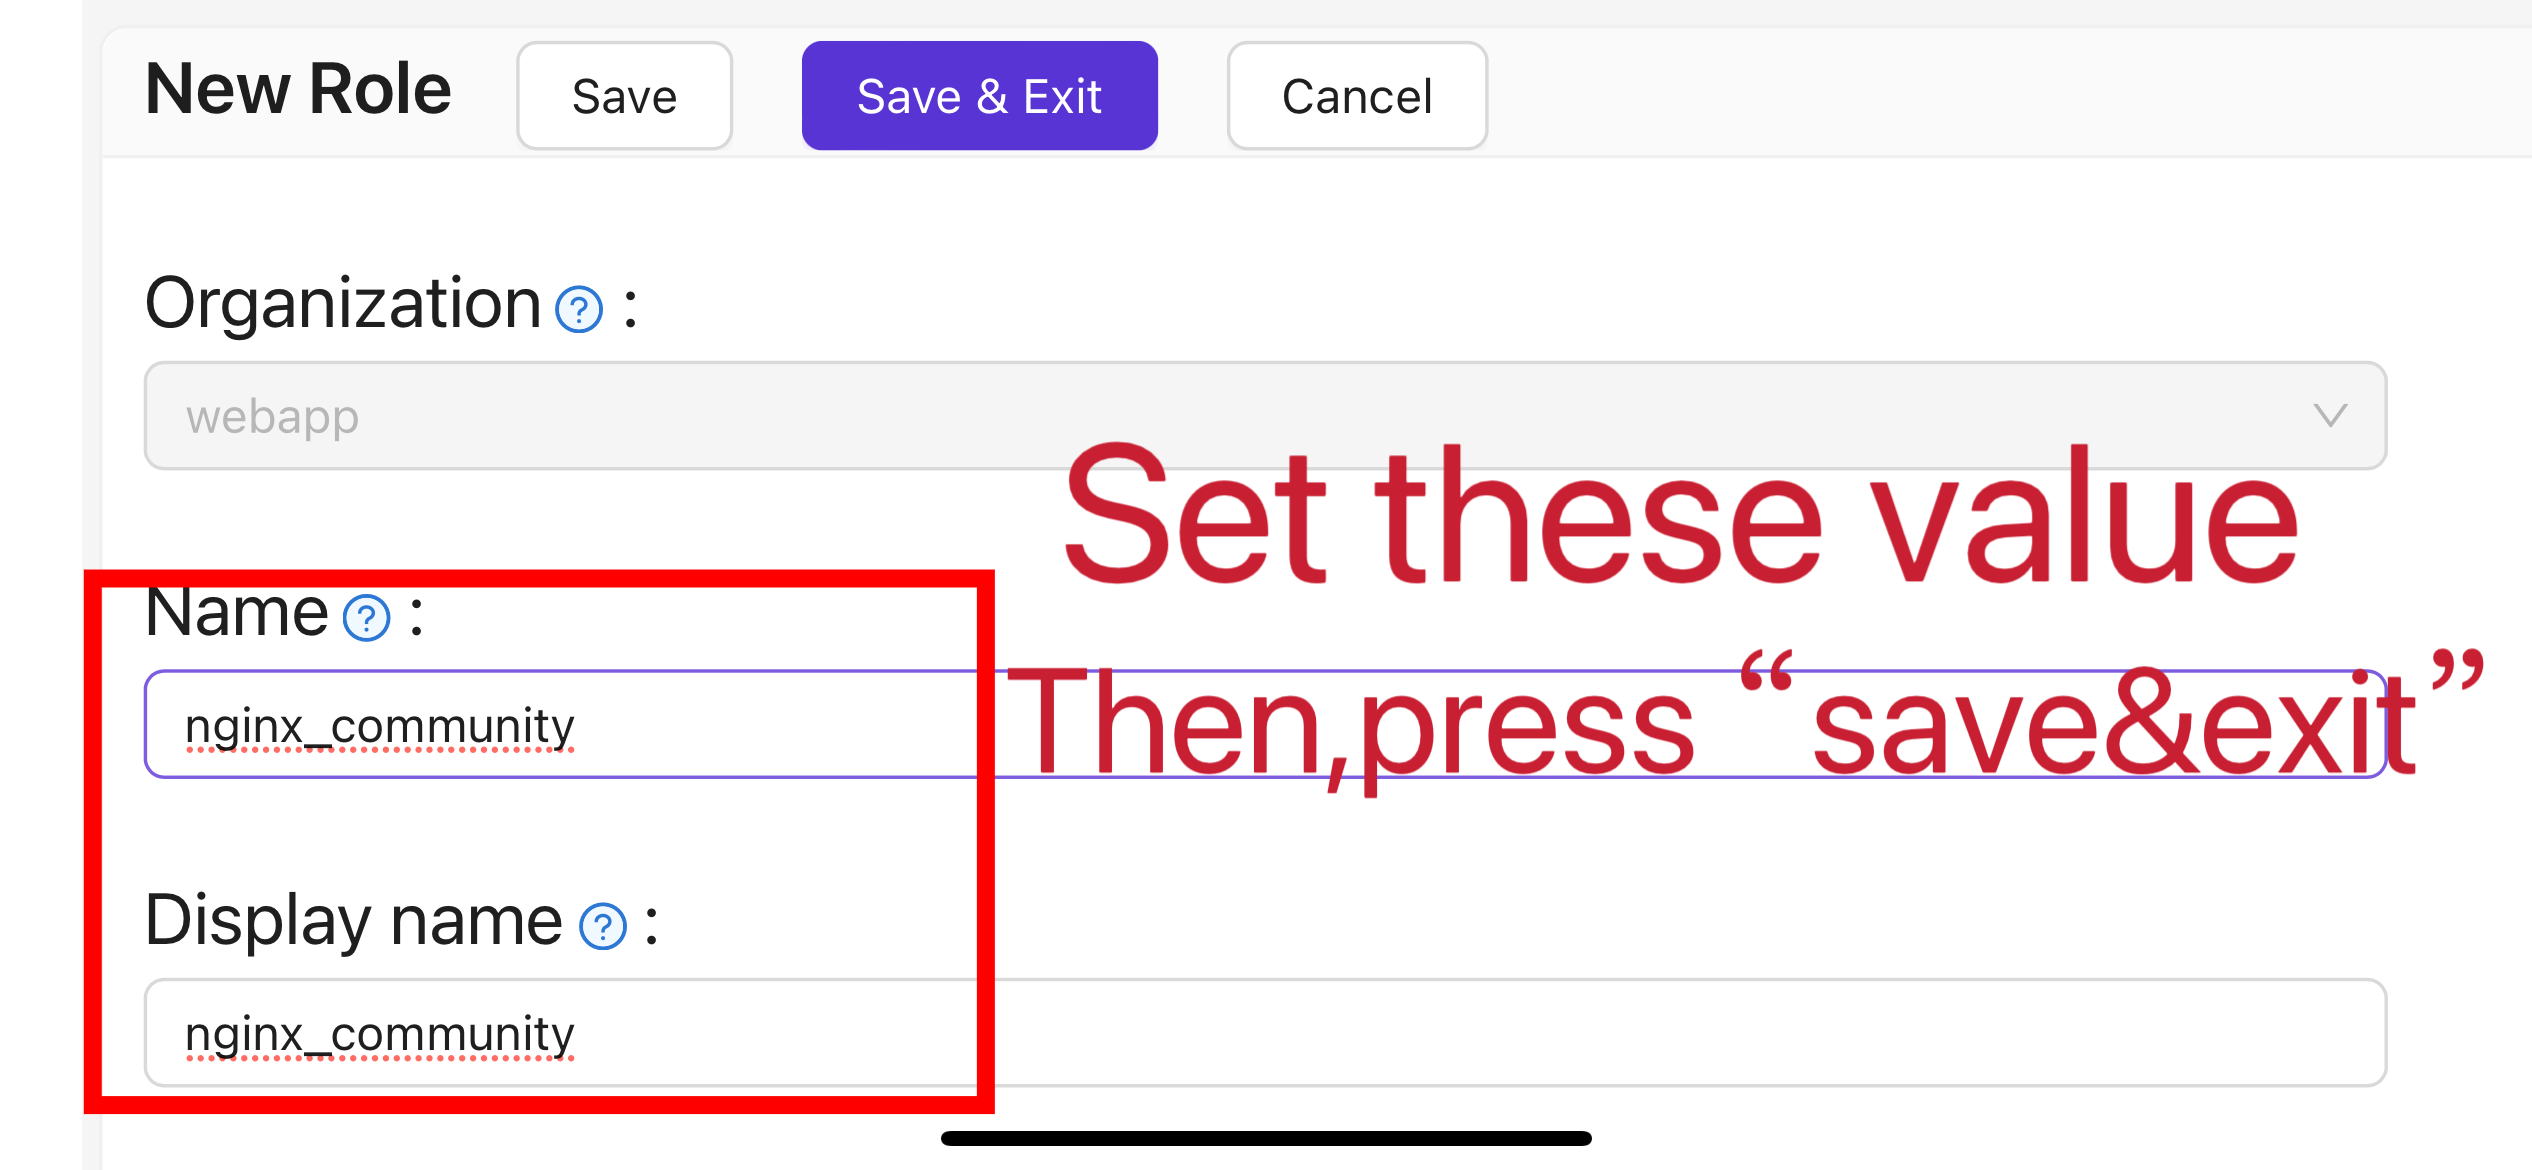
根据您的项目信息完成应用程序配置。 在本文中,我们使用"Nginx-Community"作为示例应用程序名称。
-
记下"Client ID"和"Client Secret"字段的值。 它们将在稍后配置OAuth2-Proxy时使用。 然后将"Redirect URL"配置为
https://project.yourdomain.com/oauth2/callback/。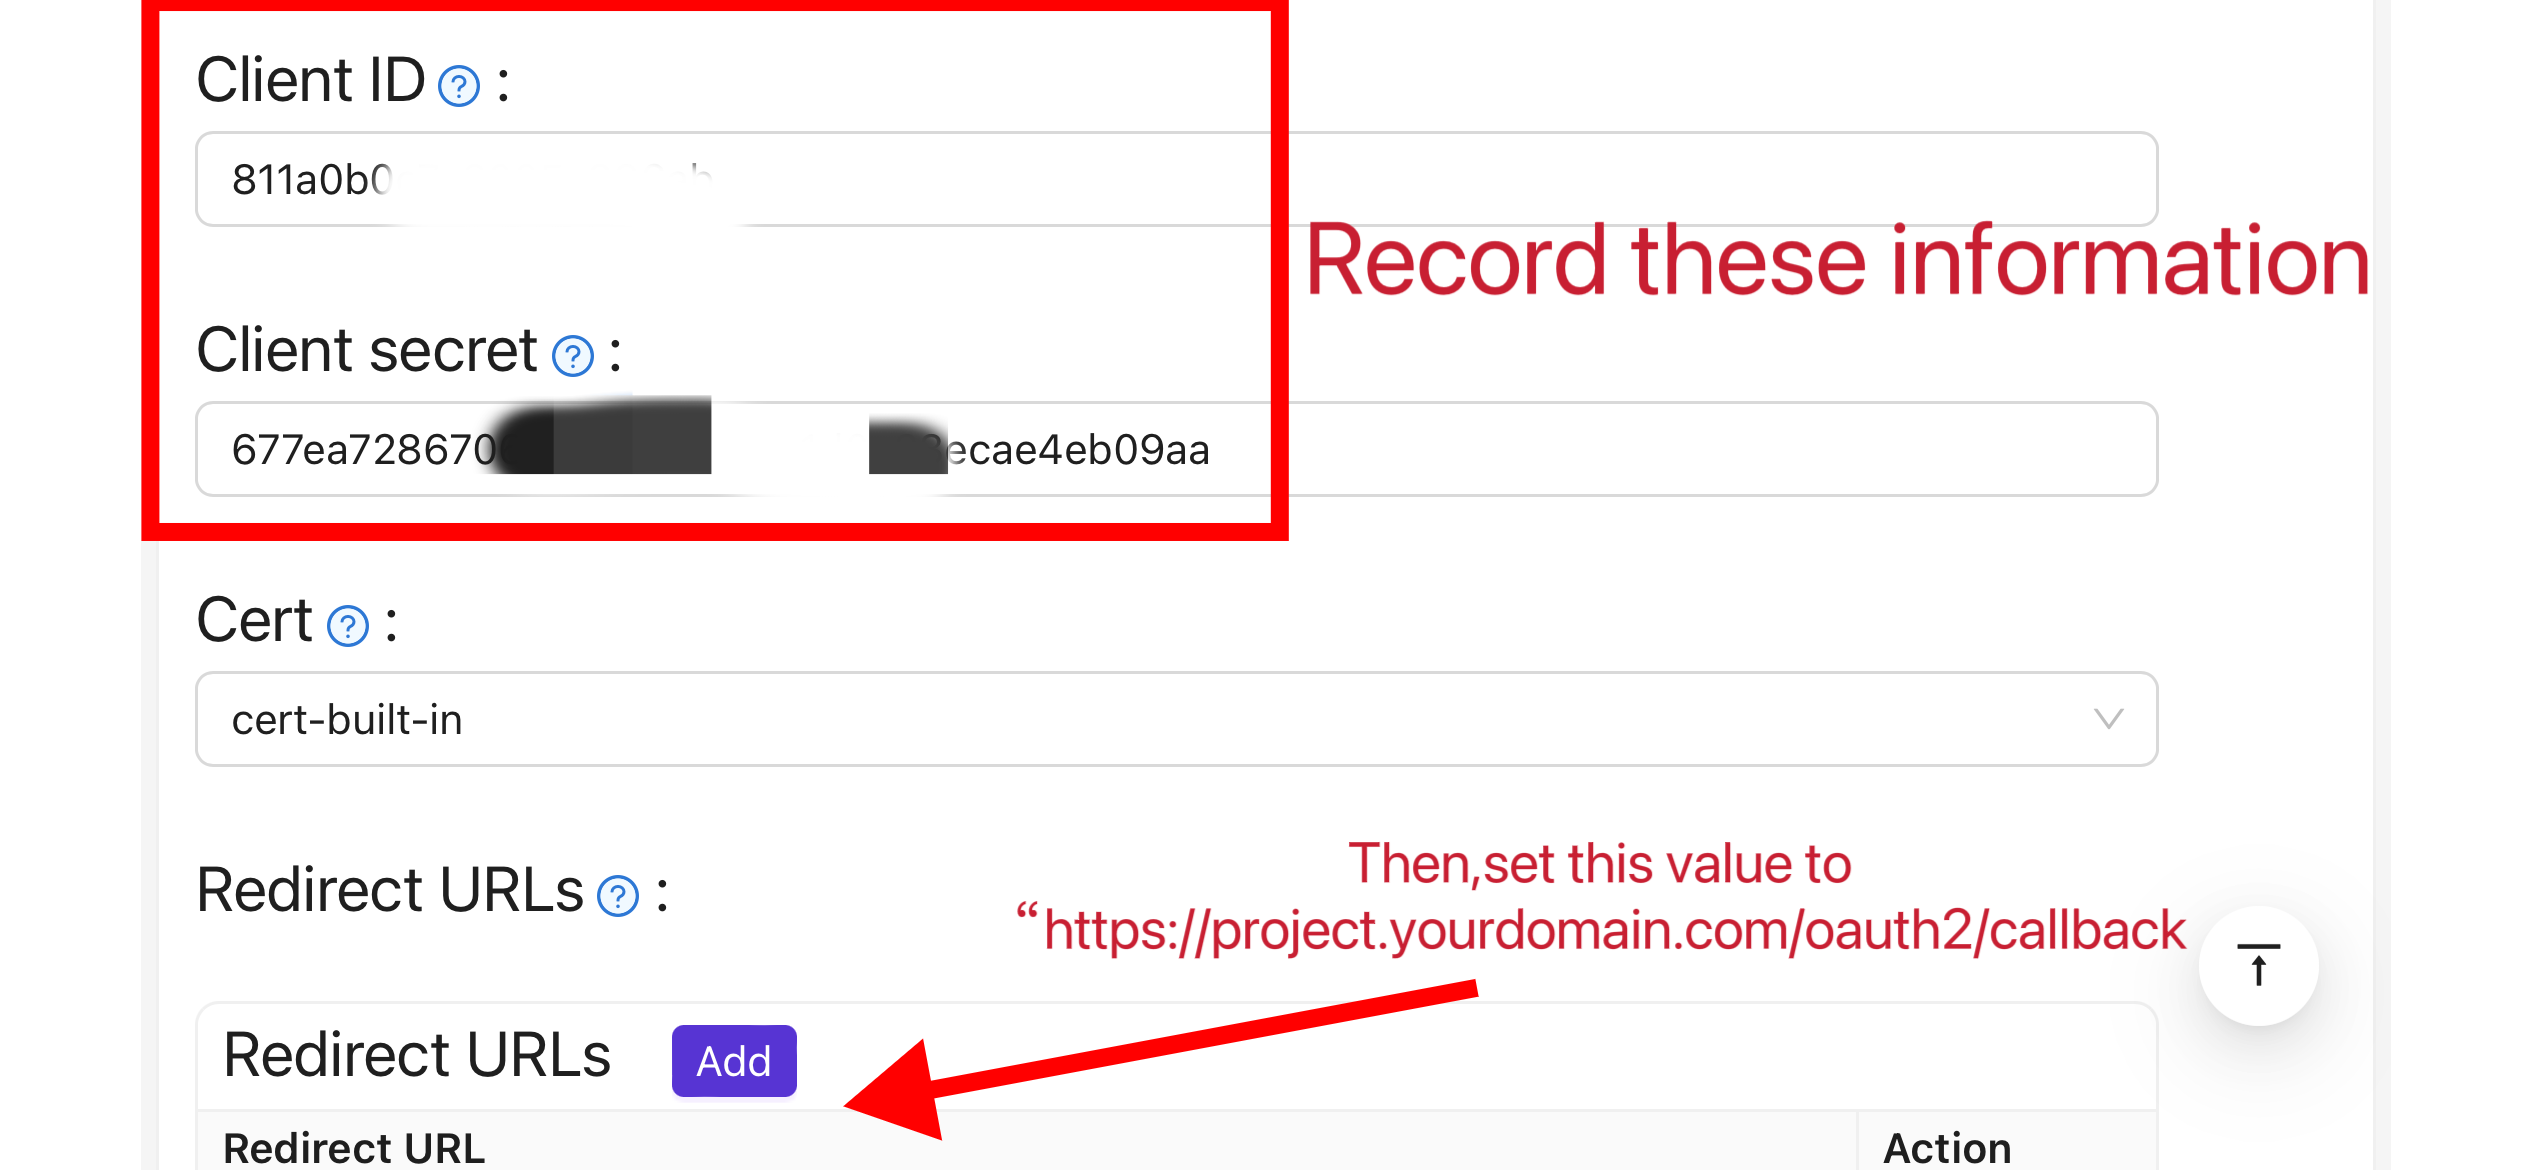
-
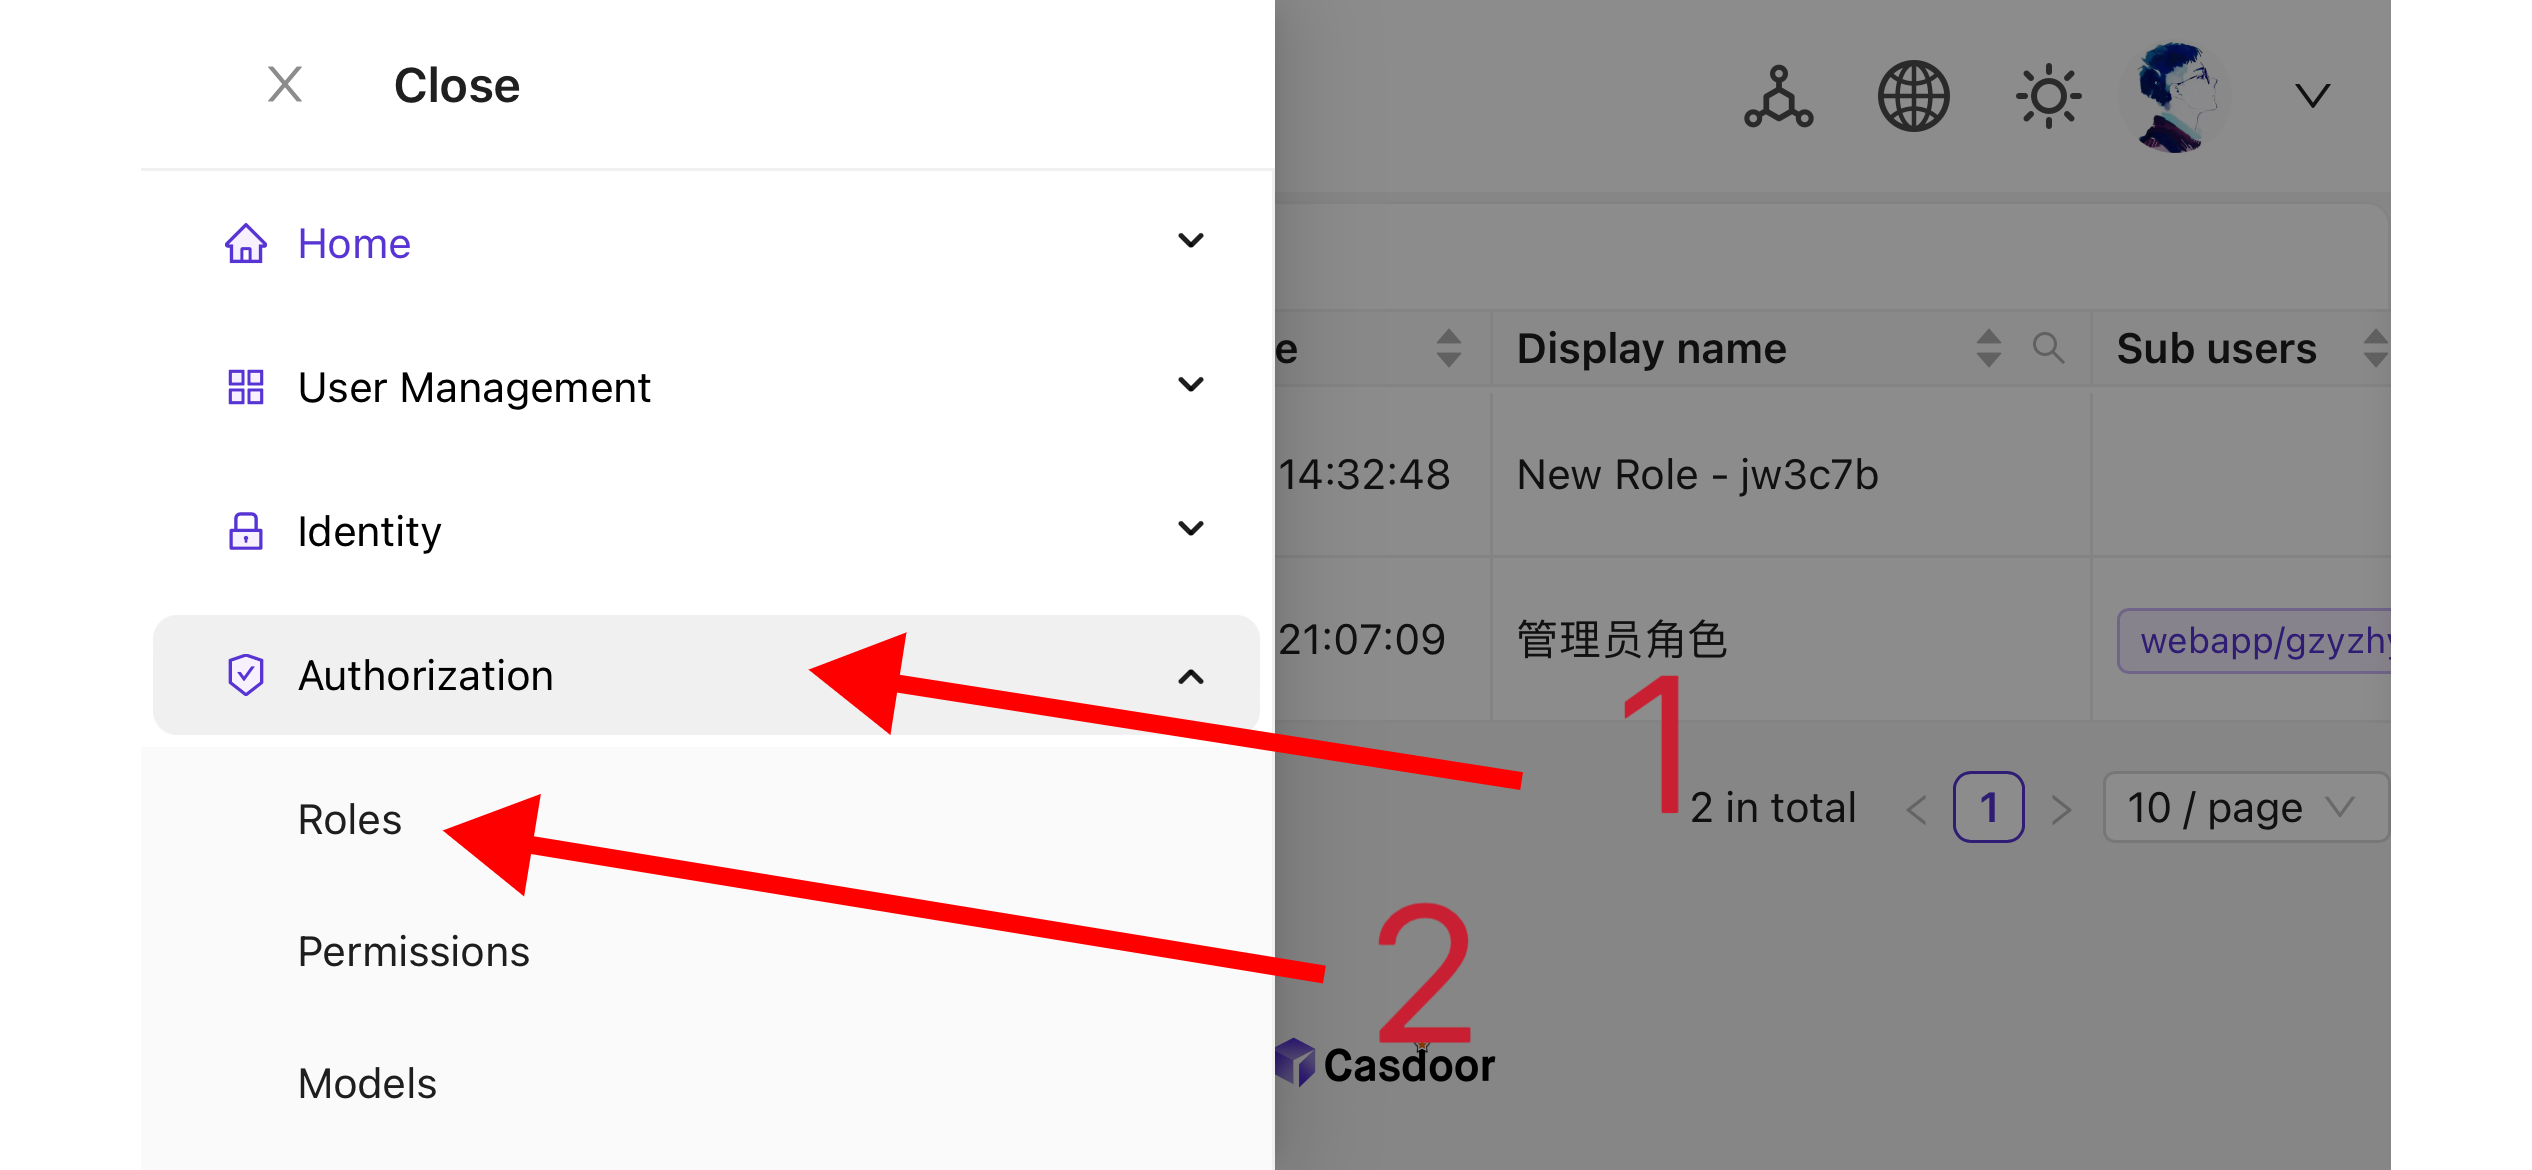
在顶部栏中,选择"Casbin权限管理" > "角色",然后在"角色"页面上点击"添加"。
-
根据您的项目信息完成角色配置。 在本文中,我们使用"nginx_role"作为示例角色名称。
-
(可选)在顶部栏中,选择"用户管理" > "用户",然后根据您的需要添加新用户。 If the users already exist, skip this step. 在本文中,我们创建了一个名为"user"的示例用户。
-
Go back to the "Roles" page mentioned in step 5, edit the
nginx_rolerole, and add the required users to Included Users (e.g. the previously createdbuiltin/user).
II. 配置Oauth2-Proxy
Note: For Vouch instead of OAuth2-Proxy, see vouch-proxy on GitHub.
Note: This guide assumes HTTPS (or HTTP→HTTPS redirect). For HTTP-only deployment, adjust the commands and see OAuth2-Proxy docs.
提示:OAuth2-Proxy提供了各种部署方法(如源代码编译、Docker安装等)。 为了便于解释,本文使用"预构建二进制文件"进行部署。
-
转到GitHub Releases页面,下载与您的操作系统和CPU架构相对应的二进制包。 截至2024年1月1日,OAuth-Proxy的最新发布版本为
V7.5.1。 To download the binary for this version on Linux AMD64, run:wget -O oauth2-proxy-linux.tar.gz https://github.com/oauth2-proxy/oauth2-proxy/releases/download/v7.5.1/oauth2-proxy-v7.5.1.linux-amd64.tar.gz强烈建议您在下载压缩包后检查官方网站在GitHub Releases页面提供的
SHA256SUM值,并与您下载的包的SHA256SUM值逐个字符进行比较。 -
解压下载的包:
tar -zxvf oauth2-proxy-*.tar.gz -
进入解压后的目录:
cd oauth2-proxy-v7.5.1.linux-amd64 -
将获得的二进制文件移动到
/usr/local/bin并配置执行权限。 根据您的情况,您可能需要使用sudo提升权限。cp ./oauth2-proxy /usr/local/bin
cd /usr/local/bin
chmod +x ./oauth2-proxy -
测试二进制安装。 如果安装成功,执行以下命令后,您应该看到类似于
oauth2-proxy v7.5.1 (built with go1.21.1)的输出。cd ~
oauth2-proxy --version -
使用命令行参数运行oauth2-proxy。 标记为[required]的参数必须根据您的具体情况进行配置,而标记为[optional]的参数可以优化性能,但也可以省略。 To run oauth2-proxy in the background, use a process manager such as
Screen,Supervisor, or a terminal multiplexer.oauth2-proxy \
--provider=oidc \ #[required] Do not change
--client-id=abc123456def \ #[required] "Client ID" obtained in step I.4 above
--client-secret=abc123456def \ #[required] "Client Secret" obtained in step I.4 above
--oidc-issuer-url=https://auth.yourdomain.com \ #[required] Your Casdoor URL (domain name or public IP)
--redirect-url=https://project.yourdomain.com/oauth2/callback \ #[required] https://domain-of-the-project-to-protect/oauth2/callback
--scope=email+profile+groups+openid \ #[required] Obtained from Casdoor: user email, user profile, groups, and login authentication
--cookie-domain=project.yourdomain.com \ #[required] Domain name of the project you want to protect
--whitelist-domain=project.yourdomain.com \ #[required] Domain name of the project you want to protect
--cookie-secret=abc123456def \ #[required] Use a random string (letters and numbers)
--email-domain=* \ #[required] List of acceptable user email domains (* means accept all domains). If the user's email suffix is not in this list, a 403 error will be returned even if the login is successful.
--insecure-oidc-allow-unverified-email=true \ #[required] Whether to accept users with unverified email addresses
--http-address=http://127.0.0.1:65534 \ #[required] Address oauth2-proxy listens on; note this for the Nginx config later.
--cookie-expire=24h0m0s \ #[optional] Cookie expiration time. After this period, users will need to log in again.
--custom-sign-in-logo=https://cdn.yourdomain.com/pic/proj.png \ #[optional] Icon displayed on the login page. It is recommended to use a rectangular image rather than a square one.
--session-store-type=redis \ #[optional] Use Redis cache. Omit if not using Redis.
--redis-connection-url=redis://127.0.0.1:6379/0 \ #[optional] Redis URL. Omit if not using Redis.
--redis-password=123456 #[optional] Redis password. Omit if not using Redis or if Redis has no password.
III. 配置Nginx
Note: If building Nginx from source, ensure ngx_http_auth_request_module is enabled (add --with_http_auth_request_module). See the Nginx auth_request module.
提示:使用宝塔面板工具安装的Nginx默认不启用此模块。
-
打开您已经部署并希望保护的网站的配置文件,并进行以下修改:
Note: Adjust the config for your setup; Nginx version and environment may require changes.
server {
    listen 443 ssl http2;

    include /path/to/ssl.conf;

    # 添加以下内容
    location ^~ /oauth2/ {
        proxy_pass       http://127.0.0.1:65534; # 将此更改为步骤II.6中配置的"--http-address"

        proxy_set_header Host                    $host;
        proxy_set_header X-Real-IP               $remote_addr;
        proxy_set_header X-Scheme                $scheme;

        proxy_set_header X-Auth-Request-Redirect $request_uri;
        # 或者,如果你正在处理多个域名:
        # proxy_set_header X-Auth-Request-Redirect $scheme://$host$request_uri;
    }
    location = /oauth2/auth {
        proxy_pass       http://127.0.0.1:65534; # 将此更改为步骤II.6中配置的"--http-address"

        proxy_set_header Host             $host;
        proxy_set_header X-Real-IP        $remote_addr;
        proxy_set_header X-Scheme         $scheme;
        proxy_set_header Content-Length   "";
        proxy_pass_request_body           off;
    }
    location ^~ / {
        auth_request /oauth2/auth;
        error_page 401 = /oauth2/sign_in;

        auth_request_set $user   $upstream_http_x_auth_request_user;
        auth_request_set $email  $upstream_http_x_auth_request_email;
        proxy_set_header X-User  $user; # 将登录的用户的用户名传递给您的后端服务
        proxy_set_header X-Email $email; # 将登录的用户的电子邮件传递给您的后端服务

        auth_request_set $token  $upstream_http_x_auth_request_access_token;
        proxy_set_header X-Access-Token $token; # 将用户的登录令牌传递给您的后端服务

        # 以下配置与用户登录的cookie验证相关
        auth_request_set $auth_cookie $upstream_http_set_cookie;
        add_header Set-Cookie $auth_cookie;

        auth_request_set $auth_cookie_name_upstream_1 $upstream_cookie_auth_cookie_name_1;

        if ($auth_cookie ~* "(; .*)") {
            set $auth_cookie_name_0 $auth_cookie;
            set $auth_cookie_name_1 "auth_cookie_name_1=$auth_cookie_name_upstream_1$1";
        }

        if ($auth_cookie_name_upstream_1) {
            add_header Set-Cookie $auth_cookie_name_0;
            add_header Set-Cookie $auth_cookie_name_1;
        }
        proxy_no_cache $cookie_session;

        # 验证成功后向用户提供网页

        proxy_pass http://127.0.0.1:8080; # 您的后端服务运行的地址
        # 注意:这不是Casdoor部署地址或Oauth2-Proxy运行地址,而是需要登录保护的您的后端服务运行的地址。

        # 然后添加配置以将用户IP,Connection请求头等传递给您的后端服务,例如:
        proxy_set_header X-Forwarded-For $remote_addr;
        proxy_http_version 1.1;
        proxy_set_header Upgrade $http_upgrade;
        proxy_set_header Connection upgrade;
        proxy_set_header Accept-Encoding gzip;
    }
    access_log /path/to/access_log.log;
    error_log /path/to/error_log.log;
} -
保存文件并重新加载您的Nginx。
测试
- Next, test your implementation.
- 在正常情况下,您的用户在登录您的服务时将经历以下过程:
- 在浏览器中打开URL
project.yourdomain.com-> 只看到一个需要登录的页面,包括一个名为"Sign in with OpenID Connect"的按钮 -> 点击按钮并被重定向到您的Casdoor地址,那里将要求他们登录 -> 用户输入他们的用户名和密码,Casdoor验证他们的凭据 -> 自动重定向回您的URLproject.yourdomain.com-> 成功访问您的服务 -> 当您设置的--cookie-expire时间到期时,用户将被要求再次登录。
故障排除
- If it does not run as expected, check your Nginx and OAuth2-Proxy configuration.
- See OAuth2-Proxy documentation.
- To suggest fixes for this doc, open an issue or PR on GitHub.