NginxCommunityVersion
사전 요구 사항
이 가이드는 다음 조건을 갖추고 있다고 가정합니다:
- Casdoor 서비스가 실행 중입니다. 아직 Casdoor 서비스를 설치하지 않았다면, 서버 설치 또는 Docker로 시도해보기를 참조하십시오.
- 컴파일 시에
ngx_http_auth_request_module모듈이 활성화된 Nginx 오픈 소스 에디션.ngx_http_auth_request_module모듈을 어떻게 활성화하는지 모르면, Nginx 모듈 문서를 참조하십시오. - 인증을 활성화하려는 웹사이트가 Nginx에 성공적으로 배포되었으며, 구성된 도메인 이름을 가지고 있습니다(IP 주소를 사용하는 대신), 그리고 정상적으로 접근할 수 있습니다.
- OAuth2-Proxy 도구 (현재, GitHub에서 높은 별을 받은 다음 두 가지 인기 있는 프로젝트 중 하나를 선택해야 합니다):
I. CasDoor 설정
참고: 이 글의 작업은 발행 시점의 Casdoor GUI를 기반으로 하지만, Casdoor GUI는 버전에 따라 변경될 수 있습니다. 이 글에서 제공된 참조를 따라 배포된 Casdoor 버전을 설정하십시오.
참고: 이 글에서 언급된 키, 비밀번호, 사용자 이름 및 기타 기밀 정보는 모두 예시입니다. 보안상의 이유로, 배포할 때 이들을 자신의 관련 내용으로 교체해야 합니다.
Casdoor 관리자 계정에 로그인하십시오.
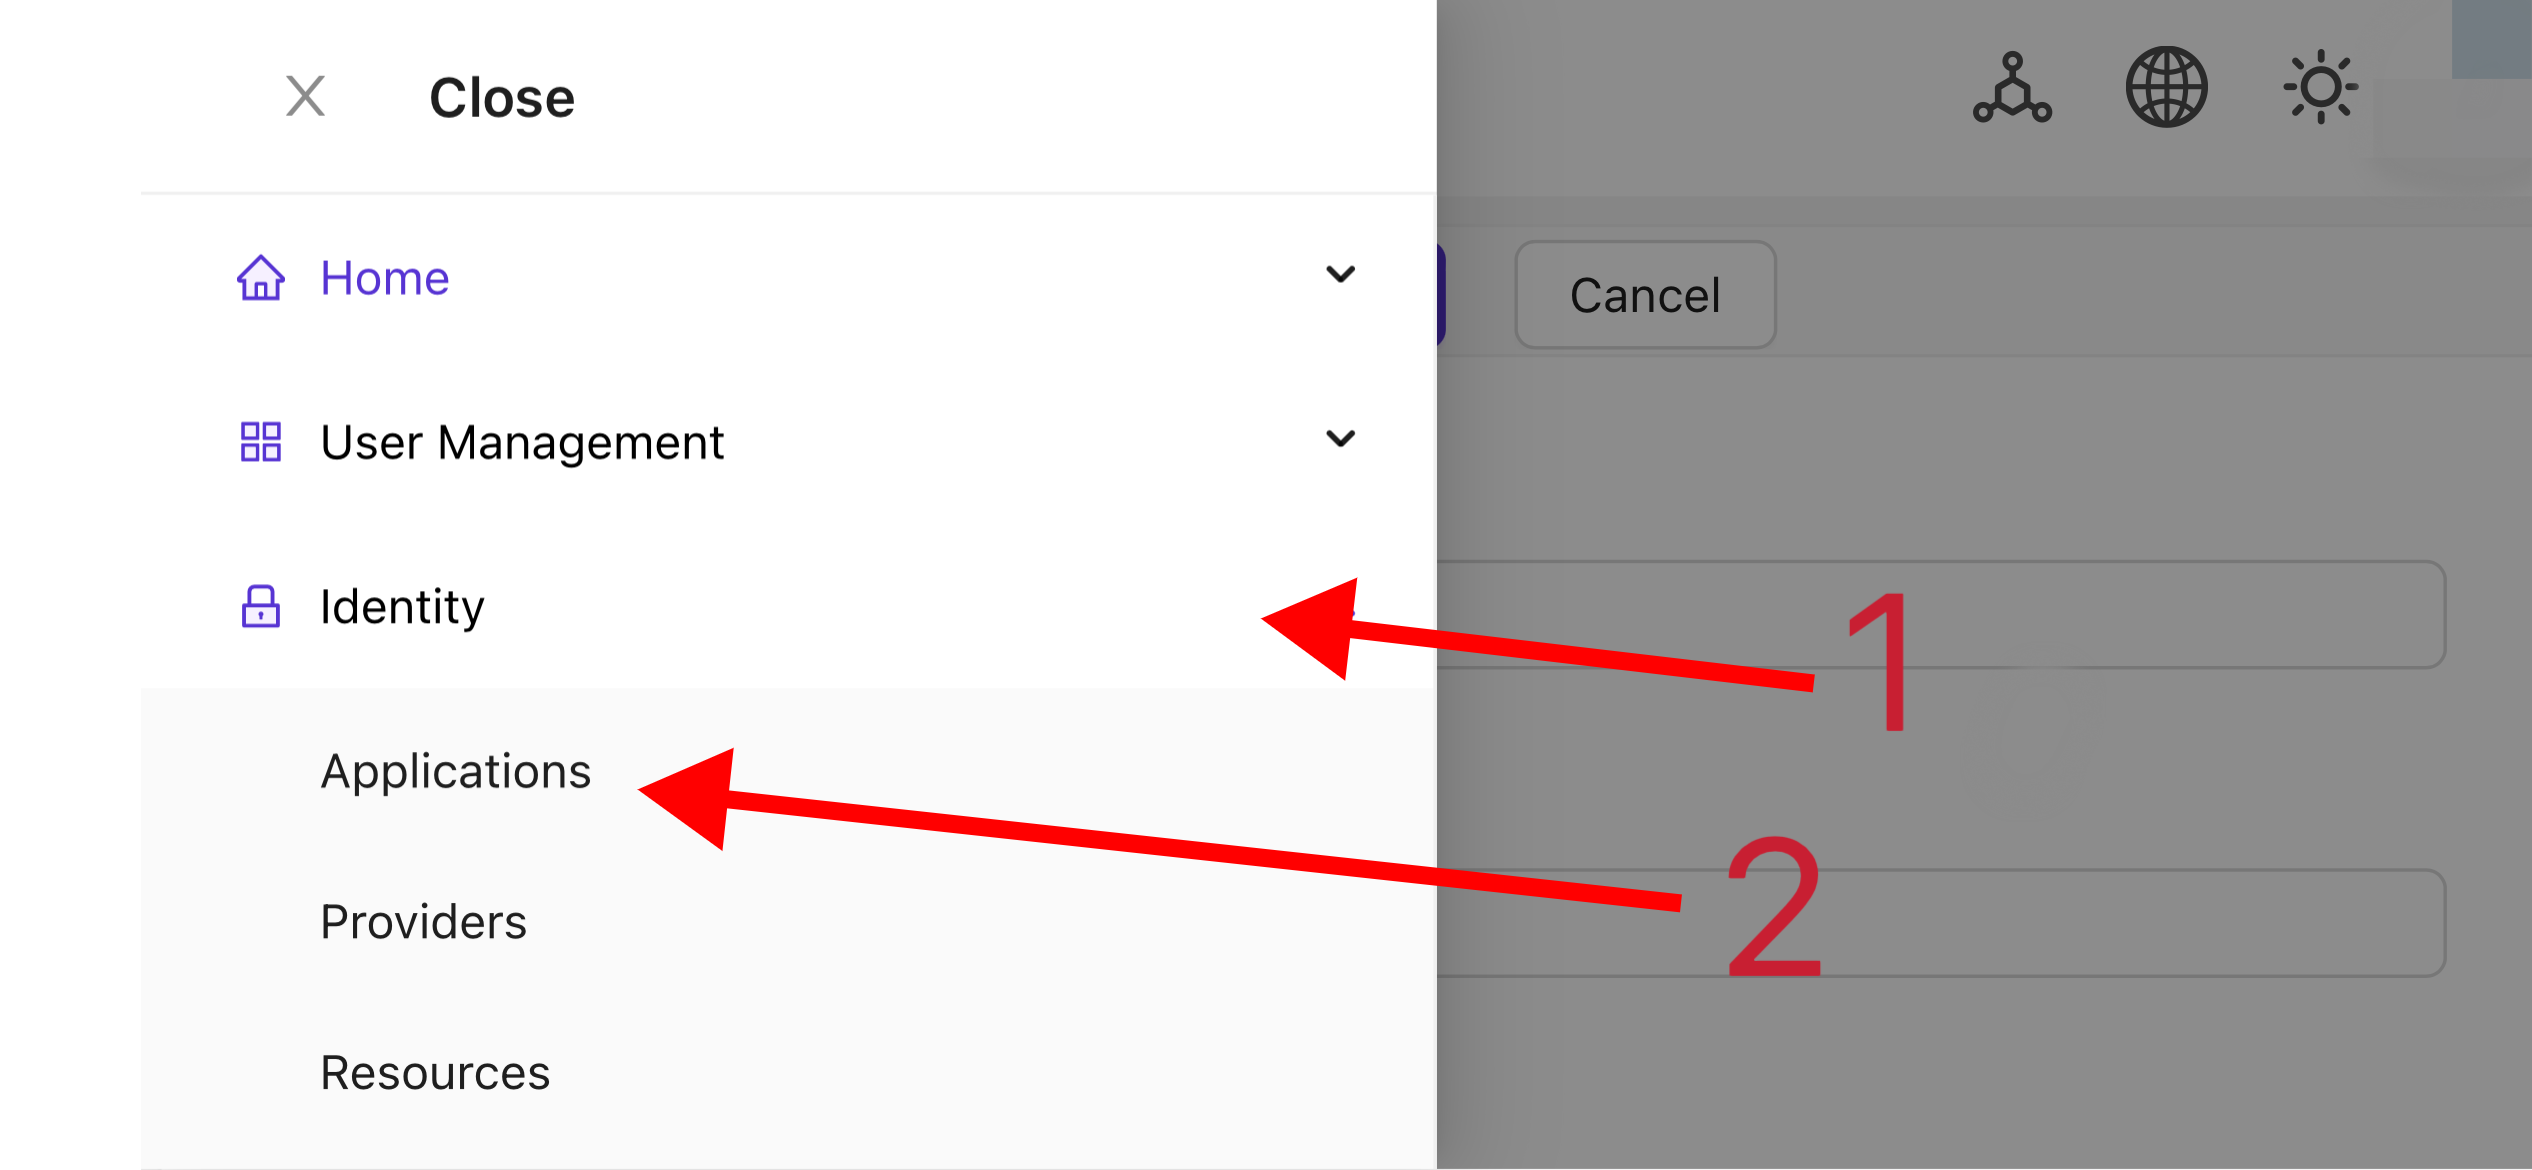
상단 바에서 '신원 인증' > '응용 프로그램'을 선택한 다음 '응용 프로그램' 페이지에서 '추가'를 클릭하십시오.
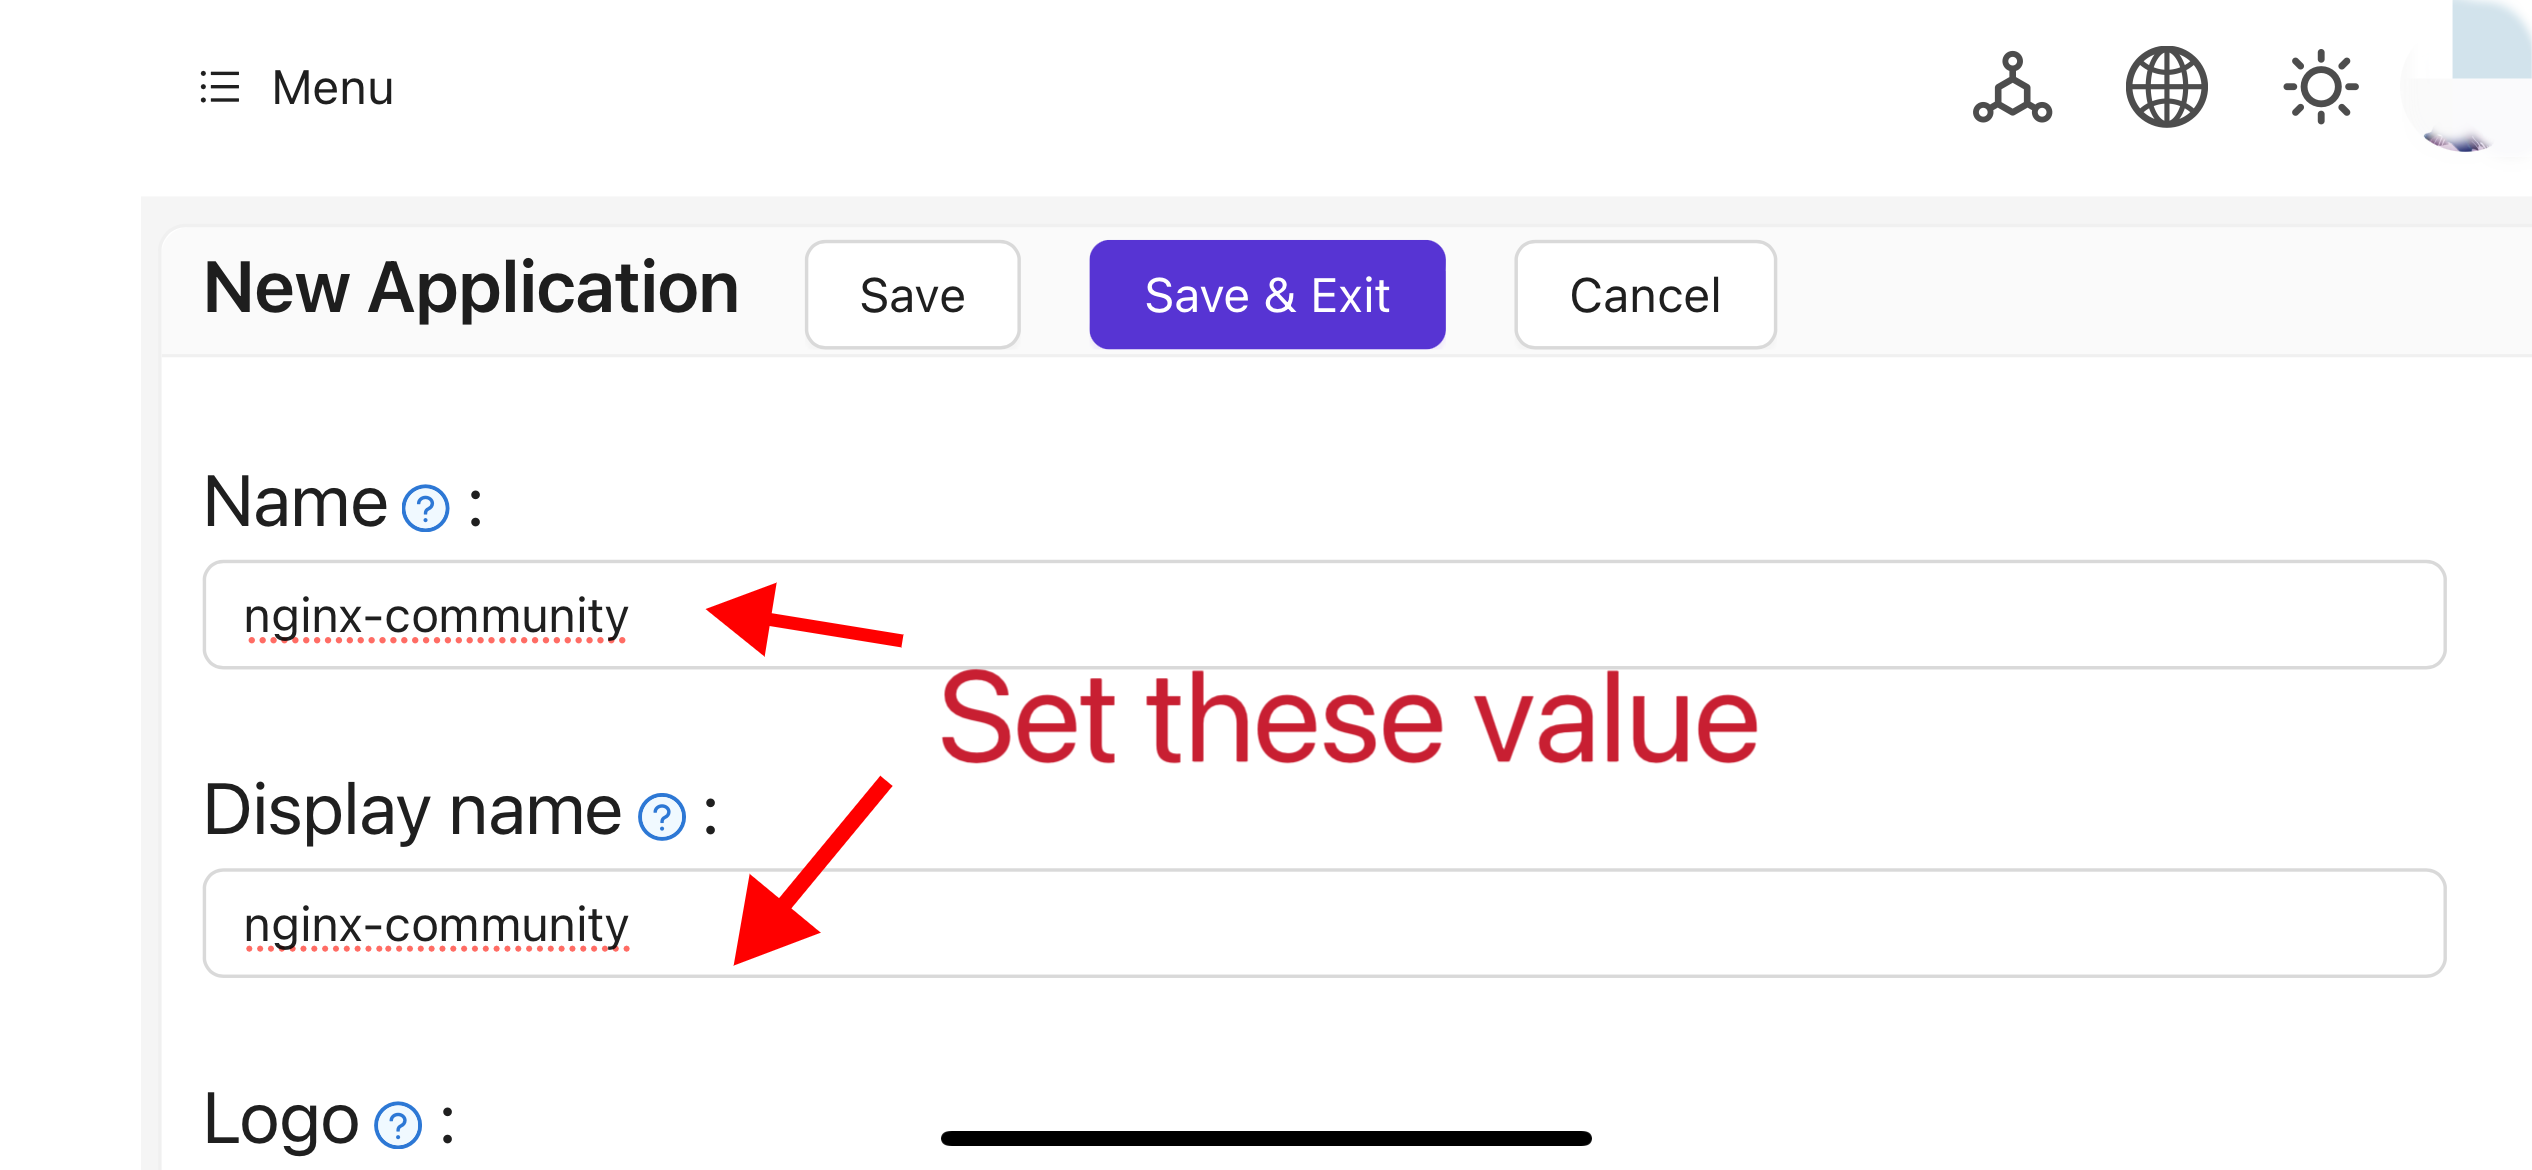
프로젝트 정보를 기반으로 응용 프로그램 구성을 완료하십시오. 이 글에서는 'Nginx-Community'를 예시 응용 프로그램 이름으로 사용합니다.
'Client ID'와 'Client Secret' 필드의 값을 기록하십시오. 이들은 나중에 OAuth2-Proxy를 구성할 때 사용됩니다. 그런 다음 'Redirect URL'을
https://project.yourdomain.com/oauth2/callback/로 설정하십시오.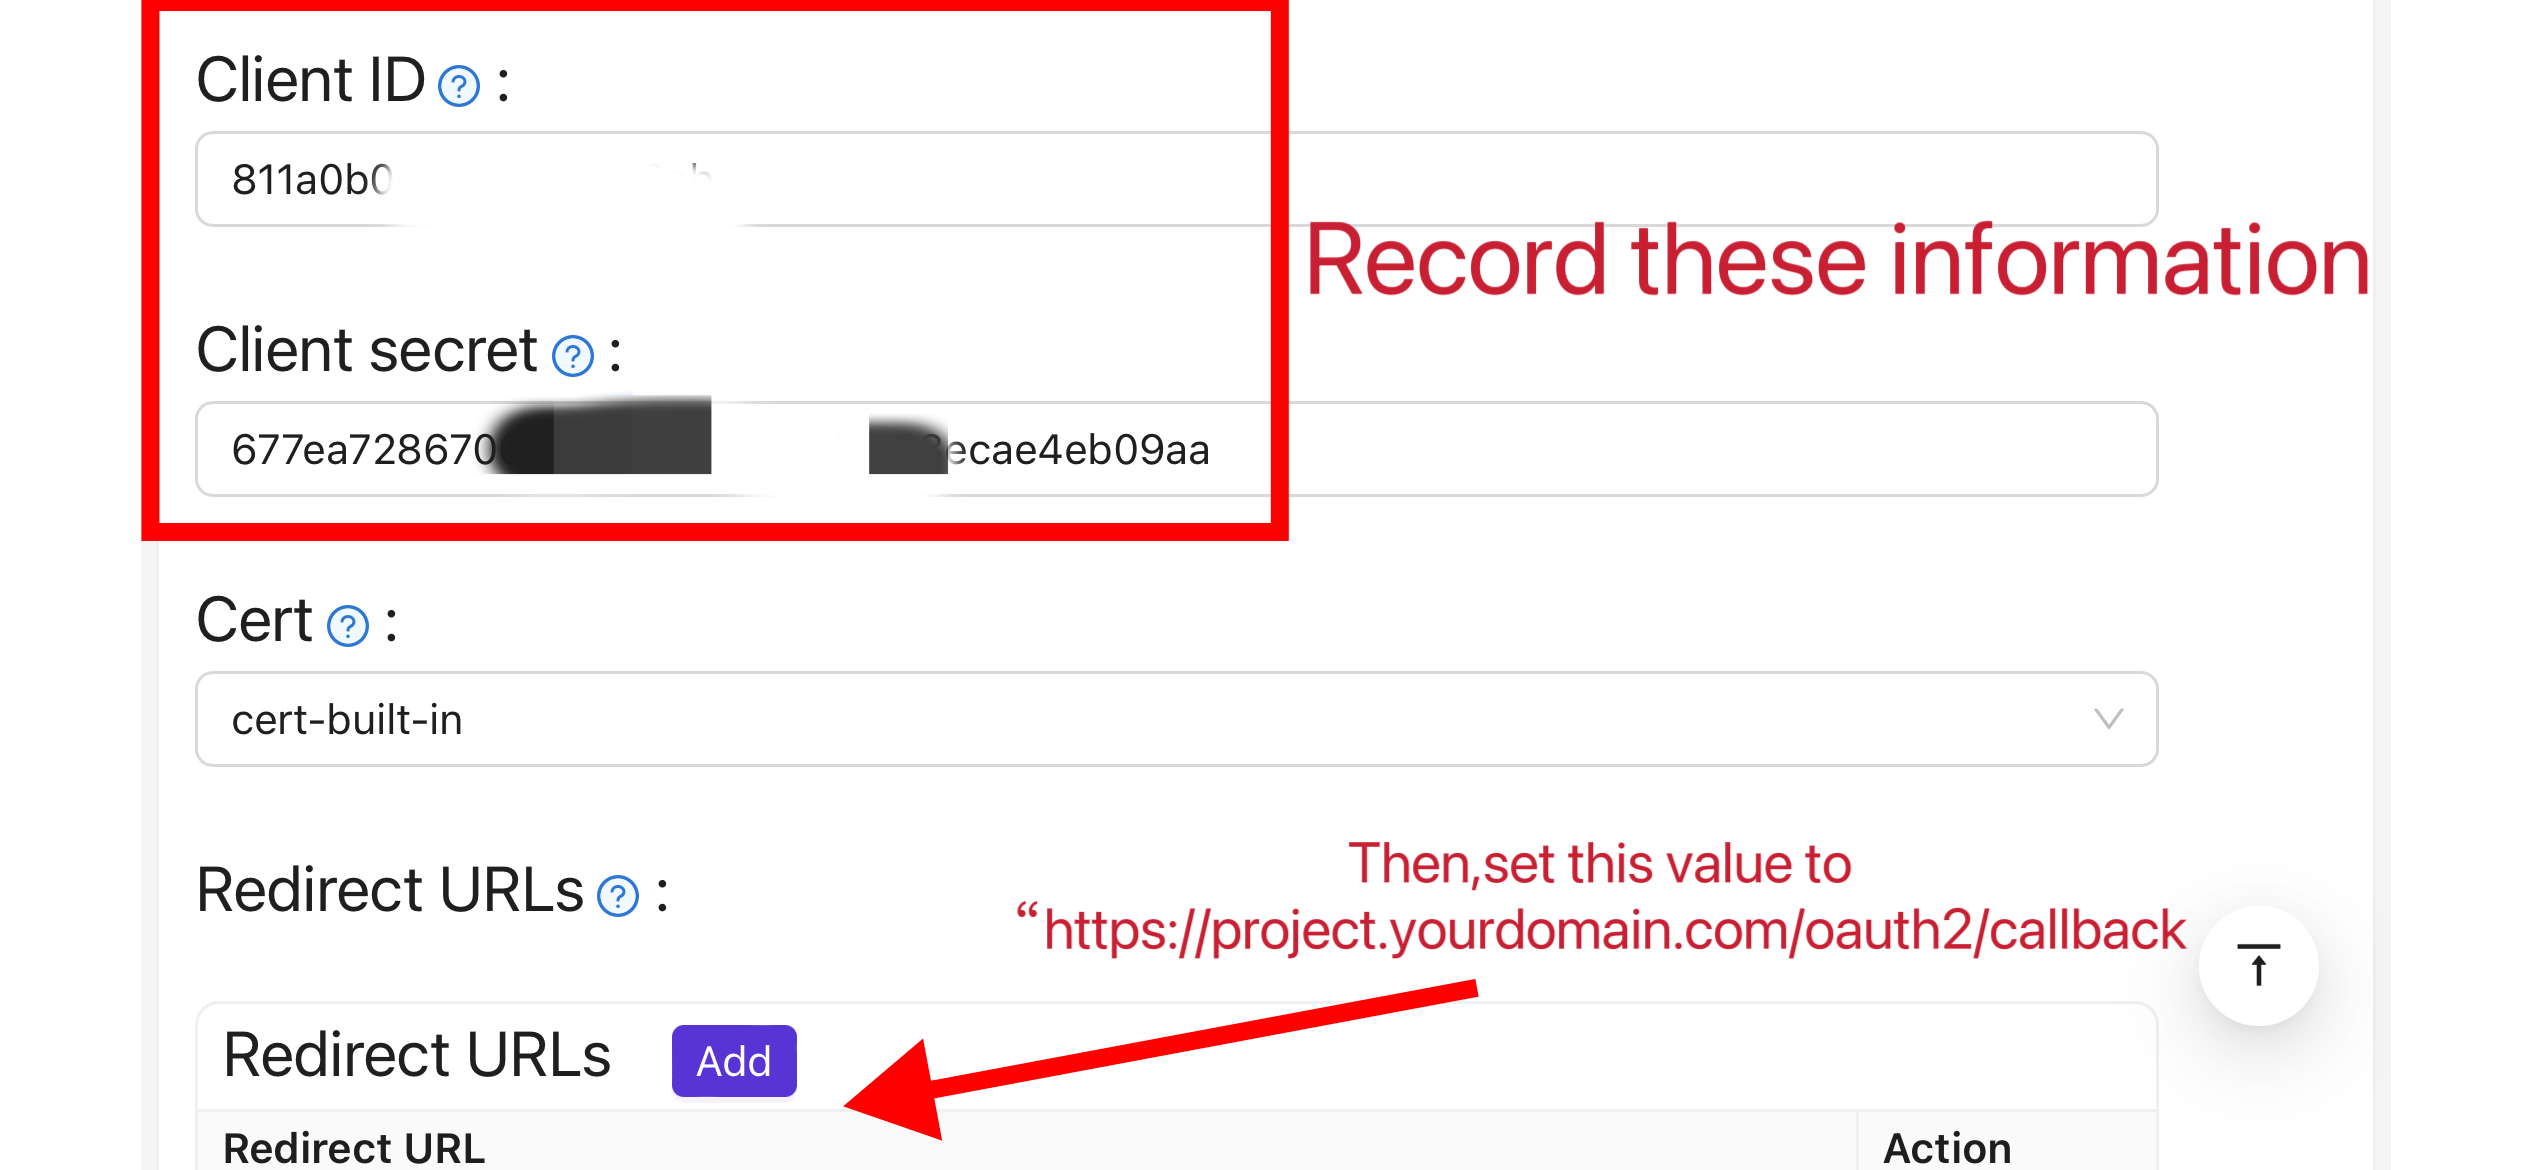
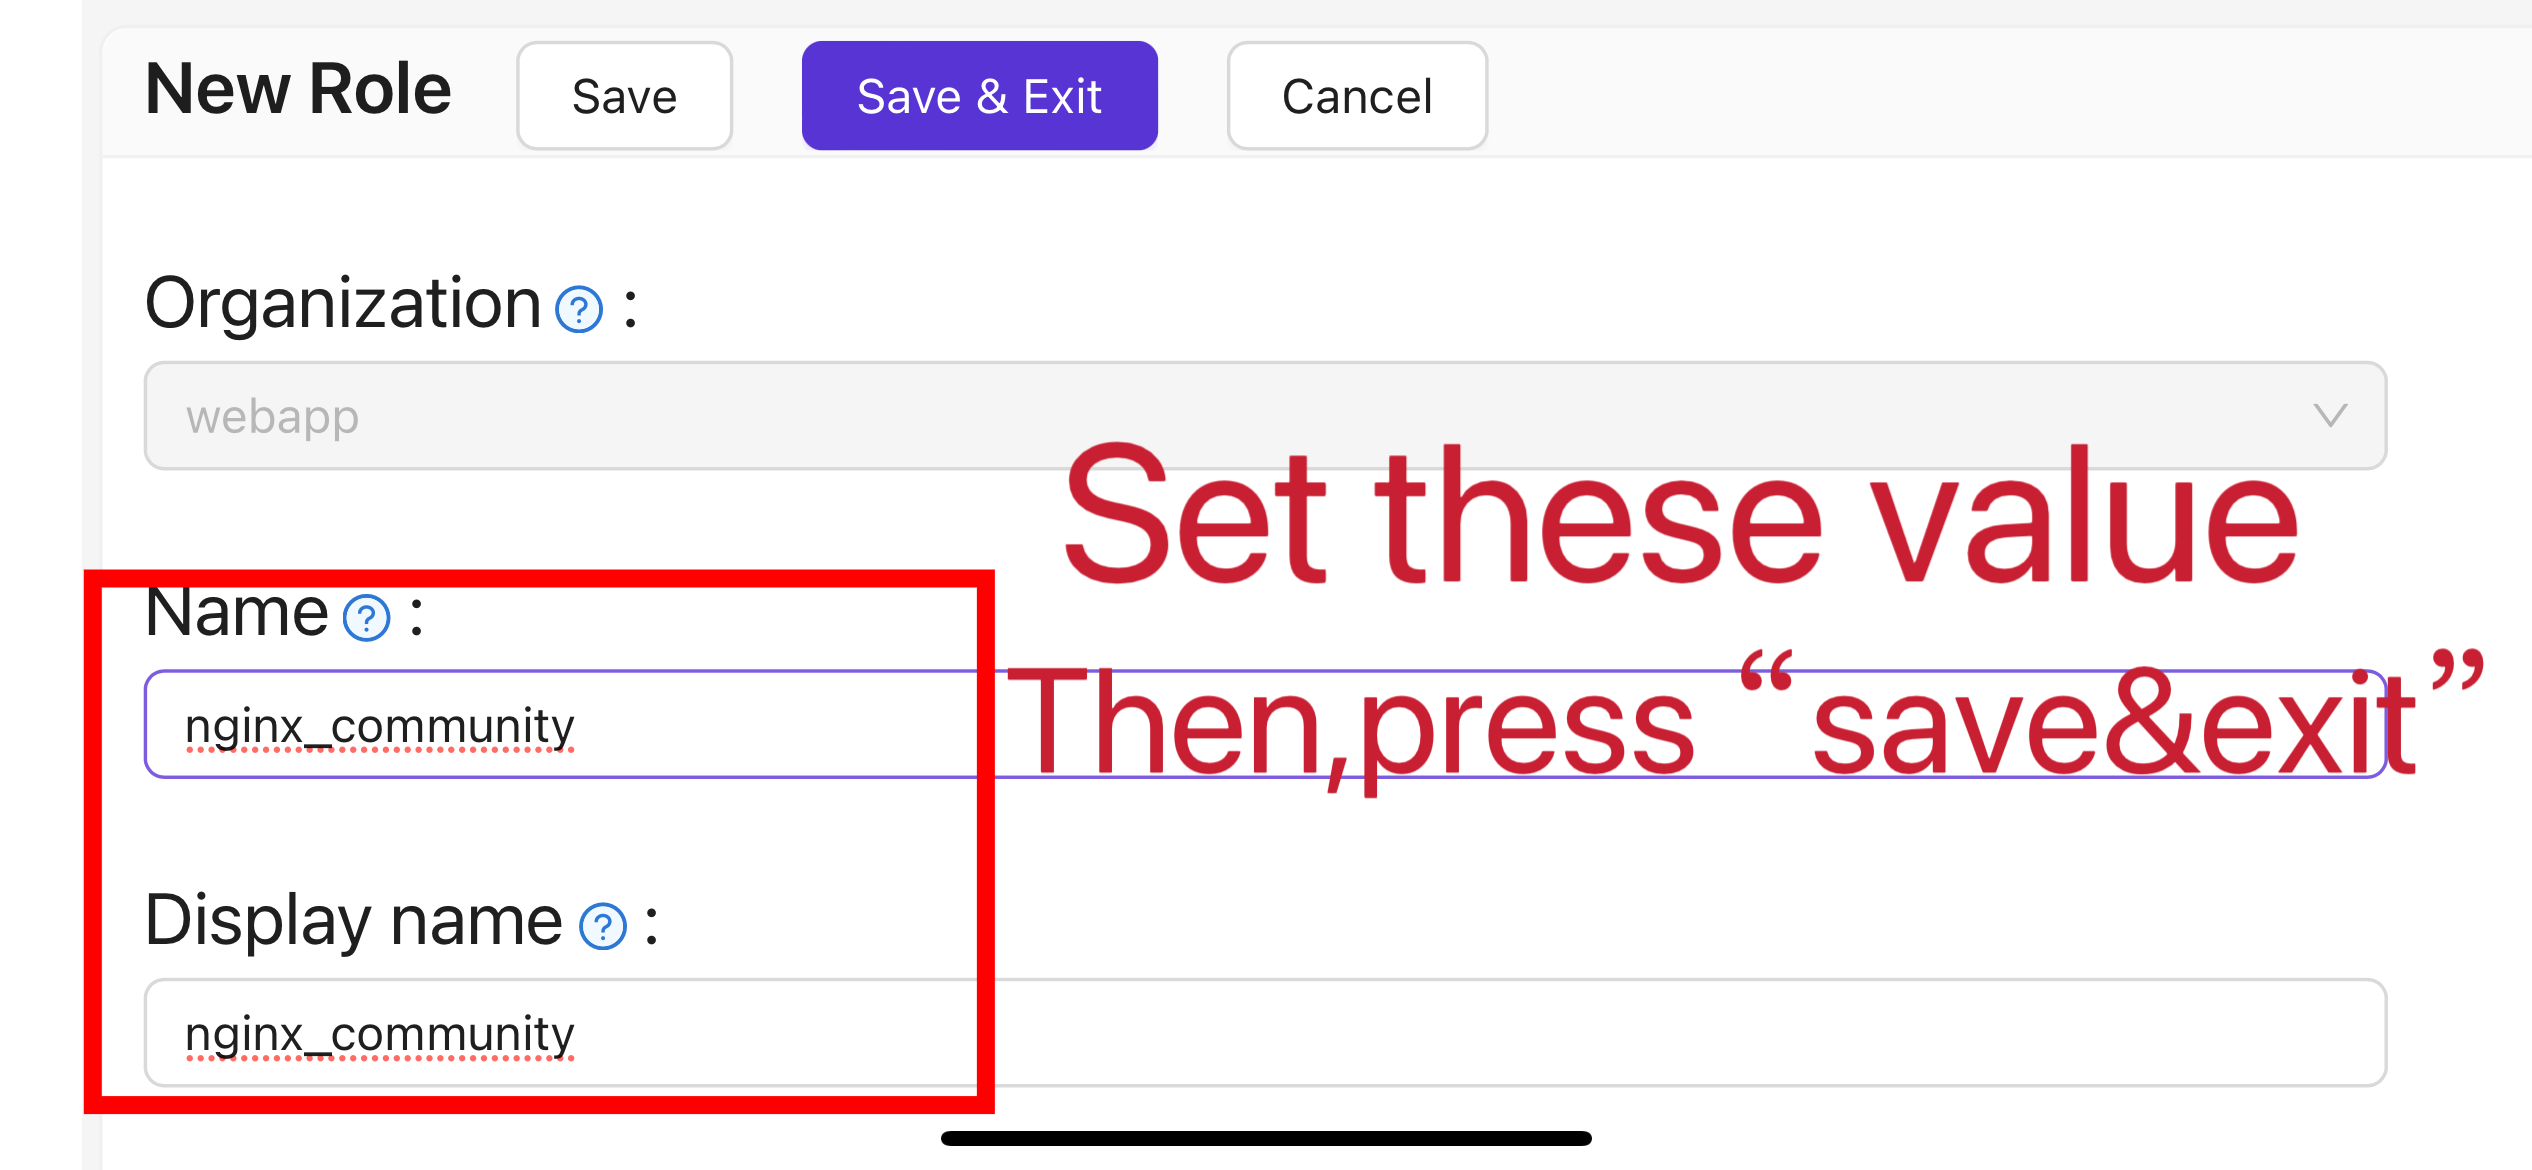
상단 바에서 'Casbin 권한 관리' > '역할'을 선택한 다음 '역할' 페이지에서 '추가'를 클릭하십시오.
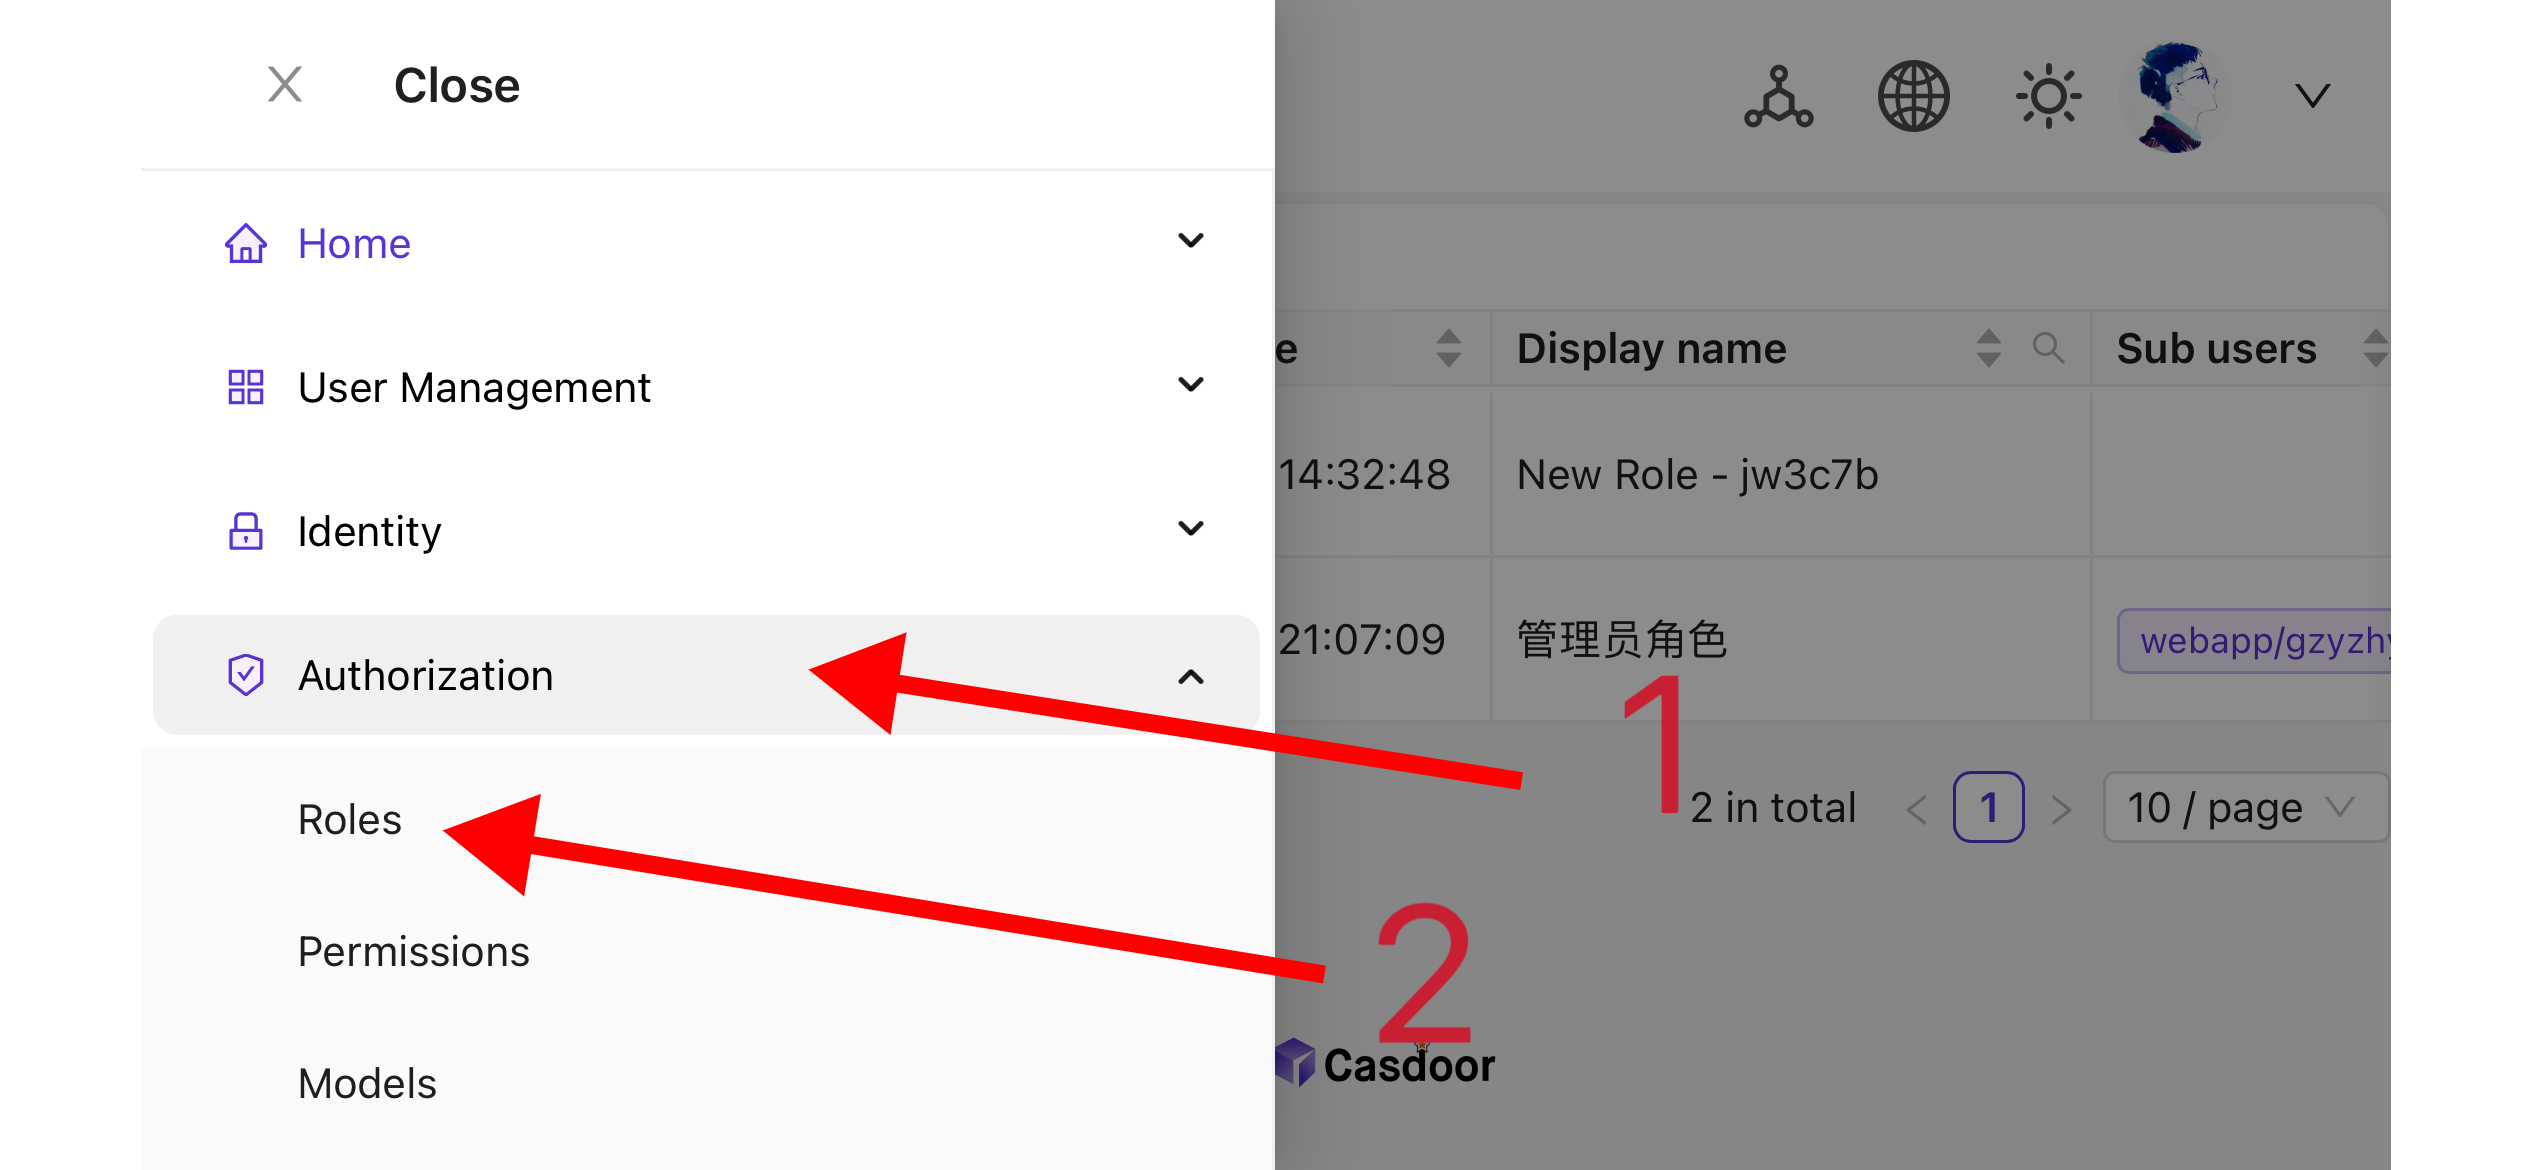
프로젝트 정보에 따라 역할 구성을 완료하십시오. 이 글에서는 예제 역할 이름으로 "nginx_role"을 사용합니다.
(선택 사항) 상단 바에서 "사용자 관리" > "사용자"를 선택하고, 필요에 따라 새 사용자를 추가합니다. 필요한 사용자가 이미 존재하는 경우, 이 단계를 건너뛸 수 있습니다. 이 글에서는 "user"라는 이름의 예제 사용자를 생성합니다.
5단계에서 언급한 "역할" 페이지로 돌아가서
nginx_role역할을 편집하고, 필요한 사용자를 "포함된 사용자" 옵션에 추가합니다. 이 글에서는 이전에 생성한builtin/user를 여기에 추가합니다.
II. Oauth2-Proxy 구성
참고: 이 글은 Oauth2-Proxy 프로젝트를 예로 듭니다. Oauth2-Proxy 대신 Vouch를 사용하려면, GitHub에서 공식 문서를 참조하십시오.
참고: 이 글은 사이트가 신뢰할 수 있는 SSL 인증서로 구성되어 있고 HTTPS 접근만 허용하거나, HTTP 방문자를 HTTPS로 자동 리디렉션 설정했다고 가정합니다. 이는 쿠키의 보호를 최대화하고 로그인 토큰의 악의적인 읽기를 방지하는 데 도움이 됩니다. 사이트가 불안전한 HTTP 프로토콜을 통해 접근해야 하는 경우, 관련 명령을 적절히 수정하십시오. HTTP를 통한 배포에 대한 추가 도움이 필요한 경우, GitHub에서 Oauth2-Proxy의 공식 문서를 참조하십시오.
팁: OAuth2-Proxy는 다양한 배포 방법(예: 소스 코드 컴파일, Docker 설치 등)을 제공합니다. 설명을 쉽게 하기 위해, 이 글에서는 배포를 위해 "미리 빌드된 바이너리"를 사용합니다.
GitHub Releases 페이지로 이동하여 운영 체제와 CPU 아키텍처에 해당하는 바이너리 패키지를 다운로드합니다. 2024년 1월 1일 현재, OAuth-Proxy의 최신 릴리스 버전은
V7.5.1입니다. 이 버전의 바이너리 패키지를 다운로드하려면, AMD64가 있는 Linux에 대해 다음 명령을 실행할 수 있습니다.wget -O oauth2-proxy-linux.tar.gz https://github.com/oauth2-proxy/oauth2-proxy/releases/download/v7.5.1/oauth2-proxy-v7.5.1.linux-amd64.tar.gz압축 패키지를 다운로드한 후 공식 웹사이트에서 제공하는
SHA256SUM값을 GitHub Releases 페이지에서 확인하고, 다운로드한 패키지의SHA256SUM값과 문자 단위로 비교하는 것을 강력히 권장합니다.다운로드한 패키지를 압축 해제합니다:
tar -zxvf oauth2-proxy-*.tar.gz압축 해제된 디렉토리로 이동합니다:
cd oauth2-proxy-v7.5.1.linux-amd64얻은 바이너리 파일을
/usr/local/bin으로 이동하고 실행 권한을 구성합니다. 상황에 따라sudo를 사용하여 권한을 상승시킬 필요가 있을 수 있습니다.cp ./oauth2-proxy /usr/local/bin
cd /usr/local/bin
chmod +x ./oauth2-proxy바이너리 설치를 테스트합니다. 설치가 성공적이라면, 다음 명령을 실행한 후
oauth2-proxy v7.5.1 (built with go1.21.1)과 유사한 출력을 볼 수 있어야 합니다.cd ~
oauth2-proxy --version명령줄 매개변수로 oauth2-proxy를 실행합니다. [필수]로 표시된 매개변수는 특정 상황에 따라 구성해야 하며, [선택]으로 표시된 매개변수는 성능을 최적화할 수 있지만 생략할 수도 있습니다. oauth2-proxy가 백그라운드에서 실행될 수 있도록 하려면
Screen이나Supervisor와 같은 프로세스 모니터링 도구나 터미널 도구를 사용할 수 있습니다.oauth2-proxy \
--provider=oidc \ #[required] Do not change
--client-id=abc123456def \ #[required] "Client ID" obtained in step I.4 above
--client-secret=abc123456def \ #[required] "Client Secret" obtained in step I.4 above
--oidc-issuer-url=https://auth.yourdomain.com \ #[required] Your Casdoor URL (domain name or public IP)
--redirect-url=https://project.yourdomain.com/oauth2/callback \ #[required] https://domain-of-the-project-to-protect/oauth2/callback
--scope=email+profile+groups+openid \ #[required] Obtained from Casdoor: user email, user profile, groups, and login authentication
--cookie-domain=project.yourdomain.com \ #[required] Domain name of the project you want to protect
--whitelist-domain=project.yourdomain.com \ #[required] Domain name of the project you want to protect
--cookie-secret=abc123456def \ #[required] Please generate a random string of numbers and letters and fill it in here
--email-domain=* \ #[required] List of acceptable user email domains (* means accept all domains). If the user's email suffix is not in this list, a 403 error will be returned even if the login is successful.
--insecure-oidc-allow-unverified-email=true \ #[required] Whether to accept users with unverified email addresses
--http-address=http://127.0.0.1:65534 \ #[required] Address that oauth2-proxy listens on. The port number here can be set arbitrarily. Please record the value you set, as it will be needed for configuring Nginx later.
--cookie-expire=24h0m0s \ #[optional] Cookie expiration time. After this period, users will need to log in again.
--custom-sign-in-logo=https://cdn.yourdomain.com/pic/proj.png \ #[optional] Icon displayed on the login page. It is recommended to use a rectangular image rather than a square one.
--session-store-type=redis \ #[optional] Use Redis cache. If you don't need Redis, you can delete this item.
--redis-connection-url=redis://127.0.0.1:6379/0 \ #[optional] Redis URL. If you don't need Redis, you can delete this item.
--redis-password=123456 #[optional] Redis connection password. If you don't need Redis or Redis has no password, you can delete this item.
III. Nginx 구성
참고: 소스 코드에서 컴파일 및 설치할 때 Nginx가 ngx_http_auth_request_module 모듈을 활성화했는지 다시 확인하십시오(컴파일 명령에는 --with_http_auth_request_module가 포함됩니다). ngx_http_auth_request_module 모듈을 어떻게 활성화하는지 모르는 경우, Nginx 모듈 문서를 참조하십시오.
팁: Baota 패널 도구를 사용하여 설치한 Nginx는 기본적으로 이 모듈을 활성화하지 않습니다.
이미 배포하고 보호하려는 웹사이트의 구성 파일을 열고 다음과 같이 수정하십시오:
참고: 이 구성 파일은 특정 상황에 따라 조정해야 합니다. Nginx 버전 및 기타 요인으로 인해 이 구성 파일이 모든 Nginx 인스턴스에서 원활하게 작동하지 않을 수 있습니다. 자신의 Nginx 정보를 기반으로 관련 내용을 조정하십시오.
server {
    listen 443 ssl http2;

    include /path/to/ssl.conf;

    # Add the following content
    location ^~ /oauth2/ {
        proxy_pass       http://127.0.0.1:65534; # Change this to the "--http-address" configured in step II.6

        proxy_set_header Host                    $host;
        proxy_set_header X-Real-IP               $remote_addr;
        proxy_set_header X-Scheme                $scheme;

        proxy_set_header X-Auth-Request-Redirect $request_uri;
        # or, if you are handling multiple domains:
        # proxy_set_header X-Auth-Request-Redirect $scheme://$host$request_uri;
    }
    location = /oauth2/auth {
        proxy_pass       http://127.0.0.1:65534; # Change this to the "--http-address" configured in step II.6

        proxy_set_header Host             $host;
        proxy_set_header X-Real-IP        $remote_addr;
        proxy_set_header X-Scheme         $scheme;
        proxy_set_header Content-Length   "";
        proxy_pass_request_body           off;
    }
    location ^~ / {
        auth_request /oauth2/auth;
        error_page 401 = /oauth2/sign_in;

        auth_request_set $user   $upstream_http_x_auth_request_user;
        auth_request_set $email  $upstream_http_x_auth_request_email;
        proxy_set_header X-User  $user; # Pass the username of the user logged in to your backend service
        proxy_set_header X-Email $email; # Pass the email of the user logged in to your backend service

        auth_request_set $token  $upstream_http_x_auth_request_access_token;
        proxy_set_header X-Access-Token $token; # Pass the user's login token to your backend service

        # The following configurations are related to cookie validation for user login
        auth_request_set $auth_cookie $upstream_http_set_cookie;
        add_header Set-Cookie $auth_cookie;

        auth_request_set $auth_cookie_name_upstream_1 $upstream_cookie_auth_cookie_name_1;

        if ($auth_cookie ~* "(; .*)") {
            set $auth_cookie_name_0 $auth_cookie;
            set $auth_cookie_name_1 "auth_cookie_name_1=$auth_cookie_name_upstream_1$1";
        }

        if ($auth_cookie_name_upstream_1) {
            add_header Set-Cookie $auth_cookie_name_0;
            add_header Set-Cookie $auth_cookie_name_1;
        }
        proxy_no_cache $cookie_session;

        # Provide the web page to the user after successful validation

        proxy_pass http://127.0.0.1:8080; # The address where your backend service runs
        # Note: This is not the Casdoor deployment address or the Oauth2-Proxy running address, but the address where your backend service that needs login protection runs.

        # Then add configurations to pass user IP, Connection request headers, etc., to your backend service, for example:
        proxy_set_header X-Forwarded-For $remote_addr;
        proxy_http_version 1.1;
        proxy_set_header Upgrade $http_upgrade;
        proxy_set_header Connection upgrade;
        proxy_set_header Accept-Encoding gzip;
    }
    access_log /path/to/access_log.log;
    error_log /path/to/error_log.log;
}
파일을 저장하고 Nginx를 다시 로드하십시오.
테스트
- 다음으로, 구현을 테스트할 수 있습니다.
- 정상적인 상황에서 사용자는 서비스에 로그인할 때 다음과 같은 과정을 거칩니다:
- 브라우저에서 URL
project.yourdomain.com을 열기 -> 로그인을 요구하는 페이지만 보이며, 'OpenID Connect로 로그인'이라는 버튼이 포함됨 -> 버튼을 클릭하고 Casdoor 주소로 리디렉션되며, 여기서 로그인하라는 요청이 표시됨 -> 사용자는 사용자 이름과 비밀번호를 입력하고, Casdoor는 자격 증명을 검증함 -> 자동으로 URLproject.yourdomain.com으로 다시 리디렉션됨 -> 서비스에 성공적으로 접속함 -> 설정한--cookie-expire시간이 만료되면 사용자에게 다시 로그인하라는 요청이 표시됩니다.
문제 해결
- 프로젝트가 예상대로 실행되지 않는 경우, Nginx 구성 및 Oauth2-Proxy 구성 매개변수의 정확성을 확인하십시오.
- Oauth2-Proxy의 공식 문서를 GitHub에서 참조할 수도 있습니다.
- 이 문서에 오류를 발견한 경우, GitHub에서 수정 요청을 자유롭게 제출하십시오.