Overview
Casdoor is a UI-first Identity Access Management (IAM) / Single-Sign-On (SSO) platform with a web UI that supports OAuth 2.0, OIDC, SAML, CAS, LDAP, SCIM, WebAuthn, TOTP, MFA, RADIUS, Google Workspace, Active Directory, and Kerberos.
Casdoor serves both the web UI and the login requests from application users.
Casdoor features
-
Casdoor follows a frontend-backend separation architecture and is developed in Golang. It supports high concurrency, provides a web-based UI for management, and supports localization in over 10 languages.
-
Casdoor supports third-party application login options, such as GitHub, Google, QQ, and WeChat, and supports extending third-party login capabilities with plugins.
-
Casdoor supports authorization management based on Casbin. It supports ACL, RBAC, ABAC, and RESTful access control models.
-
Casdoor provides phone verification codes, email verification codes, and password retrieval functionality.
-
Casdoor supports auditing and recording of access logs.
-
Casdoor integrates with Alibaba Cloud, Tencent Cloud, and Qiniu Cloud for image CDN and cloud storage.
-
Casdoor allows customization of registration, login, and password retrieval pages.
-
Casdoor supports integration with existing systems through database synchronization, enabling a smooth transition to Casdoor.
-
Casdoor supports mainstream databases such as MySQL, PostgreSQL, and SQL Server, and supports extending to new databases with plugins.
How it works

Step 0 (Pre-knowledge)
- Casdoor uses OAuth 2.0 for authorization. For a short intro to OAuth 2.0, see An introduction to OAuth 2.
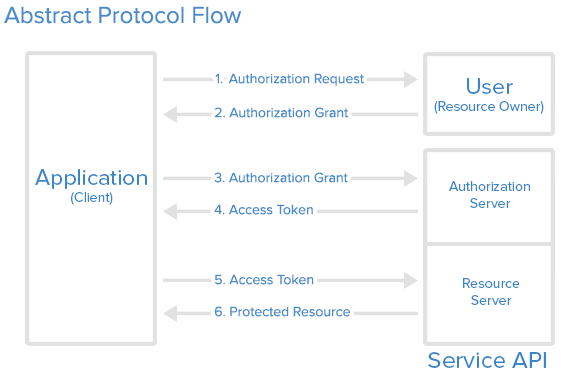
Step 1 (Authorization Request)
Your Application (which could be a website or any other application) should compose a URL in the following format: endpoint/login/oauth/authorize?client_id=xxx&response_type=code&redirect_uri=xxx&scope=read&state=xxx. Replace endpoint with your Casdoor host URL and xxx with your own information.
How to fill out the xxx parts?
- client_id: From the Application settings in Casdoor.
- redirect_uri: Your application’s callback URL; Casdoor redirects here after authorization.
- state: Your application name (or any value you use to correlate the request).
The Application will prompt the user: "Hey, I need some resources and I need your permission to access these resources. Can you go to this URL and enter your username and password for me?"
With the correctly composed URL, your Application will make the user launch a request to this URL, and the Authorization Request is completed.
Step 2 (Authorization Grant)
This step is straightforward: the user is redirected to the URL composed in Step 1, and the user will see the login page from Casdoor. By entering the correct username and credentials into the login page, Casdoor now knows the identity of the user and is about to send two pieces of information back to the callback URL set in Step 1: code and state.
The user opens the URL and provides credentials to Casdoor. Casdoor will say: "Looking good ~ this is the user (who is authorizing the Application to receive the code and state) I know in my database, and I will send the code and state back to the Application using the callback URL (redirect_uri)".
With these two pieces of information sent back to your Application, the authorization is granted to the app, and the Authorization Grant is completed.
Casdoor also provides third-party logins. In this case, instead of seeing the credential entry page, you will see a list of third-party providers. You can log in to your app using these providers, with Casdoor acting as middleware.
Step 3 (Authorization Grant)
In this step, your Application already has the code from Step 2, and it will speak to Casdoor: "Hey, the user agreed to give me the code. Can you verify this code and give me the access_token?"
Step 4 (Access Token)
Casdoor responds to your Application: "You know what, this code seems legit. You must be the authorized Application. Here's the access_token for you." With this code, Casdoor confirms that it is an authorized Application (authorized by the correct user in Step 2) trying to obtain the access_token (which will be used later to access more resources).
Step 5 (Access Token)
In this step, your Application says: "Nice! I just got the fresh access_token. Now I can use it to access something more valuable from the Resource Server!"
Your Application then turns to the Resource Server and says: "Hey buddy, can you check out this access_token? I received it from Casdoor. Do you want to verify if this is the correct token you issued to Casdoor?"
Step 6 (Protected Resource)
The Resource Server responds to your Application: "Not bad. It seems just like the one I issued to Casdoor, and Casdoor says whoever holds this access_token can access these Protected Resources. So go ahead and take it!"
And that's basically how Casdoor works with your Application.
Casdoor can act as both an Authorization Server and a Resource Server. In other words, Casdoor authorizes your Application to access resources, usually the currently logged-in user's information, from Casdoor's database.
Online demo
Casdoor
Here is an online demo deployed by Casbin.
Global admin login:
- Username:
admin - Password:
123
Casbin-OA
Casbin-OA is one of the Casbin web apps. It uses Casdoor for authentication.
- Casbin-OA
- Source code:
https://github.com/casbin/casbin-oa
Casnode
Casnode is the official forum developed by the Casbin community.
It uses Casdoor as the authentication platform and manages members.
- Casnode
- Source code:
https://github.com/casbin/casnode
Architecture
Casdoor consists of two parts:
| Name | Description | Language | Source code |
|---|---|---|---|
| Frontend | Web frontend UI for Casdoor | JavaScript + React | https://github.com/casdoor/casdoor/tree/master/web |
| Backend | RESTful API backend for Casdoor | Golang + Beego + SQL | https://github.com/casdoor/casdoor |