Spring Security OAuth
Casdoor peut utiliser le protocole OIDC comme IDP pour connecter diverses applications. Dans ce guide, nous utiliserons Spring Security comme exemple pour vous montrer comment utiliser OIDC pour vous connecter à vos applications.
Étape 1 : Déployer Casdoor
Deploy Casdoor. See Server installation. Ensure the server is running and you can open the login page and sign in (e.g. admin / 123).
Étape 2. Configurer l'application Casdoor
- Créez une nouvelle application Casdoor ou utilisez-en une existante.
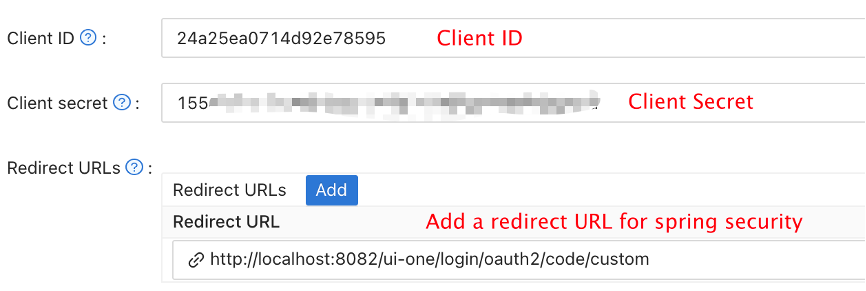
- Ajoutez votre URL de redirection (Vous pouvez trouver plus de détails sur la façon d'obtenir l'URL de redirection dans la section suivante).
- Ajoutez le fournisseur souhaité et remplissez tous les paramètres supplémentaires.
Note Client ID and Client secret from the application page for the next step. OIDC discovery: http://<CASDOOR_HOSTNAME>/.well-known/openid-configuration.
Étape 3. Configurer Spring Security
Spring Security prend en charge nativement OIDC.
Vous pouvez personnaliser les paramètres du client Spring Security OAuth2 :
Replace the placeholders with your own Casdoor instance (Client ID, Client secret, etc.).
- application.yml
- application.properties
spring:
  security:
    oauth2:
      client:
        registration:
          casdoor:
            client-id: <Client ID>
            client-secret: <Client Secret>
            scope: <Scope>
            authorization-grant-type: authorization_code
            redirect-uri: <Redirect URL>
        provider:
          casdoor:
            authorization-uri: http://CASDOOR_HOSTNAME:7001/login/oauth/authorize
            token-uri: http://CASDOOR_HOSTNAME:8000/api/login/oauth/access_token
            user-info-uri: http://CASDOOR_HOSTNAME:8000/api/get-account
            user-name-attribute: name
spring.security.oauth2.client.registration.casdoor.client-id=<Client ID>
spring.security.oauth2.client.registration.casdoor.client-secret=<Client Secret>
spring.security.oauth2.client.registration.casdoor.scope=<Scope>
spring.security.oauth2.client.registration.casdoor.authorization-grant-type=authorization_code
spring.security.oauth2.client.registration.casdoor.redirect-uri=<Redirect URL>

spring.security.oauth2.client.provider.casdoor.authorization-uri=http://CASDOOR_HOSTNAME:7001/login/oauth/authorize
spring.security.oauth2.client.provider.casdoor.token-uri=http://CASDOOR_HOSTNAME:8000/api/login/oauth/access_token
spring.security.oauth2.client.provider.casdoor.user-info-uri=http://CASDOOR_HOSTNAME:8000/api/get-account
spring.security.oauth2.client.provider.casdoor.user-name-attribute=name
Pour la situation par défaut de Spring Security, l'<Redirect URL> devrait ressembler à http://<Your Spring Boot Application Endpoint>/<Servlet Prefix if it is configured>/login/oauth2/code/custom. Par exemple, dans la démo suivante, l'URL de redirection devrait être http://localhost:8080/login/oauth2/code/custom.
Vous devriez également configurer cela dans l'application casdoor.
Vous pouvez également personnaliser les paramètres en utilisant ClientRegistration dans votre code. Vous pouvez trouver la correspondance ici
Étape 4 : Commencez avec une démo
-
Nous pouvons créer une application Spring Boot.
-
Nous pouvons ajouter une configuration qui protège tous les points de terminaison sauf
/et/login**pour permettre aux utilisateurs de se connecter.@EnableWebSecurity
public class UiSecurityConfig extends WebSecurityConfigurerAdapter {
@Override
protected void configure(HttpSecurity http) throws Exception {
http.authorizeRequests()
.antMatchers("/", "/login**")
.permitAll()
.anyRequest()
.authenticated()
.and()
.oauth2Login();
}
} -
Nous pouvons ajouter une page naïve pour que l'utilisateur se connecte.
<!DOCTYPE html>
<html lang="en">
<head>
<meta http-equiv="Content-Type" content="text/html; charset=utf-8" />
<title>Spring OAuth Client Thymeleaf - 1</title>
<link rel="stylesheet"
    href="https://stackpath.bootstrapcdn.com/bootstrap/4.1.3/css/bootstrap.min.css" />
</head>
<body>
    <nav
        class="navbar navbar-expand-lg navbar-light bg-light shadow-sm p-3 mb-5">
        <a class="navbar-brand" th:href="@{/foos/}">Spring OAuth Client
            Thymeleaf - 1</a>
    </nav>
    <div class="container">
        <label>Welcome!</label> <br /> <a th:href="@{/foos/}"
            class="btn btn-primary">Login</a>
    </div>
</body>
</html>
Lorsque l'utilisateur clique sur le bouton
login, il sera redirigé verscasdoor. -
Ensuite, nous pouvons définir nos ressources protégées. Nous pouvons exposer un point de terminaison appelé
/fooset une page web pour l'affichage.Modèle de Données
public class FooModel {
    private Long id;
    private String name;

    public FooModel(Long id, String name) {
        super();
        this.id = id;
        this.name = name;
    }
    public Long getId() {
        return id;
    }
    public void setId(Long id) {
        this.id = id;
    }
    public String getName() {
        return name;
    }
    public void setName(String name) {
        this.name = name;
    }
}
Contrôleur
@Controller
public class FooClientController {
    @GetMapping("/foos")
    public String getFoos(Model model) {
        List<FooModel> foos = new ArrayList<>();
        foos.add(new FooModel(1L, "a"));
        foos.add(new FooModel(2L, "b"));
        foos.add(new FooModel(3L, "c"));
        model.addAttribute("foos", foos);
        return "foos";
    }
}
Page web
<!DOCTYPE html>
<html lang="en">
<head>
<meta http-equiv="Content-Type" content="text/html; charset=utf-8" />
<title>Spring OAuth Client Thymeleaf - 1</title>
<link rel="stylesheet"
href="https://stackpath.bootstrapcdn.com/bootstrap/4.1.3/css/bootstrap.min.css" />
</head>
<body>
<nav
class="navbar navbar-expand-lg navbar-light bg-light shadow-sm p-3 mb-5">
<a class="navbar-brand" th:href="@{/foos/}">Spring OAuth Client
Thymeleaf -1</a>
<ul class="navbar-nav ml-auto">
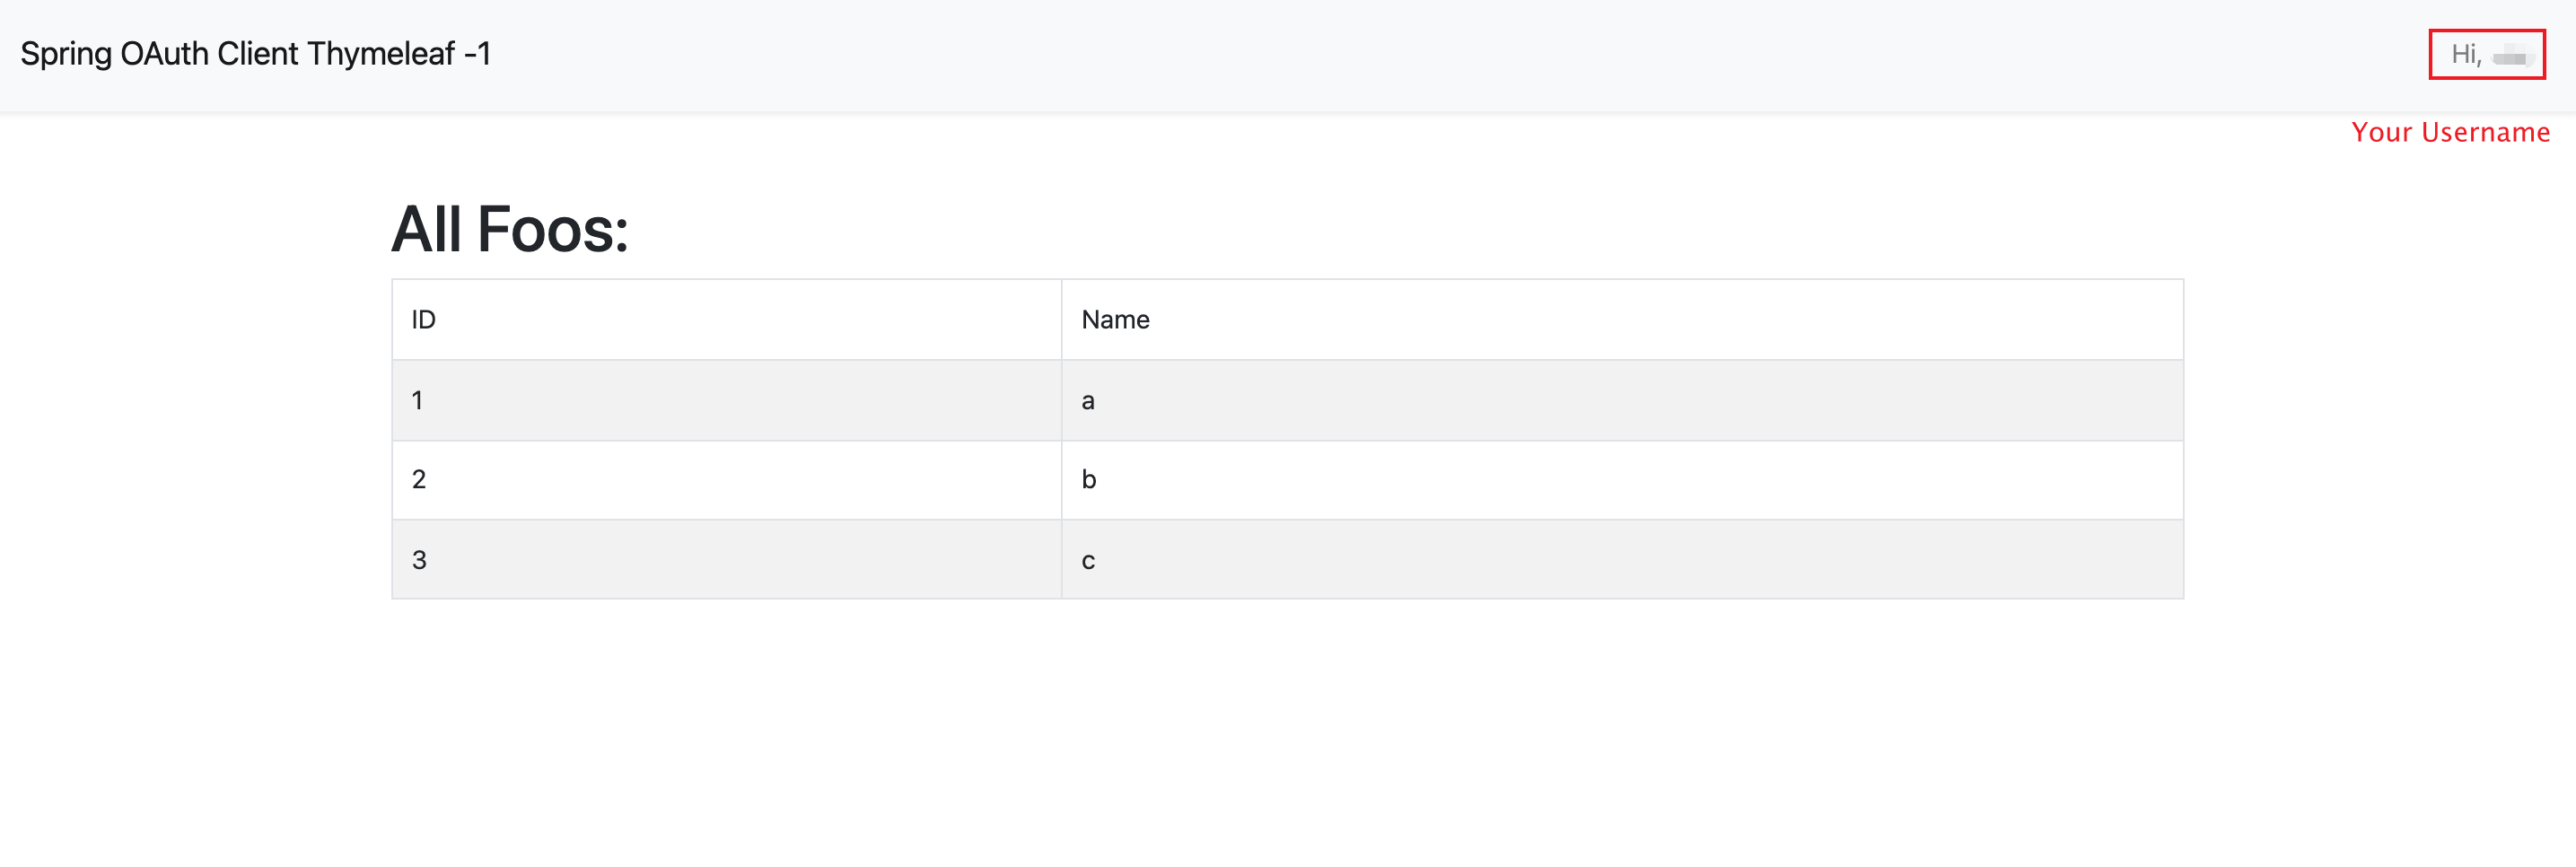
<li class="navbar-text">Hi, <span sec:authentication="name">preferred_username</span> </li>
</ul>
</nav>
<div class="container">
<h1>All Foos:</h1>
<table class="table table-bordered table-striped">
<thead>
<tr>
<td>ID</td>
<td>Name</td>
</tr>
</thead>
<tbody>
<tr th:if="${foos.empty}">
<td colspan="4">No foos</td>
</tr>
<tr th:each="foo : ${foos}">
<td>
<span th:text="${foo.id}">ID</span>
</td>
<td>
<span th:text="${foo.name}">Name</span>
</td>
</tr>
</tbody>
</table>
</div>
</body>
</html>
Tous les modèles de pages web doivent être placés sous resources/templates.
Étape 5 : Essayez la démo !
Open /foos in a browser; you are redirected to Casdoor’s login page. Sign in there or from the root page.
Si vous visitez votre page racine, vous verrez les Paramètres de l'Application Casdoor.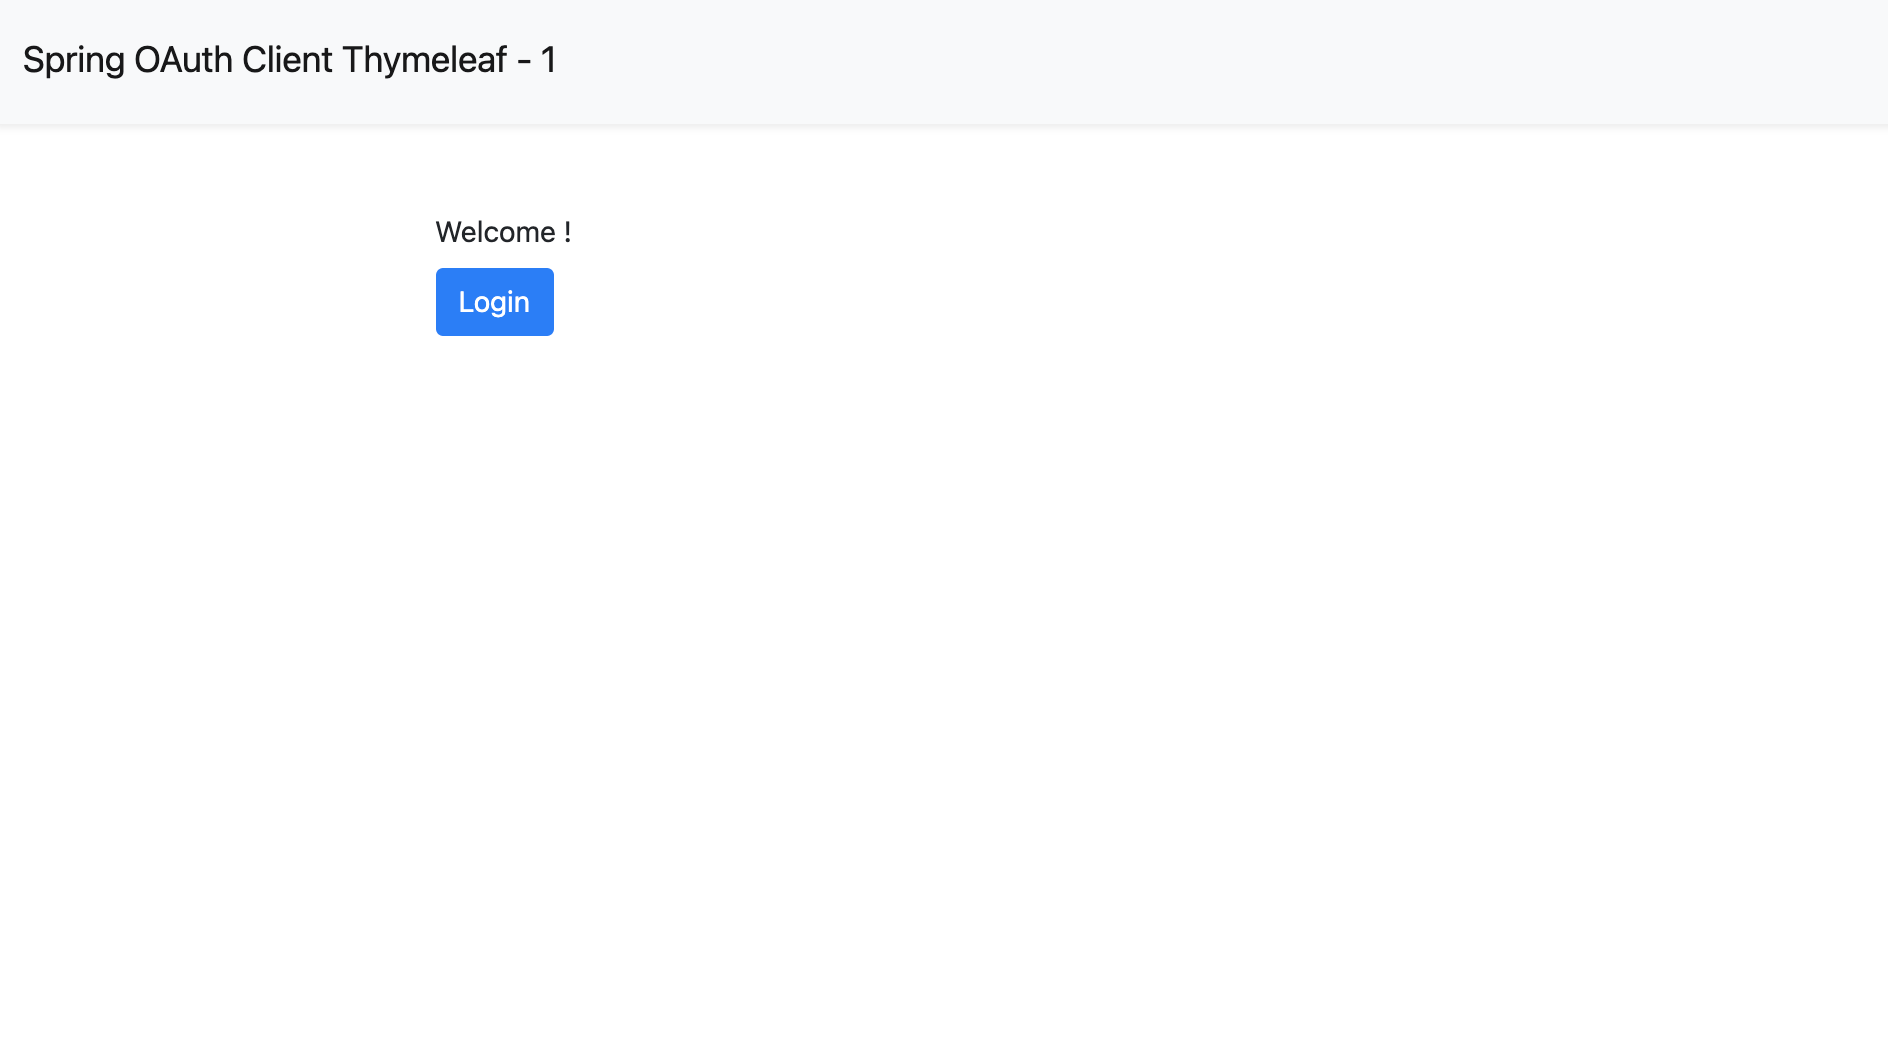
Cliquez sur le bouton login et la page vous redirigera vers la page de connexion de Casdoor. 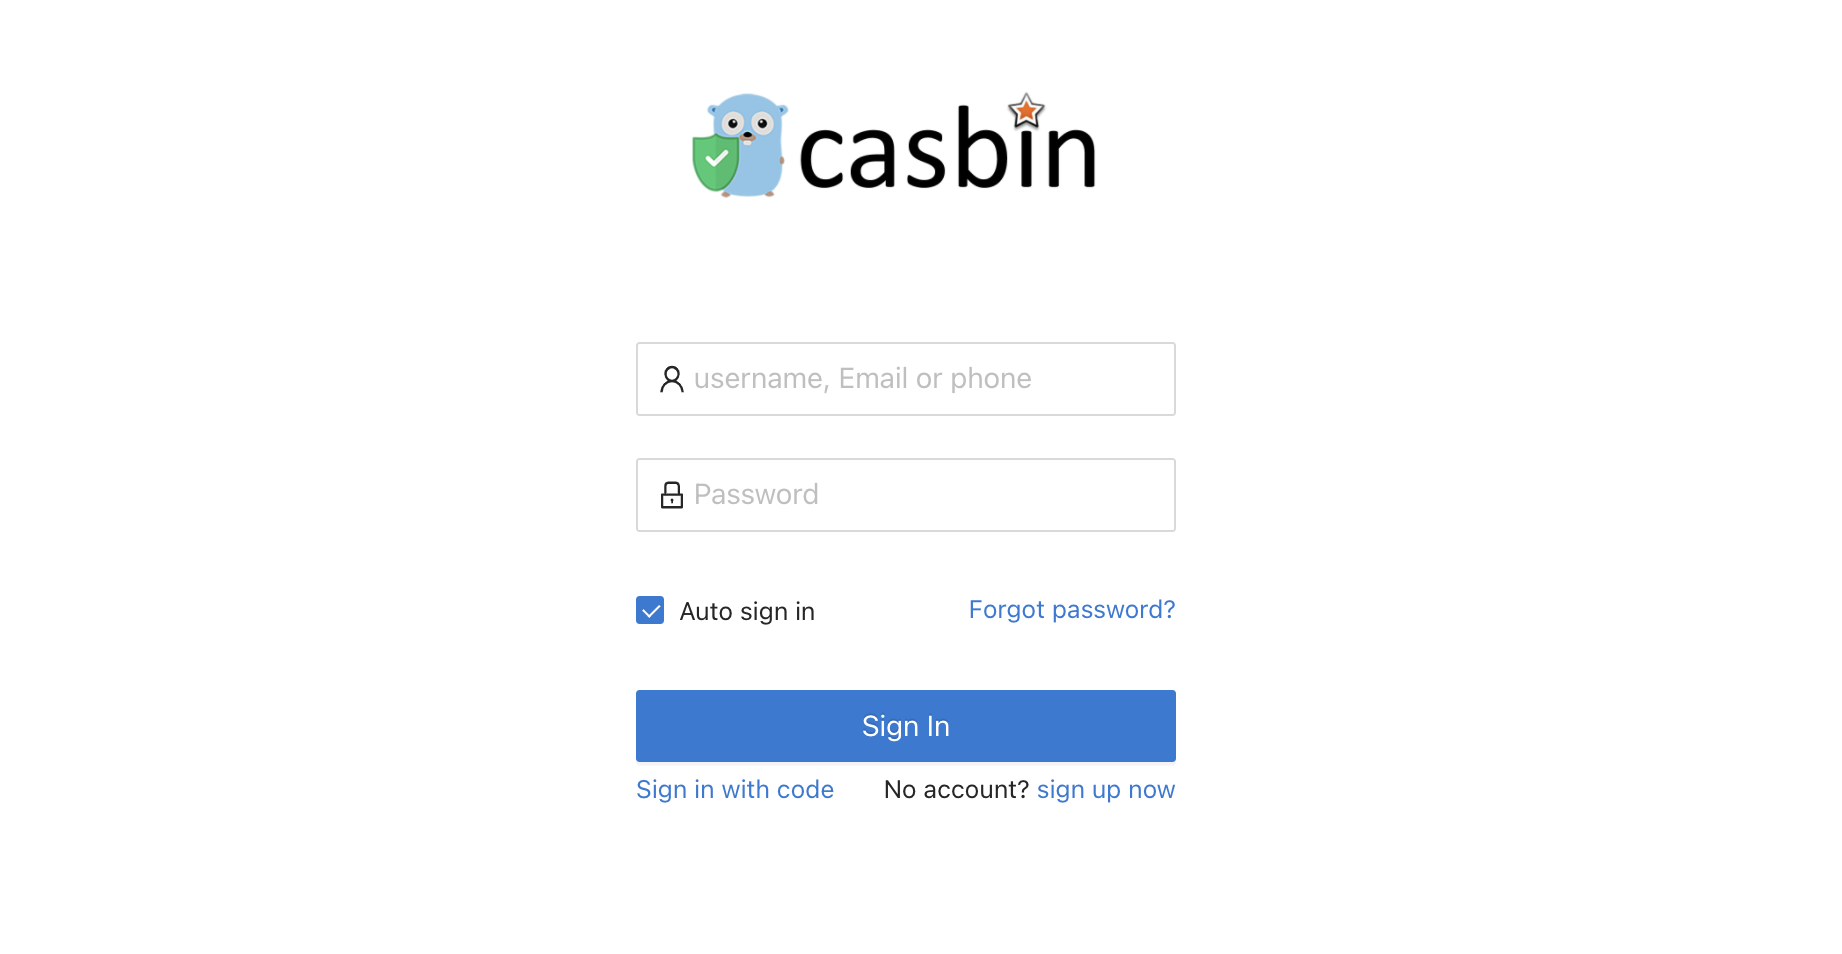
Après vous être connecté, la page vous redirigera vers /foos.