Casdoor SDKs
Overview
Casdoor SDKs extend standard OIDC with user management, resource uploads, and other features. They take a bit more setup than a generic OIDC client but give you the full Casdoor API.
Frontend SDKs — For web (JavaScript, React, Vue, etc.) and mobile (Android, iOS, React Native, Flutter).
Backend SDKs — For Go, Java, Node.js, Python, PHP, .NET, Rust, C++, and more.
For a frontend/backend split, use a frontend SDK (e.g. casdoor-js-sdk, casdoor-react-sdk, casdoor-vue-sdk) in the UI and a backend SDK for token validation and API calls. For a traditional server-rendered app (JSP, PHP), a backend SDK may be enough. Example: casdoor-python-vue-sdk-example.
| モバイルSDK | 説明 | SDKコード | 例示コード |
|---|---|---|---|
| Android SDK | Androidアプリ用 | casdoor-android-sdk | casdoor-android-example |
| iOS SDK | iOSアプリ用 | casdoor-ios-sdk | casdoor-ios-example |
| React Native SDK | React Nativeアプリ用 | casdoor-react-native-sdk | casdoor-react-native-example |
| Flutter SDK | Flutterアプリ用 | casdoor-flutter-sdk | casdoor-flutter-example |
| Firebase SDK | Google Firebaseアプリ用 | casdoor-firebase-example | |
| Unity Games SDK | Unity 2D/3D PC/モバイルゲーム用 | casdoor-dotnet-sdk | casdoor-unity-example |
| uni-app SDK | uni-appアプリ用 | casdoor-uniapp-sdk | casdoor-uniapp-example |
| デスクトップSDK | 説明 | SDKコード | 例示コード |
|---|---|---|---|
| Electron SDK | Electronアプリ用 | casdoor-js-sdk | casdoor-electron-example |
| .NETデスクトップSDK | .NETデスクトップアプリ用 | casdoor-dotnet-sdk | WPF: casdoor-dotnet-desktop-example WinForms: casdoor-dotnet-winform-example Avalonia UI: casdoor-dotnet-avalonia-example |
| C/C++ SDK | C/C++デスクトップアプリ用 | casdoor-cpp-sdk | casdoor-cpp-qt-example |
| WebフロントエンドSDK | 説明 | SDKコード | 例示コード |
|---|---|---|---|
| Javascript SDK | 従来の非SPAウェブサイト用 | casdoor-js-sdk | Nodejsバックエンド:casdoor-raw-js-example Goバックエンド:casdoor-go-react-sdk-example |
| フロントエンドのみのSDK | フロ��ントエンドのみのSPAウェブサイト用 | casdoor-js-sdk | casdoor-react-only-example |
| React SDK | Reactウェブサイト用 | casdoor-react-sdk | Nodejsバックエンド:casdoor-nodejs-react-example Javaバックエンド:casdoor-spring-security-react-example |
| Next.js SDK | Next.jsウェブサイト用 | nextjs-auth | |
| Nuxt SDK | Nuxtウェブサイト用 | nuxt-auth | |
| Vue SDK | For Vue websites | casdoor-vue-sdk | casdoor-python-vue-sdk-example |
| Angular SDK | For Angular websites | casdoor-angular-sdk | casdoor-nodejs-angular-example |
| Flutter SDK | For Flutter Web websites | casdoor-flutter-sdk | casdoor-flutter-example |
| ASP.NET SDK | For ASP.NET Blazor WASM websites | Blazor.BFF.OpenIDConnect.Template | casdoor-dotnet-blazorwasm-oidc-example |
| Firebase SDK | For Google Firebase apps | casdoor-firebase-example |
Pair the frontend with a backend SDK in your server’s language:
| WebバックエンドSDK | 説明 | Sdkコード | 例示コード |
|---|---|---|---|
| Go SDK | Goバックエンド用 | casdoor-go-sdk | casdoor-go-react-sdk-example |
| Java SDK | Javaバックエンド用 | casdoor-java-sdk | casdoor-spring-boot-starter, casdoor-spring-boot-example, casdoor-spring-security-react-example |
| Node.js SDK | Node.jsバックエンド用 | casdoor-nodejs-sdk | casdoor-nodejs-react-example |
| Python SDK | Pythonバックエンド用 | casdoor-python-sdk | Flask: casdoor-python-vue-sdk-example Django: casdoor-django-js-sdk-example FastAPI: casdoor-fastapi-js-sdk-example |
| PHP SDK | PHPバックエンド用 | casdoor-php-sdk | wordpress-casdoor-plugin |
| .NET SDK | ASP.NETバックエンド用 | casdoor-dotnet-sdk | casdoor-dotnet-sdk-example |
| Rust SDK | Rustバックエンド用 | casdoor-rust-sdk | casdoor-rust-example |
| C/C++ SDK | C/C++バックエンド用 | casdoor-cpp-sdk | casdoor-cpp-qt-example |
| Dart SDK | Dartバックエンド用 | casdoor-dart-sdk | |
| Ruby SDK | Rubyバックエンド用 | casdoor-ruby-sdk |
All official SDKs: https://github.com/orgs/casdoor/repositories?q=sdk&type=all&language=&sort=.
Using the SDK
1. バックエンドSDKの設定
On startup, call the SDK’s init function with your Casdoor endpoint, client ID, client secret, and (for JWT validation) the public key. Example with casdoor-go-sdk: https://github.com/casbin/casnode/blob/6d4c55f5c9a3c4bd8c85f2493abad3553b9c7ac0/controllers/account.go#L51-L64
var CasdoorEndpoint = "https://door.casdoor.com"
var ClientId = "541738959670d221d59d"
var ClientSecret = "66863369a64a5863827cf949bab70ed560ba24bf"
var CasdoorOrganization = "casbin"
var CasdoorApplication = "app-casnode"

//go:embed token_jwt_key.pem
var JwtPublicKey string

func init() {
    auth.InitConfig(CasdoorEndpoint, ClientId, ClientSecret, JwtPublicKey, CasdoorOrganization, CasdoorApplication)
}
InitConfig()の全パラメーターは以下の通り説明されます:
| パラメータ | 必須 | 説明 |
|---|---|---|
| エンドポイント | はい | CasdoorサーバーURL、例:https://door.casdoor.com または http://localhost:8000 |
| clientId | はい | CasdoorアプリケーションのクライアントID |
| clientSecret | はい | Casdoorアプリケーションのクライアントシークレット |
| jwtPublicKey | はい | Casdoorアプリケーションの証明書の公開鍵 |
| organizationName | Yes | Casdoor組織の名前 |
| applicationName | いいえ | Casdoorアプリケーションの名前 |
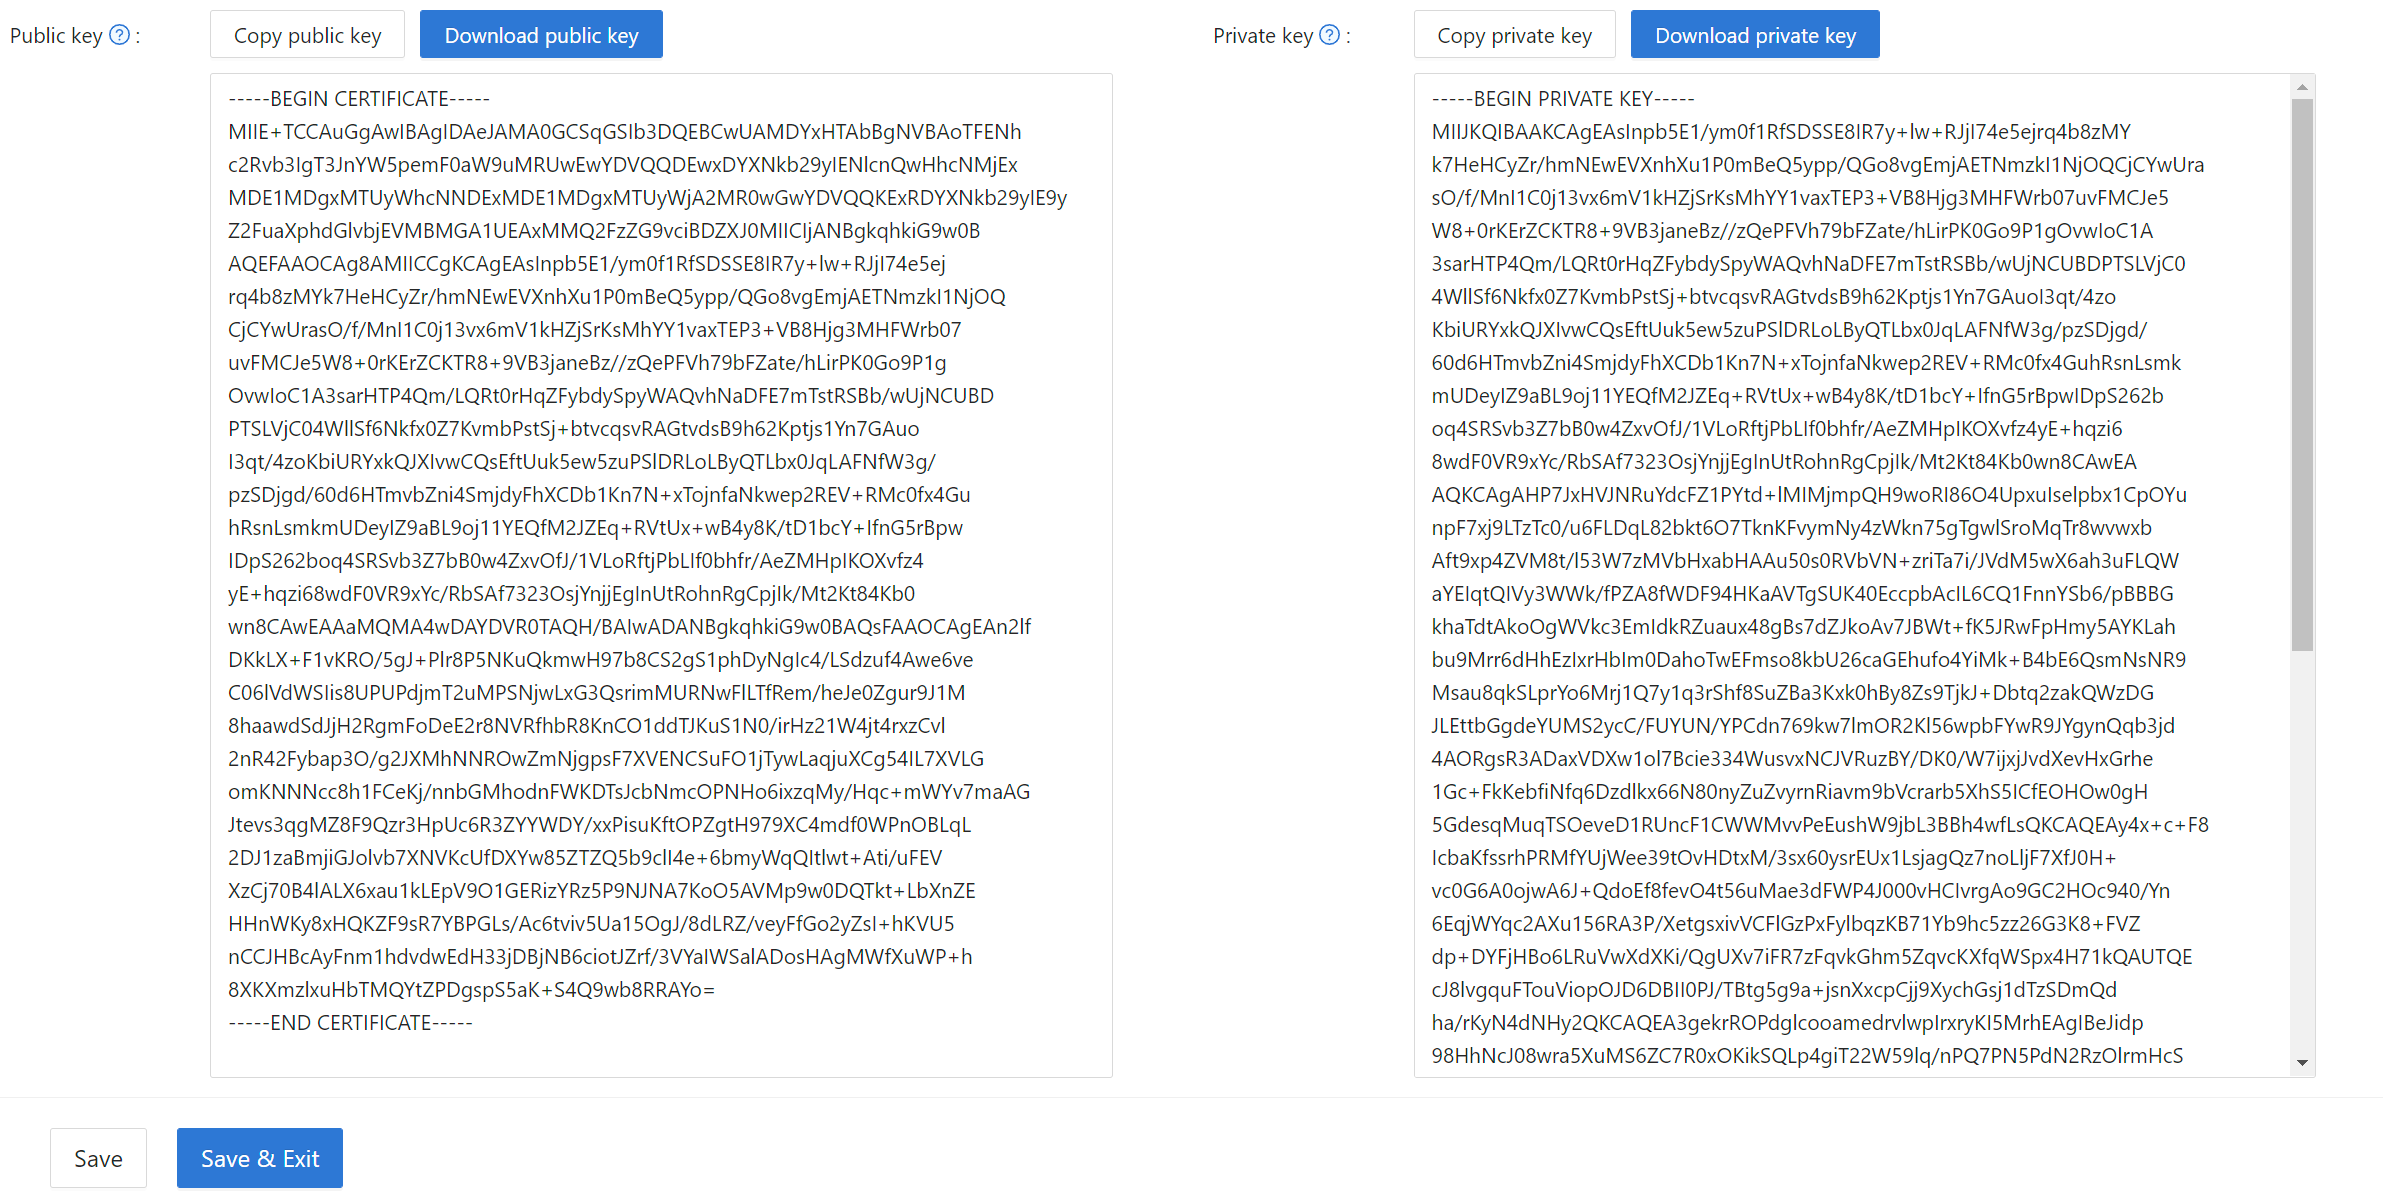
jwtPublicKeyは以下のようなCertsページで管理できます。

Copy or download the public key from the certificate edit page for use in the SDK.
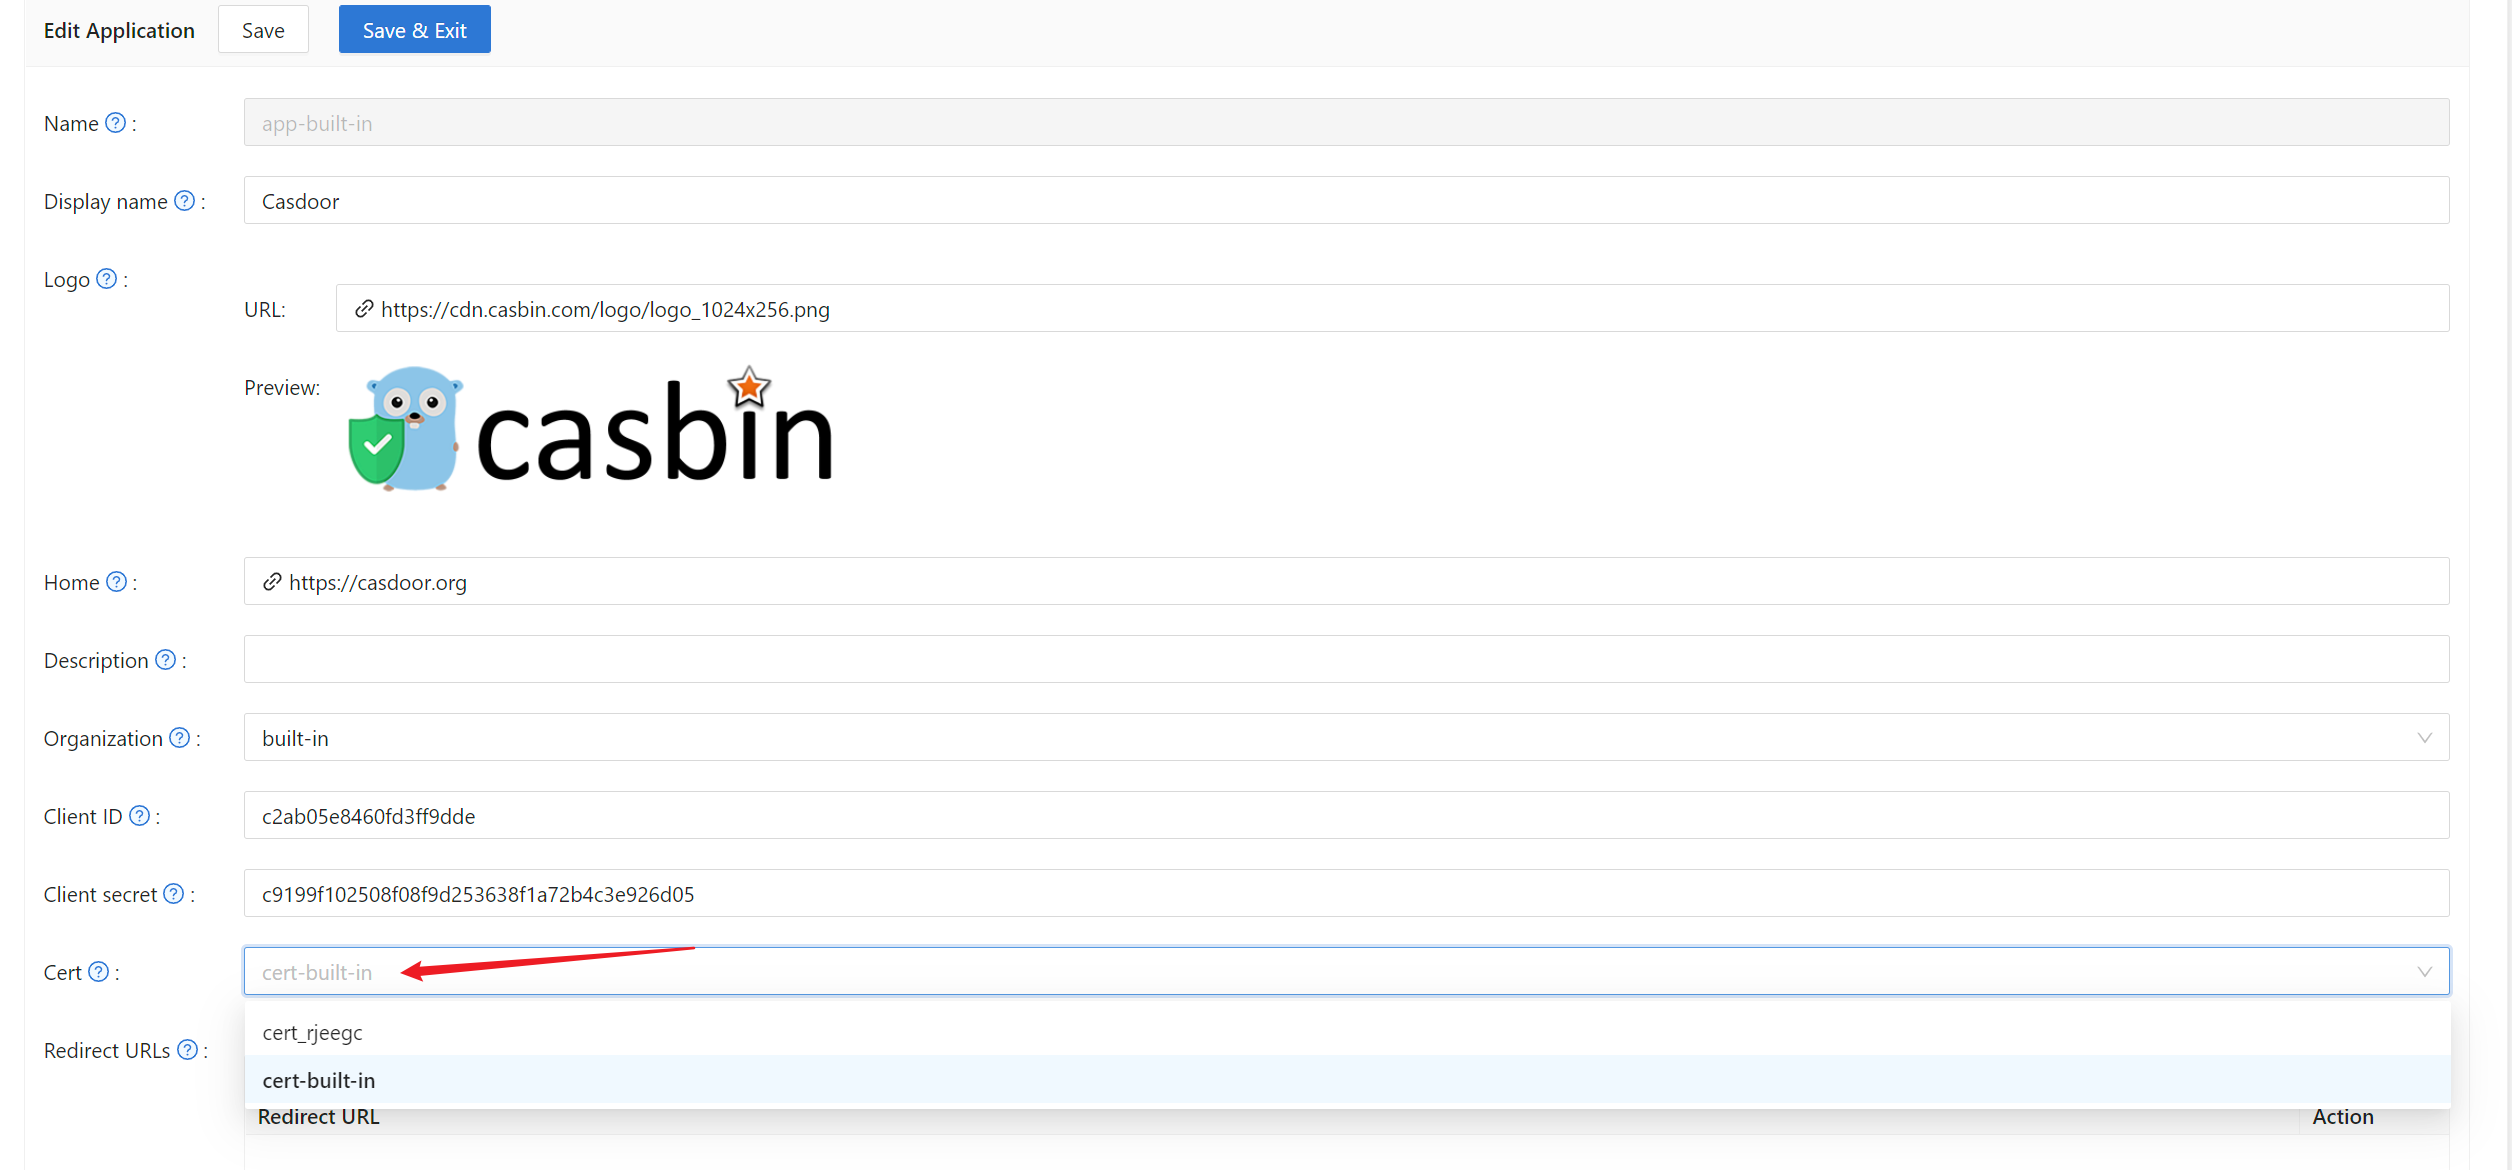
Then select the cert on the application edit page.
2. フロントエンドの設定
まず、NPMまたはYarnを介してcasdoor-js-sdkをインストールします:
npm install casdoor-js-sdk
または:
yarn add casdoor-js-sdk
次に、以下のユーティリティ関数を定義します(Setting.jsのようなグローバルJSファイルにするのが良いでしょう):
import Sdk from "casdoor-js-sdk";

export function initCasdoorSdk(config) {
  CasdoorSdk = new Sdk(config);
}

export function getSignupUrl() {
  return CasdoorSdk.getSignupUrl();
}

export function getSigninUrl() {
  return CasdoorSdk.getSigninUrl();
}

export function getUserProfileUrl(userName, account) {
  return CasdoorSdk.getUserProfileUrl(userName, account);
}

export function getMyProfileUrl(account) {
  return CasdoorSdk.getMyProfileUrl(account);
}

export function getMyResourcesUrl(account) {
  return CasdoorSdk.getMyProfileUrl(account).replace("/account?", "/resources?");
}

export function signin() {
  return CasdoorSdk.signin(ServerUrl);
}

export function showMessage(type, text) {
  if (type === "") {
    return;
  } else if (type === "success") {
    message.success(text);
  } else if (type === "error") {
    message.error(text);
  }
}

export function goToLink(link) {
  window.location.href = link;
}
In your frontend entry file (e.g. index.js or app.js in React), initialize the casdoor-js-sdk by calling InitConfig() with the required parameters. 最初の4つのパラメーターはCasdoorバックエンドSDKと同じ値を使用するべきです。 最後のパラメーターredirectPathは、Casdoorのログインページから返されるリダイレクトURLの相対パスです。
const config = {
  serverUrl: "https://door.casdoor.com",
  clientId: "014ae4bd048734ca2dea",
  organizationName: "casbin",
  appName: "app-casnode",
  redirectPath: "/callback",
};

xxx.initCasdoorSdk(config);
(Optional) This example uses React; the /callback route is handled by the component below, which forwards the call to the backend. Skip this if your callback goes directly to the backend (e.g. JSP or PHP).
import React from "react";
import {Button, Result, Spin} from "antd";
import {withRouter} from "react-router-dom";
import * as Setting from "./Setting";

class AuthCallback extends React.Component {
  constructor(props) {
    super(props);
    this.state = {
      classes: props,
      msg: null,
    };
  }

  componentWillMount() {
    this.login();
  }

  login() {
    Setting.signin().then((res) => {
      if (res.status === "ok") {
        Setting.showMessage("success", `Logged in successfully`);
        Setting.goToLink("/");
      } else {
        this.setState({
          msg: res.msg,
        });
      }
    });
  }

  render() {
    return (
      <div style={{textAlign: "center"}}>
        {this.state.msg === null ? (
          <Spin
            size="large"
            tip="Signing in..."
            style={{paddingTop: "10%"}}
          />
        ) : (
          <div style={{display: "inline"}}>
            <Result
              status="error"
              title="Login Error"
              subTitle={this.state.msg}
              extra={[
                <Button type="primary" key="details">
                  Details
                </Button>,
                <Button key="help">Help</Button>,
              ]}
            />
          </div>
        )}
      </div>
    );
  }
}

export default withRouter(AuthCallback);
3. ログインURLを取得する
Show "Sign up" and "Sign in" buttons or links to users; URLs can be obtained from the frontend or backend. See Login URLs.
4. アクセストークンを取得して検証する
手順は以下の通りです:
- ユーザーはログインURLをクリックし、Casdoorのログインページにリダイレクトされます。例:
https://door.casdoor.com/login/oauth/authorize?client_id=014ae4bd048734ca2dea&response_type=code&redirect_uri=https%3A%2F%2Fforum.casbin.com%2Fcallback&scope=read&state=app-casnode - ユーザーはユーザー名とパスワードを入力し、
Sign Inをクリックします(またはSign in with GitHubのようなサードパーティのログインボタンをクリックします)。 - ユーザーはCasdoorによって発行された認証コードを持ってアプリケーションにリダイレクトされます(例:
https://forum.casbin.com?code=xxx&state=yyy)、アプリケーションのバックエンドは認証コードをアクセストークンと交換し、アクセストークンが有効でCasdoorによって発行されたものであることを検証する必要があります。 CasdoorバックエンドSDKによって提供される関数GetOAuthToken()とParseJwtToken()。
以下のコードは、アクセストークンを取得して検証する方法を示しています。 For a real example of Casnode (a forum website written in Go), see: https://github.com/casbin/casnode/blob/6d4c55f5c9a3c4bd8c85f2493abad3553b9c7ac0/controllers/account.go#L51-L64
// get code and state from the GET parameters of the redirected URL
code := c.Input().Get("code")
state := c.Input().Get("state")

// exchange the access token with code and state
token, err := auth.GetOAuthToken(code, state)
if err != nil {
    panic(err)
}

// verify the access token
claims, err := auth.ParseJwtToken(token.AccessToken)
if err != nil {
    panic(err)
}
もしParseJwtToken()がエラーなしで完了したら、ユーザーはアプリケーションに正常にログインしたということです。 返されたclaimsは後でユーザーを識別するために使用できます。
4. アクセストークンでユーザーを識別する
この部分は実際にはあなたのアプリケーション自身のビジネスロジックであり、OIDC、OAuth、またはCasdoorの一部ではありません。 私たちは次のステップについて何をすべきかわからない多くの人々に良い実践を提供しています。
Casdoorでは、アクセストークンは通常IDトークンと同一です。 それらは同じものです。 したがって、アクセストークンにはログインしたユーザーの全情報が含まれています。
ParseJwtToken()によって返される変数claims�は以下のように定義されます:
type Claims struct {
    User
    AccessToken string `json:"accessToken"`
    jwt.RegisteredClaims
}
User:ログインしたユーザーの全情報を含むUserオブジェクト。定義はこちら:/docs/basic/core-concepts#userAccessToken:アクセストークン文字列。jwt.RegisteredClaims:JWTに必要なその他の値。
この時点で、アプリケーションは通常、ユーザーセッションを記憶するためにsessionとJWTの二つの方法を持っています。
Session
セッションを設定する方法は、言語やウェブフレームワークによって大きく異なります。 例えば、CasnodeはBeegoウェブフレームワークを使用し、c.SetSessionUser()を呼び出してセッションを設定します。
token, err := auth.GetOAuthToken(code, state)
if err != nil {
    panic(err)
}

claims, err := auth.ParseJwtToken(token.AccessToken)
if err != nil {
    panic(err)
}

claims.AccessToken = token.AccessToken
c.SetSessionUser(claims) // set session
JWT
Casdoorによって返されるaccessTokenは実際にはJWTです。 したがって、もしアプリケーションがJWTを使用してユーザーセッションを維持している場合、アクセストークンをそのまま使用してください:
- アクセストークンをフロントエンドに送り、ブラウザのlocalStorageなどに保存します。
- ブラウザにバックエンドへのすべてのリクエストにアクセストークンを送信させます。
- アクセストークンを検証し、ログインしたユーザー情報をバックエンドで取得するために
ParseJwtToken()または独自の関数を呼び出します。
5. (オプション) ユーザーテーブルとのやり取り
この部分はCasdoor Public APIによって提供され、OIDCやOAuthの一部ではありません。
CasdoorバックエンドSDKは、以下に限らず多くのヘルパー関数を提供します:
GetUser(name string):ユーザー名でユーザーを取得する。GetUsers():全ユーザーを取得する。AddUser():ユーザーを追加する。UpdateUser():ユーザーを更新する。DeleteUser():ユーザーを削除する。CheckUserPassword(auth.User):ユーザーのパスワードをチェックする。
これらの関数はCasdoor Public APIに対してRESTfulコールを行うことで実装されています。 If a function is not in the Casdoor Backend SDK, call the Public API directly.
6. (Optional) Manage Applications via SDK
Casdoor SDKs also provide functions to manage applications programmatically:
AddApplication(): create a new application.GetApplication(name string): get an application by name.GetApplications(): get all applications.UpdateApplication(): update an application.DeleteApplication(): delete an application.
When creating applications via SDK using AddApplication(), Casdoor automatically initializes essential fields with sensible defaults. This includes signup items (ID, Username, Display name, Password, Confirm password, Email, Phone, Agreement), signin items, and signin methods. This ensures applications created programmatically work correctly in the UI without requiring manual configuration of these basic settings.